Mustang Restoration Chapter 6: Suspension
Last Updated November 25, 2025 | Meghan DrummondNo matter how well-cared-for your Mustang is, it's likely there will be some issues with its stock suspension. Shimmies, shakes, clunks, and thuds are known phenomena in older vehicles. These issues can usually be traced to the suspension system.
Even if your Mustang is driving well, you may want to clean and inspect the suspension system. Issues that are small enough to escape detection can still cause damage. Avoiding this damage is really the best approach.
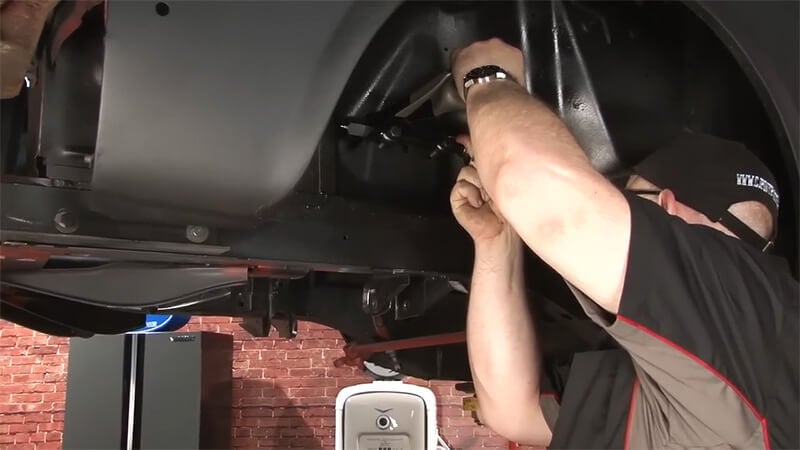
To begin your suspension rebuild, you'll first need to take it apart. Remember to take lots of pictures to make reassembly as easy as possible. Also, bag and label bolts and screws as you go.
The first disassembly step will be to safely lift your Mustang. For the suspension and brake assemblies, you'll want the components not to be supporting your Mustang's weight.
While cleaning and maintaining your suspension, it makes sense to take care of the brakes as well, since your Mustang will already be on a lift with the wheels removed. Taking care of the suspension and brakes together saves you time.
Covered In This Chapter:
- Front Suspension - Removing, cleaning, and inspecting your front suspension
- Rear Suspension - Removing, cleaning, and inspecting your rear suspension
- Stock Suspension Upgrades - Ways to improve your stock suspension setup
- Modern Suspension Upgrades - Options for a total suspension swap out
Disassembling and Reassembling Your Front Suspension
A first-generation Mustang has a double control arm, or double-wishbone, front suspension. That means there's both an upper and lower control arm. The two control arms then bolt to your Mustang's body.

The spring and shock absorber attach to the upper control arm, while the lower control arm attaches to a stabilizer bar and a strut rod.
A double-wishbone suspension, when properly tuned, allows for stability and consistent steering. If you're not feeling that while you're driving, your suspension could probably use a tune-up.
Removing the Front Suspension

Once lifted safely and on jack stands, remove the wheels and tires.

In your underhood area, you'll see the top of the shock mount. Remove the shock tower nuts before continuing through the suspension components.

Use the jack to raise the lower control arm. You can then remove your lower shock nuts in the same manner. From the under hood area, lift the shock out.

Use a coil spring compressor kit to compress your Mustang's front springs. If you don't have one, many local auto parts stores will rent them. This will have you remove the spring from underneath your Mustang. Be careful with your compressor's hooks if you plan to reuse your coil spring.

You might be surprised by your coil spring's resilience. To the untrained eye, the coil spring above may look beyond salvage. But with a quick wire brush cleaning and a new coat of paint, the coil spring looked nearly new. There were different spring rates from the factory based on your engine choice. If the engine has been swapped to a different one, this is a good time to change the springs to the correct rate.

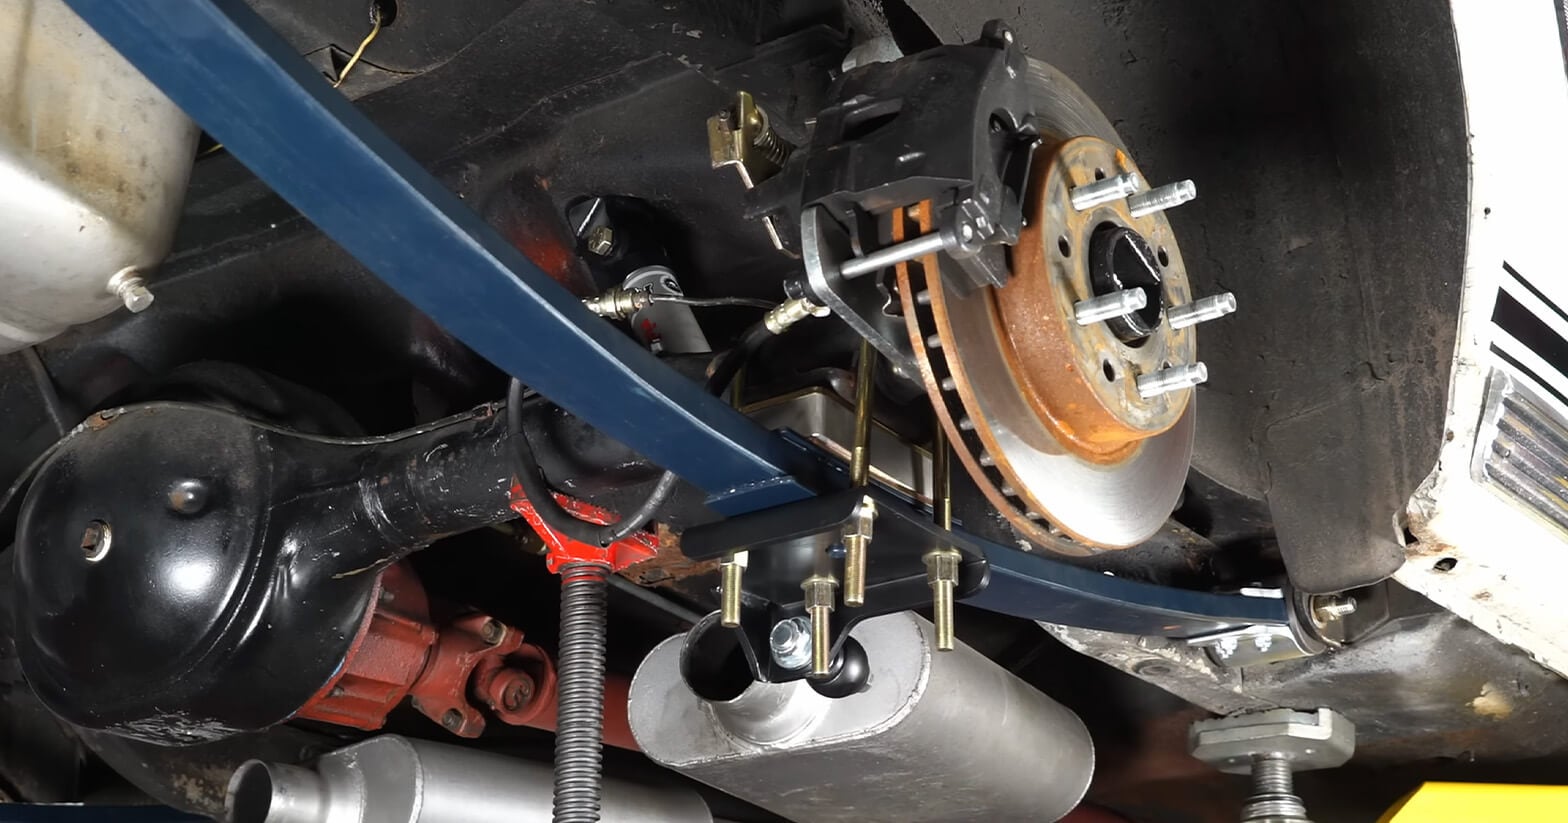
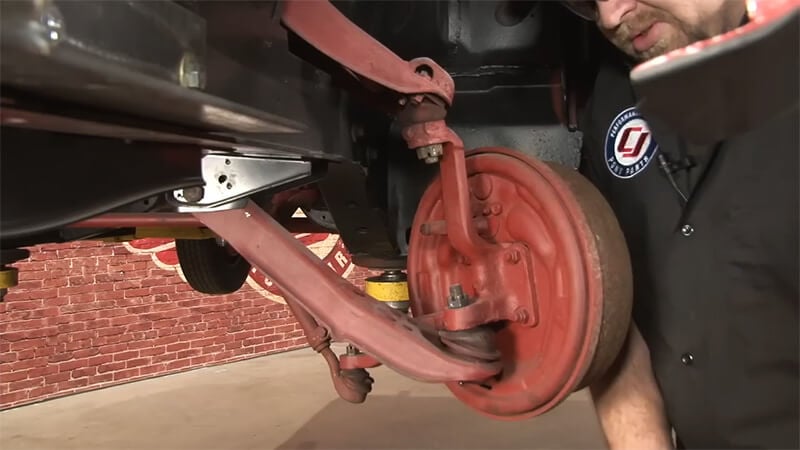
The lower and upper control arms will both connect via the spindle to the back of the brake assembly.
Disconnect the spindle from the tie rod. Disconnect the brake line from the drum or disc brake caliper.

Then disconnect the spindle from the upper and lower control arm. This may require the use of a pry bar, a hammer, a pickle fork, or really whatever works without damaging the parts. Then, you can lift the entire brake assembly away.
To remove the lower control arm, simply remove the attached bolt, which should be very visible.
For the upper control arm, you'll also need to remove two bolts hidden in the engine compartment.
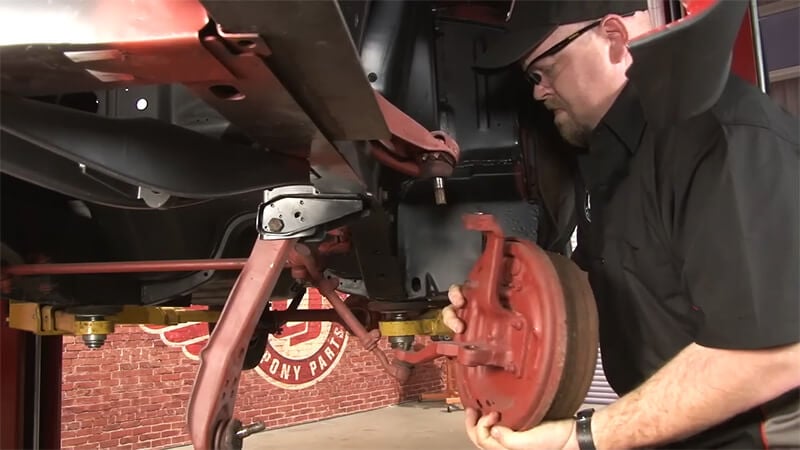
Once you've removed your upper and lower control arms, you can more easily appraise them.
The Upper Control Arm
You'll need to disassemble your upper control arm assembly. This is so you can appraise the condition of the bushings, ball joints, and the upper control arm itself.
The location of most suspension components makes them rust magnets. Some rust and a lot of grease are to be expected. If there's a lot of rust, you may need to consider purchasing a new upper control arm. They aren't very expensive, and considering they have the front weight of your Mustang perched on them, you want them to be stable. Consider replacing the ball joint at a minimum.
Unfortunately for show Mustangs, upper control arms aren't considered “consumable.” If you're planning a show Mustang, you need to clean your upper control arms. If they can't be salvaged, you'll want to find exact replicas.
To remove grease, any degreaser should work. Some restorers have been shocked at how good their control arms looked after a degreasing pressure wash.
Small patches of rust can be removed with a wire-bristle brush. This will help show you if you're dealing with surface rust or if there are more significant issues.
Once you're done cleaning away the rust and grease, most people opt to run their upper control arms through a media blaster.
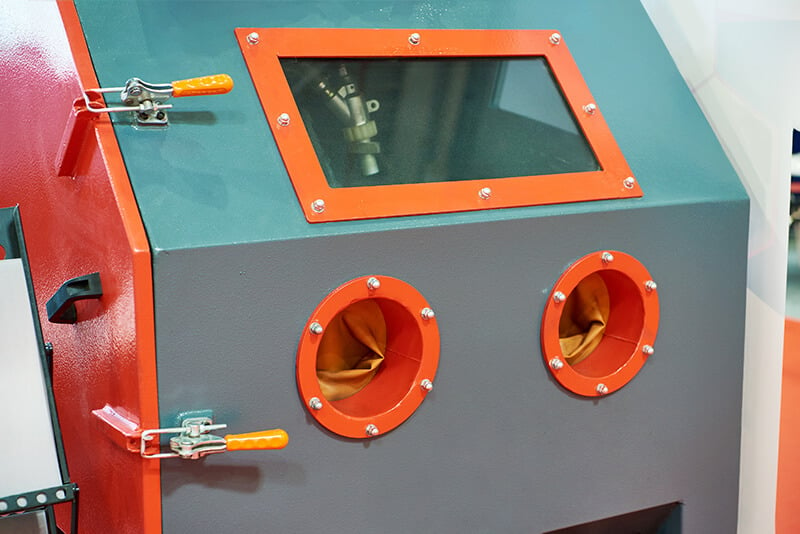
Sandblasting
Sandblasting is also referred to as “media blasting.” Media blasting is the more correct term, since most of the time you won't be using sand. Once sandblasted, your upper control arm will be free of paint, dirt, and rust. Leaving nothing behind but a bar metal surface ready to be repainted and reassembled.
Lower Control Arms
For the lower control arm, you'll mostly follow the same steps as for the upper control arm. If they seem to be in relatively good condition, then cleaning and repainting may be all that's necessary. Consider replacing the ball joint as it takes the most abuse and is inexpensive to replace.
There are a lot of lower control arm options for those looking for a little bit of an upgrade. Tubular lower control arms are more durable and can look nearly identical to their stock siblings.
Reinstalling the Control Arms
Once your upper control arm is cleaned, painted, reassembled, and ready for reinstallation, you should do two things. The first is to make sure the shaft is centered. Once you're sure it's centered, rock the shafts back and forth to make sure they're properly seated. This can help avoid any surprises during the installation process.
Make sure the bushings are facing inward and re-bolt the upper control arm in the factory location. The lower control arm will also bolt back into its factory location.
Disassembling and Reassembling the Rear Suspension
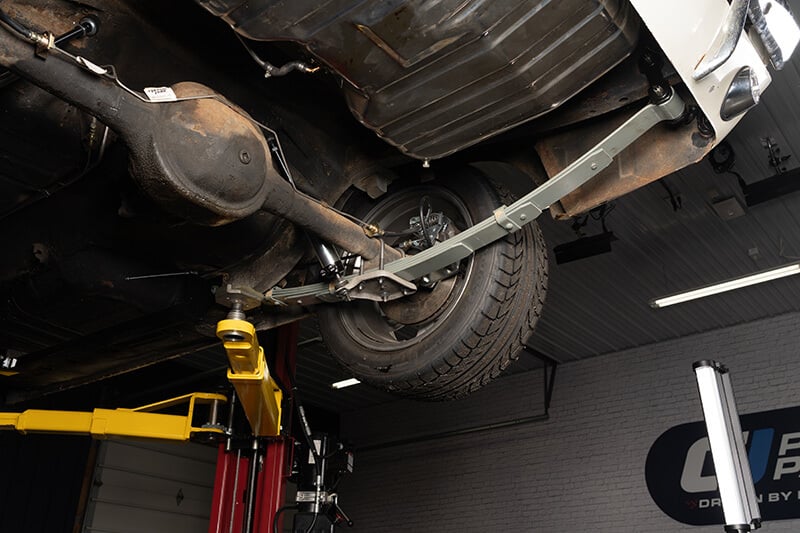
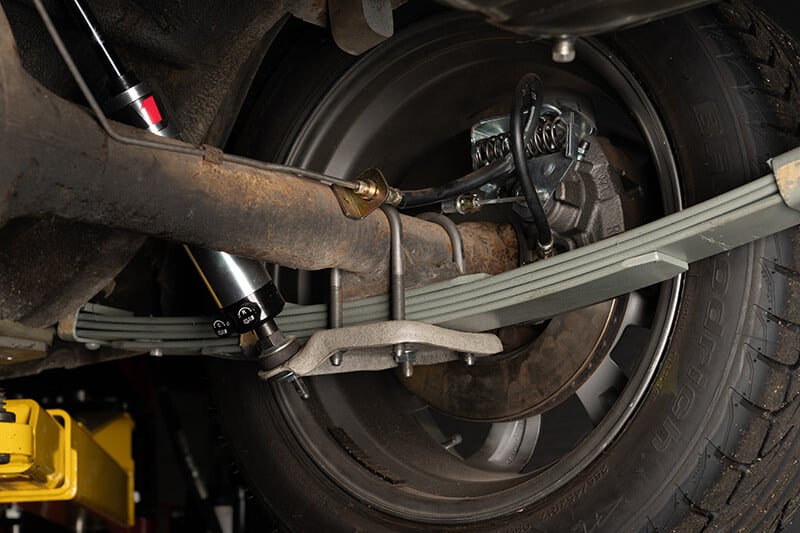
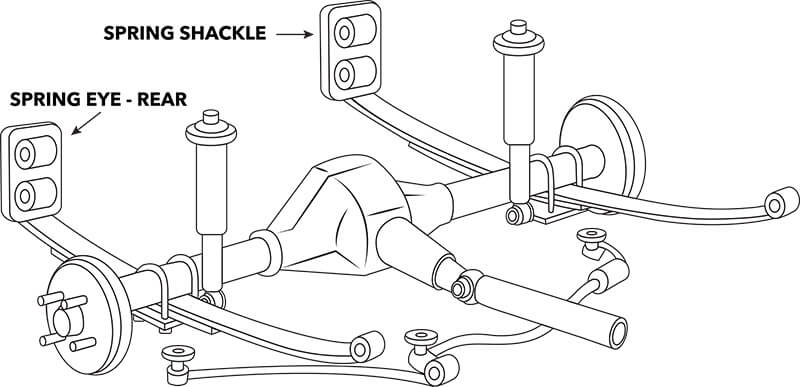
Your Mustang's rear suspension is a leaf spring system. These are even simpler to work on than double-wishbone set-ups.
Leaf springs are curved towards the road. When your rear axle encounters a bump, it flattens out slightly to absorb it. This simple system is also effective.

You'll need to replace your leaf springs if there are any visible cracks. You'll also want to take note if your Mustang is sitting lower in the rear than the front. Typically, that's a sign of a worn leaf spring, which is very common.
To keep the leaf springs secured, your Mustang uses U-bolts and leaf spring shackles. U-bolts and leaf spring shackles need to be replaced from time to time as well.
Regular cleanings can extend the life of your leaf springs.
Use a jack to lift up the rear of your Mustang until the tires are off the ground. Place jack stands in front of the leaf spring mount.
Remove your rear wheels.
Lower the Mustang so it's resting on the jack stands.
Use the floor jack on the rear axle to lift it up, taking the weight off the springs.
Use a 9/16” deep socket to remove the lower shock bolt from the shock plate. Then remove the shocks.
Use an 11/16” wrench to remove the four nuts from the u-bolts. Then remove the u-bolts and the shock plate.
Use two ¼” wrenches to loosen and remove the nut that holds the front of the leaf spring in place.

If the bolt will not come out, you may need to use a hammer to punch the bolt back out of the hole. In many cases the bolt will rust to the sleeve and must be cut out with a sawzall. Once the bolt is removed, lower this end of the leaf spring to the ground.
Use two 9/16” wrenches to loosen and remove the bolt holding the rear leaf spring shackles to the frame.
Leaf Springs
Your leaf springs are a stack of metal beams. As long as they're not rusted, cracked, worn, or otherwise severely damaged, they're good to go. Unless, of course, you'd like to improve your ride.
Upgraded leaf springs can improve ride quality while preserving the classic look and feel of your Mustang. While your stock leaf springs have four leaves (or beams), a five-leaf set-up will improve your ride quality. Leaf springs can also be used to lower your Mustang if you're interested in a lower ride height.
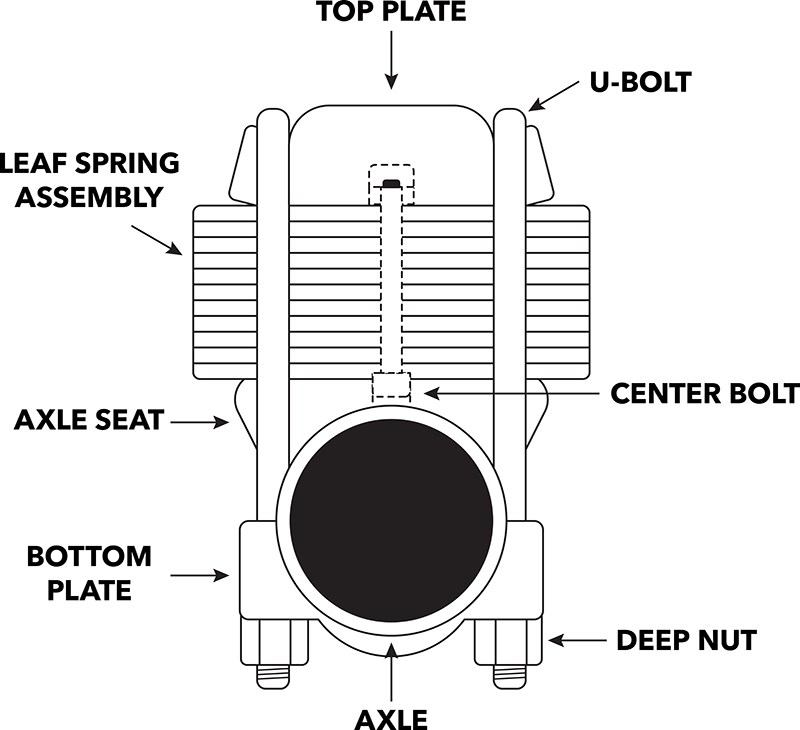
U-Bolts
A U-bolt on either side of your leaf spring prevents too much side-to-side movement and secures the leaf spring to the rear axle assembly. If you're thinking these look a lot like a bike lock, you're absolutely correct. Just like a bike lock, these are easy to put on, and are secure once they've been screwed tight.
Instead of a flat bar though, the U-bolts have a lower shock plate.
After looping the U over the axle, you'll then secure the lower shock plate underneath.
As you can see, there are four nuts for each end of the U-bolt and then a center bolt. This should effectively prevent any side-to-side movement.
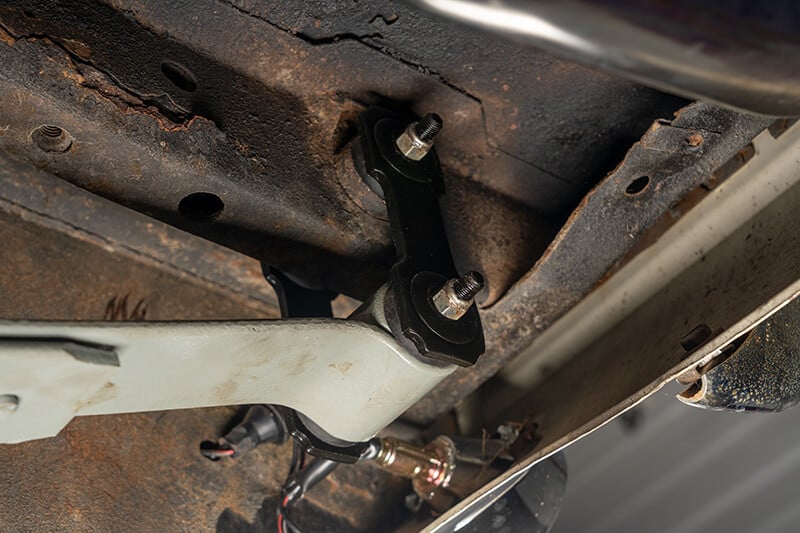
Leaf Spring Shackles
While U-bolts prevent side-to-side movement, the leaf spring shackle allows the leaf spring to elongate, creating a softer ride. While you don't want any side-to-side wobble, the leaf springs won't function if they can'7t flatten out.
Your leaf spring shackles insert into the spring eye bushing on the rear of your leaf spring. Like the other bushings, you'll likely want to replace this with a higher-quality polyurethane replacement. There are a grand total of eight bushings attached to your classic Mustang's leaf spring shackles. Most are sold as a set of eight.
You will need to establish your rear shackle bolt bore before deciding on a set of bushings though. Some 1965-1966 Mustangs had 9/16” rear shackle bolts. The rest of the first generation had ½” rear shackle bolts.
Upgrade Your Stock Suspension System
A few minor upgrades can help keep your stock suspension system working well. These can also address some of the creaks that occur in older suspension systems.
Reweld the Shock Tower
The shock towers under your hood secure the front suspension in place. Unfortunately, the original welds in the Mustang's shock tower are known to be a little spotty. If you're planning on taking your Mustang on more spirited drives or want to be cautious, you may want to address this.
The best suspension is useless if the mounting points are damaged, so make sure all sheet metal is solid.
But if your first thought was to look up welding equipment rentals, you shouldn't be doing this. Welding takes skill and training. It can also have disastrous consequences if done poorly. Burned metal can fatigue and fail. Usually at the worst possible time. The best place to try out welding isn't “on a classic Mustang” or “alone in your garage.”
This task is best performed by a professional.
Replace Old Bushings
Most vibrations in older cars can be traced back to the bushings. Rubber bushings act as a sleeve, isolating vibrations between the suspension's moving parts. As bushings wear, the suspension becomes more mobile. This creates shimmies, rattles, and clunks.
Like rubber hoses, bushings are only really designed to last around fifteen years. If yours are older than that, then you've probably got a rough ride.
A suspension without good bushings is like a joint without cartilage. Parts that were never meant to rub against each other will slowly wear away.
Replacing your bushings gives you an opportunity to inspect every component of your Mustang's suspension system. You can replace bushings with stock replicas or upgrade to more durable options, like polyurethane.
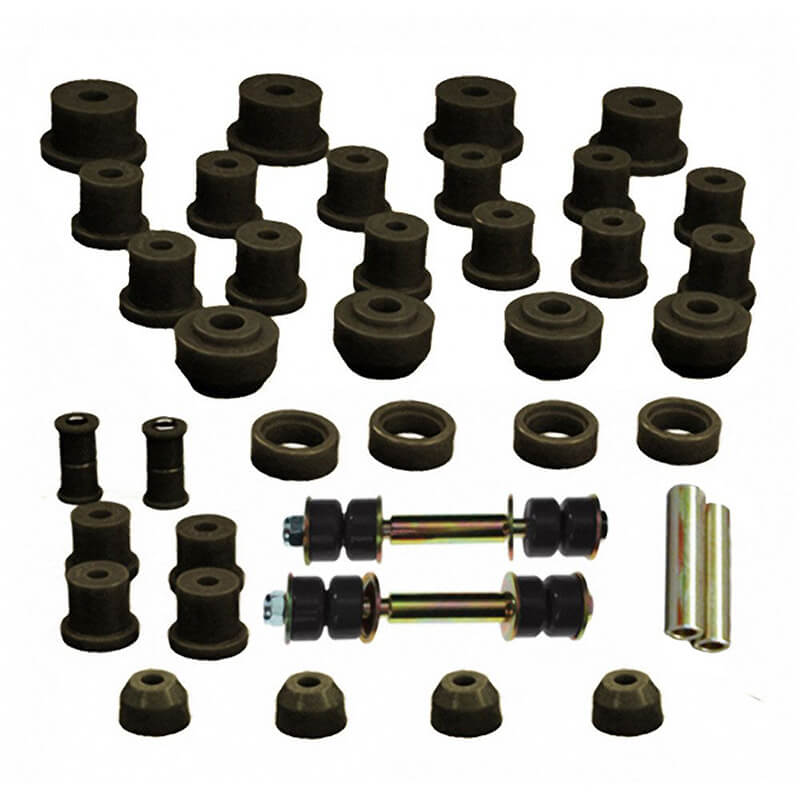
Fortunately, even for show Mustangs, upgraded bushings are an option. Even very strict shows won't deduct points for swapping out “consumable” parts. That means that air filters, rubber bushings, and brake pads can all be replaced. This is great news for your ride comfort, safety, and your Mustang's well-being.

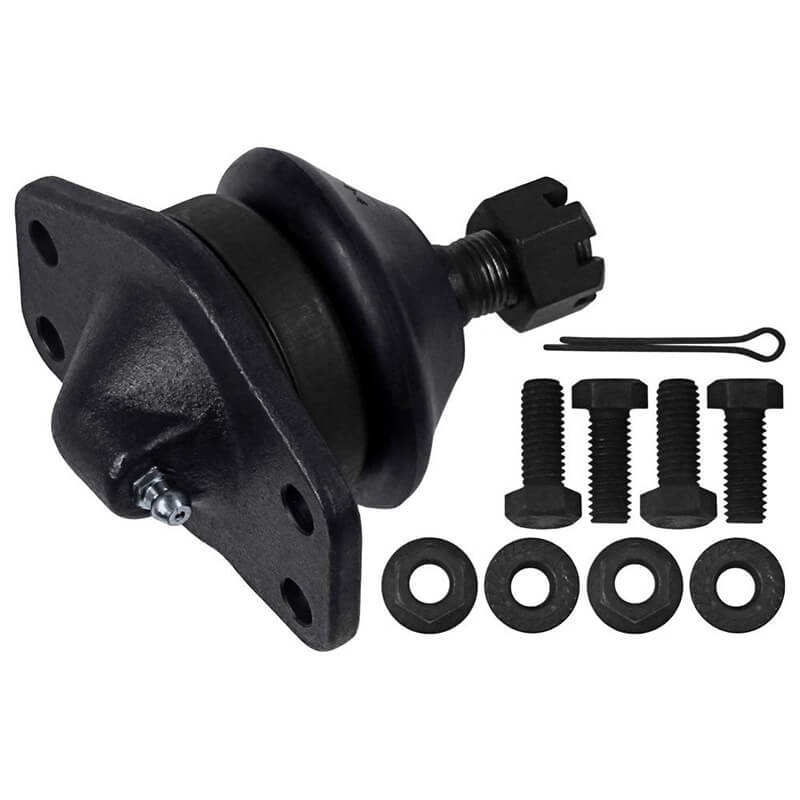
Replace Ball Joints
In addition to replacing the bushings, you'll also want to replace the ball joints. As ball joints go bad, they issue a wide range of sounds. If it's only just started to go bad, you may hear clicking, popping, or snapping sounds. As it nears the end of its life, ball joints can issue long squeaking sounds whenever you apply your brakes.
There are ball joints in both the lower and upper control arms in the front suspension of your Mustang. Both are easily replaced while you're checking over the control arms themselves.
Upper Control Arm Ball Joint
Your Mustang either has a three or four-bolt ball joint in the upper control arm. This was determined by the engine size. Both three and four-bolt replacements are available. But there's no doubt that the four-bolt is stronger.
Replacing your upper control arm with a four-bolt upper control arm and ball joint assembly would be a positive upgrade.
Repaint Suspension Components
Most suspension parts are painted. This paint is supposed to help prevent rust. Unfortunately, over time, paint wears away. The first-generation Mustang also had many parts that were bare metal.
There are ways to paint your suspension so it's protected while achieving a factory look. One method is to paint the parts that are supposed to be metal in their appropriate shade of metallic. Or, if you're worried about matching, you can paint clean and sandblasted parts with clear acrylic paint. This will give them protection while allowing the original metal to show through. Since you're taking your suspension apart, it's a great time to clean and repaint everything.
Our descriptions below assume your Mustang has stock components. If you find something else, it's likely that the previous owner did a suspension upgrade at some point. It's up to you whether you replace those components with stock replacements or new, modern equipment.
| Part | Color | Notes |
|---|---|---|
| Lower Control Arms | 3/4 black, ends left bare | |
| Strut Rods | Bare Metal | |
| Tie Rods | Bare Metal | Darker in 1970-1973 Mustangs |
| Sway Bars | Semi-Gloss Black | |
| Spindles | Heat-Treated | Bare, but Dark Gray |
| Leaf Springs | Heat-Treated | Bare, but Dark Gray |
| Shock Plates | Bare Steel | |
| Ball Joints | Bare | |
| Leaf Spring Shackles | Bare | |
| Leaf Spring Mounting | Bare | |
| Shock Tower Brace Bolts | Bare | |
| Shock Mounting Bolts | Bare | |
| Suspension Attaching Bolts | Bare | |
| Coil Springs | Semi-Gloss Black | |
| Upper Control Arms | Semi-Gloss Black |
Modern Suspension Upgrades
If ride comfort or performance is your only interest, you have a lot of options.
First, even if you've decided you don't want them, your stock suspension components have a lot of value to collectors. Selling these parts online can help fund your project. Even better, you'll be helping out another Mustang enthusiast who's desperate for your rusty upper control arm.
There's no shortage of restomod suspension options for classic Mustangs.
Coilovers
Coilovers are perhaps the most popular suspension modification. Besides being easy to install, coilovers don't need much maintenance and upkeep. This makes them a perfect solution for people who want a firm, responsive suspension.
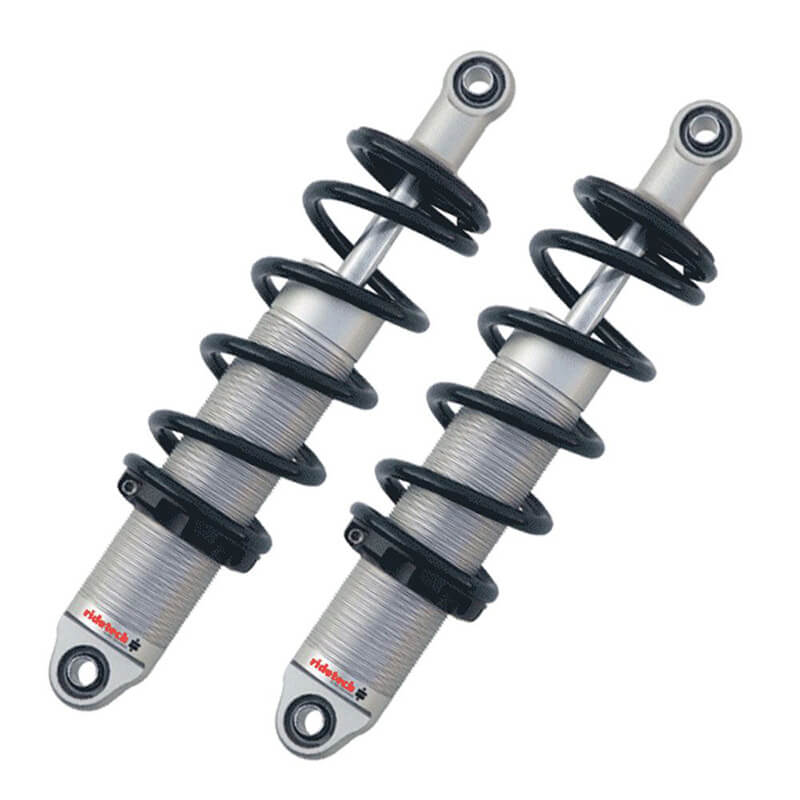
Coilover stands for coil over shock absorber. Essentially, it's the combination of a coil and a shock in one single unit. These take the place of your existing coil springs, and usually don't need major modifications beyond that.
Because coilovers are adjustable, many people use them to lower their Mustangs. Lowering a vehicle's center of gravity is a good way to improve responsiveness.
Air Ride Suspension
Air ride suspensions are also available for classic Mustangs. Air ride suspensions offer the greatest degree of flexibility of any suspension option. If you want a soft or firm suspension at a moment's notice, then air ride suspensions are the perfect option for you.
Air ride suspensions do have a more involved installation process than many other suspension types. Partly because they need an air compressor. Usually the compressor goes in the trunk and has lines running to each wheel.
Your Suspension
Once you've chosen how to restore or replace your suspension, leave your Mustang on the lift with the wheels off. The next thing we'll look at is the brake system.
Check out our full Classic Mustang restoration guide to learn everything you need to tackle your next project.


