CJ Classics Fuel Tank Premium With Drain Plug Kit Mustang 1969
Highlights
- Corrosion-Resistant
- Pressure Tested
- Direct-Fit Replacement
- Uses Factory Mounting Holes


CJ Classics Premium Fuel Tank Kit with Drain Plug for 1969 Mustangs.
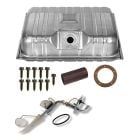
This North American-made Premium Fuel Tank Kit XFTK2 from CJ Classics has been pressure tested twice and is a direct replacement for the stock fuel tank with the correct 20-gallon capacity. Each fuel tank is coated in a protective paint that fights off corrosion and rust for long-lasting durability. The premium fuel tank features a drain plug for easy drainage and access so draining the fuel can be done on the ground. This fuel tank is designed for 1969 Mustangs, using the factory mounting holes for easy installation.
Features and Benefits:
- Correct 20-Gallon Capacity
- Direct-Fit Replacement
- Resistant to Corrosion and Rust
- Drain Plug Allows for Easy Drainage
- Uses Factory Mounting Holes
- Measures 32-5/8" x 24-1/2" x 8"
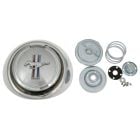
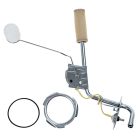
The tank is made using original dimensions, measuring 32-5/8" x 24-1/2" x 8", with the correct 20-gallon capacity. The fuel sending unit features a 3/8" outlet tube and uses a plastic float. A retaining ring, O-ring gasket and filter are included. The best part about this fuel tank kit is the fact that everything bolts up to the factory mounting locations using the new hardware. If you don't have original hardware to use, the AMK tank mounting hardware kit is included, which comes with factory correct mounting hardware required to drop in the new fuel tank and secure it.
Connecting the original fuel filler pipe to the 20 Gallon Fuel Tank is a durable, correct Autolite red striped fuel filler hose that is made from flexible, hard rubber. Replacing this hose is always recommended when installing a new fuel tank. Finally, a new fuel filler pipe to body gasket is included to replace that worn-out or missing original. The gasket is made out of cork and sits on the end of the filler pipe which meets the gas cap.
Kit Includes:
- Premium Quality 20-Gallon Fuel Tank
- Superior Fuel Sending Unit
- Correct Autolite Red Striped Fuel Filler Hose
- AMK 11-Piece Mounting Hardware Kit
- Fuel Filler Pipe Gasket
*Fuel filler pipe sold separately.
Tech Tip: if you install two cork gaskets on the filler pipe, it helps to move the gas cap away from the tail light panel which helps to keep the gas cap from scratching the paint.
California Residents: Proposition 65 Warning
Related Categories: Mustang Parts, Mustang Engine, Mustang Fuel Tank Area, Mustang Fuel Tank Kits, Mustang Fuel Tanks
Installation Videos
Video Transcript
This is our standard fuel tank kit for the '65 through '68 Mustang. It includes the tank, sending unit with the correct brass float, mounting hardware, filler hose and the filler pipe gasket.
For this installation you will need a flat blade screwdriver, Philips screwdriver, hammer, 3/8-inch ratchet, 1/2-inch socket, 3/8-inch socket, 1/4-inch ratchet, 7/16-inch socket, 5/16-inch socket, short extension, wire cutters, pry bar, 3/8-inch open-end wrench, scraper, safety glasses and a lift or jack and jack stands.
As you can see, the tank in our '66 has a nice big dent in it. It's due for replacement. The first step is going to be to drain the fuel. There is a couple ways you can do this. Drain it either from your sending unit, or if the tank has a drain, you'll want to use that. The best way to drain it? Take your car for a drive. If it's not drivable, either one of these ways will work.
The last step before removing the fuel tank from above is to disconnect the sending unit. You're going to pull the sending unit wire off the stud and then you'll want to disconnect the hose. We have the original stock crimp-clamps, which are one-time only and so you'll want to cut that off. Keep your pan handy as you may still have a little fuel come out of it. Now, we are ready to move inside the trunk. After you drain the tank, you'll want to clear your trunk out and remove the bolts that are holding the tank in place. Now, we're going to loosen the two screws the hold the filler pipe seal to the tank and to the filler pipe.
Now, we're going to disconnect our filler pipe. To remove the filler pipe you have to take the gas cap off. There are four bolts in the front here and there is on the back that we have to get off first. You'll want to pull the filler hose off the tank by twisting the whole assembly. Twist the hose off the pipe and pull out your filler. You'll be reusing the filler tube with your new tank. We include a new hose and also a new gasket so you can throw both of those away. Now, we are ready to remove the tank from the car itself.
Even though the hardware is removed there is still some seal holding it in place. We're going to start with a pry bar and see if we can get it loose. If you have trouble getting it off with a pry bar, a jack underneath the car forcing it up will usually do the trick as well. We are going to be installing new sealant with the new tank and so we want to get the surface as clean as possible and scrape off the old excess sealant. Once you've finished cleaning the original sealant off the trunk you will probably have a couple areas that are bare metal. We recommend a coat of primer before you install the new tank. Once you're finished with the primer, it usually only takes about 5-10 minutes to set up and then we can get in to installing our tank. I will put some strip caulk around the outside edge before we install the new tank. This will replicate the OEM caulking. Make sure not to leave any gaps in the corners; you want to seal all the way around. Before the tank goes back in the car, you want to test your sending unit; whether it's the original or a new one, you will still need to test it before you put it on the car.
You will use your multimeter set on ohms to test your sending unit. You want to ground it anywhere on the chassis, push the positive to the stud. You should see somewhere between 70 and 80 ohms, which is empty. As the flow goes up, that number is going to decrease, getting roughly to 8-10 by the time the tank would be full. As you can see, our sending unit is working properly.
Once you have tested your sending unit and you know it's good, we are ready to install it. The first step is to install this ring. There is a groove that it goes in to. I will put the float in at an angle first and make sure that the stud is at the bottom and put the ring on. I get about _ turn by hand. I will use a hammer to push it on the rest of the way. If you are ever working with a sending unit that has fuel involved, you'll want to use a brass punch. Since everything is new here a flathead screwdriver and hammer will work fine. Now, we're ready to install our tank.
The tank is going to go in the same way the old one came out. Line up the holes and grab our new hardware. Right now, we're going to put the fuel filler hose on. It goes over the tank. Slide it down and put the clamp on, but we're not going to tighten it down just yet. Put another one over here. Now we will install the fuel filler pipe. The new gasket comes with it, so make sure that you put it on before you put the pipe in. Once you install the filler pipe, your hose plants in place and we will tighten them back down. Now, we will reinstall our gas cap. Line the gasket up with the holes. The last step is to connect the sending unit. Make sure that you grab a new hose clamp to replace the one we took off. Now, our installation is finished. Once you're finished with the install you'll want to put some fresh fuel in the tank and check everything for leaks before you take it for a test drive. Installation should only take you for about an hour so you'll be back on the road in no time.
Vehicle Fitment
This product will fit the following Mustang years: