MBRP Cat-Back Exhaust System Installer Series 3" Aluminized Focus RS 2016-2018
Highlights
- 3" Aluminized Series Cat Back
- Heavy Gauge Aluminized Steel
- Gains Of 7HP & 8Ft. Lb Torque
- Drone-Free Exhaust Note


MBRP Installer Series 3" Aluminized Cat-Back Exhaust System for the 2016, 2017 and 2018 Focus RS.
The MBRP Installer Series 3" Aluminized Cat-Back Exhaust System (P/N: S4203AL) for the 2016-2018 Focus RS is built for the budget minded consumer without compromising on quality! While the seams are a major point of rust through with some budget systems, MBRP’s fully sealed tubing will add years to the life of your system.
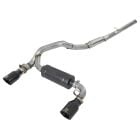
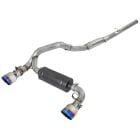
This system employs mandrel-bent 3” aluminized steel tubing and a pair of 4-1/2” polished dual wall T304 stainless steel tips. The inventive design of this MBRP cat-back also includes a built-in Helmholtz resonator that is located above the muffler. This Helmholtz resonator will deliver drone-free performance and a truly unique tone. MBRP claims gains of over 7 horsepower and 8 ft.lb of torque while delivering a 10% increase in exhaust flow. And to ease the installation process, MBRP includes all necessary hardware along with detailed instructions.
Features and Benefits:
- Aluminized Steel 3" Mandrel Bent Piping
- Pair of Polished T304 Stainless Steel 4-1/2” Dual Wall Exhaust Tips
- Built-In Helmholtz Resonator Provides a Drone-Free Tone
- Gains of Over 7hp and 8ft.lb. of Torque with a 10% Increase in Flow
- Includes ALL Necessary Hardware and Detailed Instructions
*To easily remove the factory cat-back exhaust, you will be required to cut your OE system directly in front of the rear axle assembly.
Please Note: This system does NOT have a mounting location for the factory electronics that control the OE exhaust valve, but does include an electronic valve simulator. This device will trick the factory computer into thinking the OE exhaust valve is still present and prevent any unwanted check engine light or trouble code. Once the original actuator and electronics are disconnected, the electronic valve simulator can be plugged in and secured.
Performance and sound are generally the two key factors in putting an exhaust on any Focus RS. While many brands offer one or the other - great performance or nice sound, MBRP offers both in their extensive selection of full exhaust systems and exhaust parts. CJ Pony Parts has many parts from MBRP, and many different prices, levels of performance and with different sounds, so you can get the exact exhaust that you're looking for.
Manufacturer Part Number: S4203AL
Order this MBRP Installer Series 3" Aluminized Cat-Back Exhaust System for your 2016, 2017 or 2018 Focus RS from CJ Pony Parts today!
California Residents: Proposition 65 Warning
Related Categories: Ford Focus ST Parts, Ford Focus RS Parts, Focus RS Exhaust
Installation Difficulty

Novice skill is required for this installation.
Installation Videos
Video Transcript
Jesse: Well this system, as you know, is quite a bit different underneath the ST versus the RS, so we had to start from scratch. It didn't mean we didn't get to use any of the parts from before, but we wanted to kind of stick with the same sound that we got from the last system, so we continued to use the three inch mandrel bent system from the downpipe back. We knew we wanted to make a system similar to what we made for the ST, but the cars are very different underneath, so we basically had to start from scratch. We knew we wanted to use a three inch mandrel bent system from the downpipe back like we did with the ST. But that really is where the similarities end. We had to go with a completely different muffler style and we actually had to incorporate a different tailpipe section because the tips are now in a different position-
Bill: Yeah, side versus the center.
Jesse: Yeah. And we actually had to use a resonator to really dial in the sound for this particular vehicle. So we have basically a single in dual out muffler, and a Helmholtz resonator that really dial in the sound for this particular application.
Bill: So that resonator's going to give us the tone we're used to from these systems, but no drone.
Jesse: Correct. The ST uses a resonator and a muffler. This actually is similar but the muffler and the resonator are two different positions on the car.
Bill: Okay, and something very unique to your system is the finishes. Now this is obviously stainless steel. Tell us about that and the different options you guys are offering.
Jesse: Okay, well just like we did for the ST, we really wanted to have sort of a price point and a styling for everybody out there. So we have the very budget conscious aluminized product that we offer here. This is sort of our entry level product. Then we go to our 409 system, like what you see right here, and then we have something a little different and that's our black system. Our black system is actually an aluminized system that we take, media blast and coat the rear half of the exhaust system for the consumer so he gets that nice blacked out finish if he wants it.
Bill: Okay. And we're going to be doing the stainless system. Now, tell us about the stainless, the material that you use.
Jesse: This is a T409 stainless steel product. It's all basically- We start with a mill finished tubing like what you see here. It's all mandrel bent. Everything is robotically welded. All the materials are all identical except for the tips. The tips are a T304 polished steel.
Bill: Okay. And as far as the system, obviously everything comes with it. Clamps, everything you need to hook it up and do the installation.
Jesse: Mm-hmm (affirmative). Everything you need to install is in the box.
Bill: Cool. Let's get started with the install.
Jesse: All right, thanks.
Bill: For this installation we need a lift or a jack and jack stands, 3/8" ratchet, 14 millimeter socket, 5/16" Allen key, short extension, 1/2" ratchet, 15 millimeter socket, 16 millimeter socket, a 14 millimeter wrench, and an exhaust hanger removal tool.
Since this car already had an aftermarket system on it, we removed it previous to the installation, but check out the next clip, we'll show you how to do it. To remove the exhaust the first thing you want to do is remove the actuator from the active system to make sure you don't damage it. You can unplug that and unbolt that and put that aside, now you can remove the exhaust. To do that, like I said, you do have to cut it. What you want to do is go right here in front of the rear axle, right in this section here. We're going to cut that down the middle, that way we can separate the two pieces and remove the exhaust.
Now we're ready to begin the installation. Now normally we would start in the front. Your system we're starting in the back.
Jesse: We are. That allows us to go basically from the middle of the car, the rear of the car, forward. It allows us to line it up a little easier than going from front to back.
Bill: So we slide the pipe over from the back of the car, obviously, because that twin pipe isn't going to fit over there.
Jesse: Jesse: Yeah, and then we're just re-utilizing the factory hanger.
Bill: We found when mounting this pipe it's easier to remove the hanger and just put it on the pipe here. This is a little bit larger than the factory stuff to make sure it's got a tight fit, and can be hard to put on up in place.
Jesse: All right, I like to put the band clamps on so you can actually get all the access to them from underneath the car. So I like the nuts actually facing down so you can hit them with an impact later.
Bill: The next thing you want to do is actually put the two long pipes together. Make it as one assembly. Make sure you have a clamp in the middle and then put it up into place, starting with the back and then the v-band clamp in the front.
Once again we're going to pull the hanger off, make it a little bit easier to install. Now we're going to make the connection with the front v-band clamp. Push back on the pipe a little bit. Now once this is in place we're going to snug it up just to make sure it doesn't pop off. Make sure these little clamps are all lined up. Then we're going to pop the factory hanger right back in place.
Now we want to clamp these up, just tighten them down a little bit. Before we do that though, we want to make sure everything is pulled forward enough that the pipes are fitted properly. Give that one a little nudge forward for me. There you go, now it's moving. There you go.
Jesse: All right, next we're actually taking the muffler and on the dual side we're gonna go ahead and install one of our three inch band clamps, and we're going slide it on this over axle pipe.
Bill: Now once again we're going to remove the rubber hangers here and put them onto the pipe just to make things easier. And now we're putting the driver side tail pipe in first.
Jesse: What we've done we've already put our factory isolator on here. We're going to take one of our three inch band clamps, slide on the muffler, and then put the passenger side tail pipe on.
Bill: Once you make your adjustments, we're going to tighten the clamps up. We're going to go back through and tighten everything else down.
All right, next we're actually taking our Helmholtz resonator here and we're taking the supplied hardware. We're gonna go ahead and put it up and over the muffler we've already installed. We're going to take the hardware that comes with the kit and bolt these two parts together here. Go ahead and cinch down the supplied band clamp that comes with the kit.
Jesse: All right, we're going to go ahead and install the supplied tips that come with your system. And this, really, you can kind of orientate them however you'd like. Some people like them flush with the valence, some people like them out a little bit. I kind of like it, you know, right kind of even with the edge of the bumper.
Bill: You might be asking about the power valve as obviously there isn't one installed on this system. MBRP goes by the thought process a lot of us do, that you want to sound good all the time, the valve really isn't necessary. To that end they give you this little plug. What you do you plug this in. That way it will fool the computer into thinking it's there. You won't have any issues and the exhaust will sound good all the time. And your installation's finished.
As expected the MBRP system fits great, now let's see how it sounds. It's obviously louder but it still has that deep kind of tone that the ST system had that made it really popular.
I mentioned several times and I was a fan of the MBRP on the ST, and I feel the same way about it on the RS. Like it has that, it's not overly loud, but it sounds performance and it has a deeper tone to it. I mean so often these little 4-cylinder engine you get this high pitch sound, which I mean, I know some people love the signature sound of a four-cylinder engine, but to me I'd rather have something a little bit deeper sound to it and definitely inside the car this has the deepest tone of anything I've heard on RS.
And even as you get the higher RPM bands, I mean it does get louder, the pitch does change a little bit, but it still has a nice tone to it. It really, really sounds clean. I go up to highway speeds, and no drone at all. I mean you can hear it back there but it's not something that would drive you nuts or annoy you while you were driving.
Yeah, in my opinion this is how this car should sound from the factory. None of that piped-in speaker sound, none of that. This is a nice tone. Like this is perfectly livable, cruising speeds. [inaudible 00:13:21] its got a nice sound to it and I said it doesn't drone at all when you're in the higher gears.
This is what I would want my RS to sound like. This has a very, very nice sound. I know I've said it multiple times about the deeper sound, and what you get out of these things, but this system really sounds good on this car.
Higher rpms you do get a little bit of a pop. If you let off, I'd say over 5,000, 5,500, it will get a little bit of a pop to it. But overall definitely a performance-oriented sound. That nice deep MBRP tone that we got to know on the ST is definitely presently on the RS as well.
Jessie thanks for coming out today and bringing us the new MBRP system for the RS. Just like the system we had for the ST, it has that nice deep tone. We think it's going to be really popular with RS owners. The installation is very straightforward, will take you less than two hours. You'll be back on the road in no time.