Roush Cold Air Intake Kit Mustang GT 2018-2023
Highlights
- Tap To View 3D Model
- Direct Fit
- Complete Kit
- Easy Installation


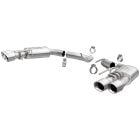
Roush Cold Air Intake Kit for 2018-2023 GT Mustangs.
If you’re on the hunt for a great way to boost performance in your 2018-2023 GT Mustang, it’s time to take a closer look at this Roush Cold Air Intake kit. It’s easy to install and is less restrictive than your stock airbox.
Features and Benefits:
- Increases Performance and Presence
- Improves Throttle Response
- More Efficient Than Standard Stock Airbox with Superior Filtration Properties
- Allows for Latent Potential in Power and Fuel Efficiency that Would Otherwise be Restricted
- Provides Reduced Pressure Drop
- Custom Tune Not Required: System Engineered and Tested Specifically for this Application to Ensure MAF Signal Performance Matches Factory Settings
- CAD-Designed for Optimized Hood Sealing and Performance
- Includes Innovative Airbox Lid with See-Through Lens and Roush Logo
- Includes Dry Filter with Clamp that’s Proven to Retain Its Shape Under High Airflow
- Filter Has Inner and Outer Layer of Wire Mesh for Durability and Reliable Support of Filtration Media
- Filter Does Not Require Oiling and is Washable for Re-Use
- Kit Also Includes Injection-Molded Lower Airbox/Tray with Airbox Lid, Blow-Molded Clean Air Tubes and All Necessary Mounting Hardware
- Uses Factory Emissions and Vacuum Lines
- Quick and Easy Installation: Uses Factory Mounting Locations and Hardware
- CARB E.O# D-418-31 for 2018-2021 models ONLY
This Roush (422086) Cold Air Intake kit is just what you need to improve your GT’s performance and presence. You’ll see an improvement in throttle response and more. This cold air intake is more efficient than standard stock airboxes and allows for latent potential in power and fuel efficiency that would otherwise be restricted. Plus, no custom tune is needed after installation since this kit was specifically engineered and tested for your application. This kit comes with an innovative airbox lid with a see-through lens, a washable dry filter that’s proven to retain its shape under high airflow, air tubes, installation hardware and more. Installation is quick and easy because you’ll use your factory mounting locations and hardware.
*Will require you to remove your factory sound tube and trim the factory engine cover for installation.
Tech Tip: With this Roush Cold Air Intake Kit, you can remove the included MAF insert for larger bore MAF and re-calibrate or custom tune your PCM for even more power. (Calibration or tune file is NOT included.)
Please Note: While this part will fit the 2022-2023 Mustang GT, it is not EO/EPA compliant for 2022-2023 Mustang GT models. CARB Approval only applies to 2018-2021 GT Mustangs.
California Residents: Proposition 65 Warning
Related Categories: Mustang Parts, Mustang Engine, Mustang Cold Air Intakes, Mustang GT Cold Air Kits
This item is 50-state legal (CARB E.O. Number D-418-42 (NO 2022))

Installation Difficulty

Novice skill is required for this installation.
Installation Videos
Video Transcript
This Roush cold air intake kit's going to be a direct replacement for the factory intake kit on your 2018 Mustang GT. Features a custom designed seal box with a clear top with an extension that works with the factory ram air system and keeps your filter sealed from engine heat. Comes with a reusable, washable filter, does not have to be oiled, along with a mass air meter and an inlet tube. Now the meter that's included is designed to work without a tune, there's an insert you can remove for custom tuning and more power.
For this installation you need a 1/4 inch ratchet, 7 millimeter socket, 8 millimeter socket, 10 millimeter socket, T-20 Torx bit, T-30 Torx bit, short extension, 10 millimeter wrench, flat head screwdriver, pliers, scissors, marker, some sort of a cutting instrument and safety glasses.
To begin the installation by removing the intake cover then we're going to remove the factory cold air intake. To remove the cover you're going to pop these little caps off here, little flat head screwdriver makes it easy. With the caps off you're going to remove the 10 millimeter nut on each side. Lift up to remove it. While you've your 10 millimeter handy, go over to the fender apron here and remove this bolt for the air box. Next we're going to disconnect everything from the cold air intake. This line here, these two here and then our mass air sensor. To remove just simply push in. This one has a little has a little gray tab you're going to lift up on kind of underneath. This you're just going to squeeze the clamp. The mass air sensor's this little red tab underneath. Pull the tab out, that'll come off, make sure you don't forget to remove this little Christmas tree clip from the air box. Now you go back over here, loosen up the clamp at the throttle body.
The air box will come out as one entire assembly. Before you do that though, lift up over here on this symposer, separate it from the air box. Now for the fun part. Part of the installation of the Roush is going to require removal of the sound symposer too. The tube itself is pretty easy to get to but back here on the firewall there's a nut that holds it to a stud. Basically you have to reach in there, easiest from the front of the engine. Use a 10 millimeter wrench, remove the nut and then remove the symposer tube. With the nut off, just going to pop these clips and you can remove it. With the symposer removed you'll be left with this hole in your firewall. Roush includes a plug, basically the same way you went in there before to remove it, push the plug in place, block the hole.
There's a few pieces that we're going to need from our factory cold air intake. We're going to start with the mass air sensor. Going to remove this rubber grommet here. Going to remove this grommet with the metal insert, just push the metal insert up through. Remove the grommet. The last one is underneath. Squeeze this, remove that and put your factory cold air kit aside. So the pieced are removed, we're now going to install on our Roush intake. The box is just about ready to go back in the car. Last thing you do is grab this extension piece here that works with the factory ram air system. Lock that in place and we're ready to put in the car.
Before we put the box in, the mass air harness, make sure it's out of the way. But this harness has to go a little further than before. So you want to remove it from the factory clip right here by sliding it off and then also this one down here. That'll give us a lot more length so it should reach. We'll take the box, I'm going to slide it down into place. It's going to be a little bit of a tight fit through here. The box in place, we're going to reinstall the factory hardware here. The box installed, grab the filter, the mass air housing, put these together here. What you want to do, this metal piece here is going to 90 degrees from where the sensor's going to go. You want to make sure that's facing down. This arrow here will face down when it's installed. Want to make sure that when that's there, sometimes it's hard to turn. Make sure the insert is lined up. Then you can tighten this down.
The filter sample, grab your mass air sensor, it's only going to fit in one direction. Line up your original screws and then tighten them down. Very carefully now take this assembly, put the mass air sensor through the opening here, line it up and install the supplied bolts. Now that that's finished up we can install the inlet pipe next. Now we can reconnect everything. And then last step is the cover.
The last step of the installation is optional. If you want to you can leave your engine cover off. If you want to use it you do have to trim it. Now the bottom of our page, we have instructions from the manufacturer that include this template. What you're going to do is basically just lay this here, line up all the lines then mark where we have to cut. Once you have it marked, before you cut you want to turn it over then just remove this from the back. It'll simply tear off 'cause it's going to get in the way when you go to cut it. With it trimmed out now we can reinstall our engine cover. Cover installed we can reinstall the nuts. Putting a little dab of grease inside your socket will make the nut stick to it, makes it a lot easier to line these up. And your installation is finished.
With this large reusable filter and much smoother inlet, the Roush can get more air to our engine. It looks a lot better under the hood as well. As far as the installation goes, figure about an hour or so you can be back on the road in no time.