
How to Install a Fox Body Mustang Alternator
Last Updated February 8, 2024 | Bill TumasNone of us want to see the dreaded battery light come on in our Fox Body Mustang. If your battery is consistently having trouble charging then it may be time for a new alternator.
Thankfully, installing a new alternator can often fix a battery charging problem, and with the right tools and know-how, the installation is a breeze. Check out this guide for step-by-step instructions on how to install a Fox Body alternator in less than an hour.

Fox Body Mustang Alternator Install Instructions
For this installation, we chose the PA Performance alternator direct-fit replacement. It fits all 1986-1993 Mustangs with 60 amps at idle and 120 amps maximum.
Your alternator might be different from the one we chose, but the installation should be similar for all 1979-1993 Mustangs. Just make sure the alternator matches your engine configuration, and always read the manufacturer's instructions before you install it.
One thing to note before you begin your install is whether your Fox Body has a supercharger where the alternator would typically be. This was the case for our Fox Body, so to access it, we raised the car and removed the alternator from underneath. You may not need to lift your Fox Body if it has a standard setup. Otherwise, the installation steps should be exactly the same.
Important: The last thing you need to do before the install is disconnect the battery from all wiring. This is an important safety precaution as you'll be working with electrical systems.
Parts and Tools Needed:
- ⅜” Ratchet
- ½” Socket
- 9/16” Socket
- 10 mm Socket
- 18 mm Socket
- Basic Wiring Tools
Step 1: Remove Belt
Using a socket wrench, loosen the bolt on the belt tensioner. Once the tensioner is able to move, remove the belt from the system.

Step 2: Detach Old Alternator Wires
Head underneath your Fox Body to access the alternator. Unclip the two wires attached to the alternator.

Pro Tip: You may not need to raise your Mustang to access the alternator depending on your setup.
Step 3: Remove Old Alternator
Using a ratchet, remove the bolts holding the alternator to your Mustang's frame. Remove the old alternator and set it aside.

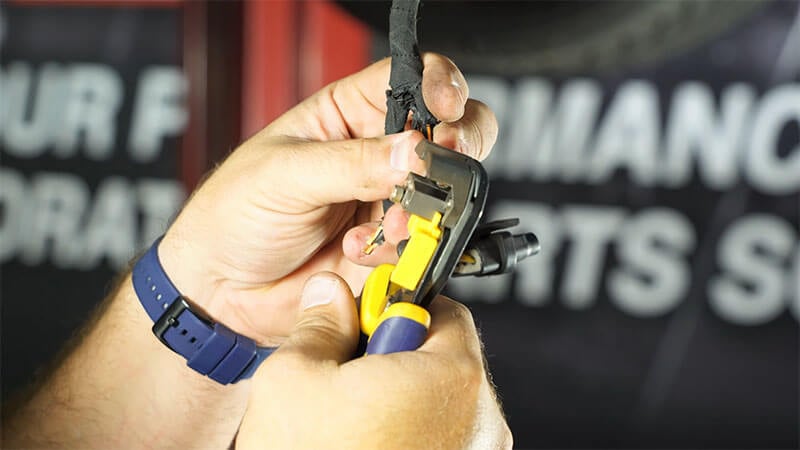
Step 4: Strip Old Wiring
There are two wiring harnesses that connect to the stock alternator. The smaller harness can plug directly into the new alternator, while the larger harness will need to be rewired.
To begin this process, use a wire cutter to separate the large wire clip from the wires. Once the clip is removed, use a wire stripper to strip each of the wires.
Step 5: Install Wiring Connectors
Slide the provided heat shrink onto the wire. Then, use the wiring connectors provided with your alternator kit to attach to the orange and black wires.
Twist the connector onto the wire and crimp the connector using pliers. Make sure there is a firm connection between the wires and the metal portion of the connector.

Step 6: Solder the Wiring Connection
Use a soldering iron to secure the connection between the wire and the metal connecting point.
Repeat this process for the other wire.

Step 7: Tighten Heat Shrink
Use a handheld torch or other small heating device to tighten the heat shrinks provided with your alternator kit over the connecting point of the wire and metal connector.

Step 8: Attach New Alternator Wiring Connection
Grab the remaining wire from the original wiring harness and use the supplied connector to attach the new plug wire. Crimp the connector with a pair of pliers to secure the connection.

Step 9: Install New Alternator
Using the supplied bolts, connect the alternator to your Mustang by sliding the bolt through the hole in the frame.
Pivot the attached alternator to the secondary connection point and install the second bolt. Tighten down both bolts.

Step 10: Plug In New Alternator
Reattach the new wiring to the installed alternator. Position the orange and black wires together and attach them to the power stud on the back of the alternator.
The small wire will plug into the side of the alternator and the wire clip will plug into the factory socket.

Step 11: Reattach Belt
Reattach the belt to the new alternator and use a socket wrench to tighten the belt assembly back into position.

Congratulations, you're all done!
Keep Your Fox Body Mustang's Electrical System Running Smoothly
With your new alternator installed, your Fox Body's electrical output should be back in top shape. But don't stop there. While a new alternator may fix your battery charging problem, it's not a universal fix for outdated wiring or electrical systems. We have you covered with parts for any electrical installation your Fox Body may need. Check out our Mustang electrical and wiring parts page below for top-rated Fox Body electrical parts.


