
Restoring a Chevy C10
Last Updated May 15, 2024 | Meghan DrummondOne of the best parts about buying a classic C10 is restoring it to its glory days. Though any classic truck restoration is going to be a lot of work, you can make sure that work is fruitful by planning out your strategy in advance. Coming up with a restoration plan ensures that your restoration project turns out exactly the way you want it to.

The first step in your process is deciding what your end goals are. Do you want your C10 to look and sound exactly like it did out of the factory? Do you want it to be period-correct, but perhaps with additional options that weren’t purchased from the get-go? Or are you in pursuit of a restomod look, where classic and modern features blend to create something unique?
Once you’ve figured out what your goals are, you’re ready to work on the details of how to get there.
Research and Planning
If you’re looking to do a restoration project correctly, then your first step is going to be research. Not only do you need to know where to get C10 parts, but you’ll also want to know as much as you can about your truck’s original equipment.
It’s good to generate your budget in advance as well. Restorations can famously get out of hand pretty quickly. By making sure you’ve figured out what your needs are and what your wants are you’re making sure that you’ll be pleased with the results and stay in your budget. If you're looking for budget mod ideas, we have a list of 5 cheap C10 mods to get you started.
If you’re trying to turn a salvage title into a rebuilt title, this is also a good time to start taking pictures of your truck’s problems to make sure you have proper documentation for reapplying for the title when you’re finished.

Chevy C10 Restomod
If you're planning on restomodding your truck, you need to decide that before starting the project. A faithful restoration and a restomod have different goals and require different parts, so it's hard to pivot halfway through the project. Restomodding, by definition, is restoring a classic car or truck, but using non-period correct parts. This could mean sticking a modern LS engine into a classic C10 chassis, or installing a modern sound system and radio into your truck.
There are a variety of different ways to restomod a Chevy C10, so every build will be different. If you decide to restomod your truck, plan your build out ahead of time and build something unique!
The Truck Itself
Obviously in order to restore a truck, you need a truck. C10s are readily available thanks to the popularity this classic truck had throughout its production. There are a lot of tips for buying a C10, but specifically for restoration you’re looking for a truck that’s got enough problems that it’ll offer you the experience you want and come in at a lower cost, but that won’t have problems that can’t be fixed.
Getting a truck with a bent frame is going to be a lot to handle, and it will probably not be worth it in the end. On the other hand, a truck that’s beginning to suffer from rust and damage but that still is rock solid underneath is going to be ideal, but a challenge to find.
Inventory your own automotive skills as you decide what type of damage is acceptable and what isn’t. You may also not really have a choice if your plan is to restore a truck that has emotional significance.

Set Up a Workspace
Organization is often the difference between a great restoration and a tragedy. Clean your workspace, whether that’s a shed in your backyard, a garage, or just a large table beside your driveway.
You’ll want small containers for nuts and bolts that are removed and markers to clearly label those containers. Ziplock bags can work here, but small jars or bottles can also function. You should have a copy of the owner’s manual and all of your tools. Create spaces for everything and make sure that it stays in that place, otherwise, you’ll likely spend a significant part of your working time desperately hunting for your 10mm.
Even though it may seem like a lot of time and energy, keeping this area clean is going to make sure that you don’t lose an important screw at the wrong moment. Check out our list of 10 must-have garage items for more ways to keep your space clean and organized.

Getting Your Chevy C10 Mechanically Sound
Though all restoration projects vary in terms of goals, the one bullet point they all have in common is that it’s important to have a finished product that’s mechanically sound.
That means under the hood of course, but also the electrical components, the exhaust, and the suspension should all be up to snuff before you start thinking about aesthetics.
While you check out the mechanics, it’s a good idea to have cleaner ready and go over parts to make sure they’re free of dirt and rust. This will also help you to locate small problems that you may not have seen without taking a much closer look.
If you can lift your engine and transmission out of your truck and place them on a teardown table, that will make many of the next steps easier, but if these aren’t available to you there are ways to make the most out of any space.
Chevy C10 Engine Evaluation
If your engine is in particularly bad shape, you may want to consider an engine swap. LS C10 swaps are especially popular. If you want to keep the current engine though, it’s a good time to perform some general maintenance to make sure that it’s in tip-top shape.
The C10 has an air filter and oil filter that both require periodic maintenance. Depending on how you got your C10, it may not have had these parts looked at in some time. While you’re checking these, you can also go ahead and check the spark plugs, or glow plugs if you have the diesel option.
Traditionally, engines were painted. You may choose to repaint yours, which is a great way to make your restoration seem thorough and give you an underhood area that you’ll be excited to show off at your next truck meet.

You also will want to go ahead and complete a changeout of all the important fluids you’ll find under your hood, both the engine oil and coolant of course, but also the windshield wiper fluid.
Chevy C10 Transmission
You will probably want to change the transmission fluid if you don’t know much about the truck’s background. That will tell you a lot about the truck and is a good step anyway. If you see flakes of metal in the old fluid, that indicates a more serious problem, but if it’s just dirty then a quick fluid change should be all that’s needed.
If you’re engine swapping or planning on performing extensive performance enhancements, then you’ll also want to swap the transmission for one that can handle more power and fits your new drivetrain.
Chevy C10 Checking the Battery
Make sure that your battery terminals are free of corrosion. This can be achieved with the help of a simple stiff-bristled wire brush. You should also go ahead and check your battery to see how much of a charge it’s holding and if it needs to be changed out for a new one.
Chevy C10 Suspension
The suspension of your truck is comprised of a lot of parts: ball joints, bushings, bump stops, shock absorbers, springs, and torsion bars are all crucial to your truck’s suspension. Check all of these and determine if they're still in good shape or in need of replacing.
If your truck’s suspension has seen better days, you’ll have to decide whether you plan to do a direct replacement or an upgrade. Obviously, if you intend to create a faithful restoration, you’ll need stock replacements, but otherwise, it may be worth it to go ahead and upgrade.
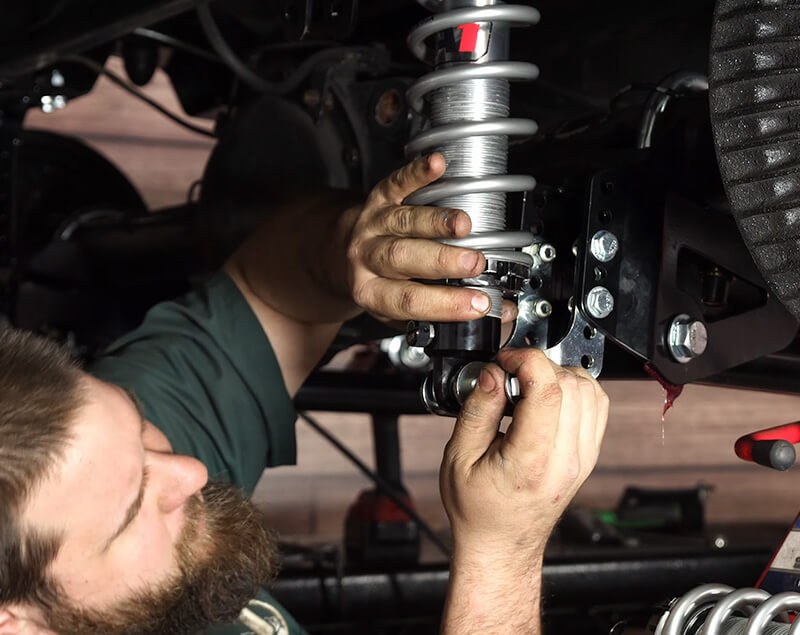
Suspension is one of the many areas where significant performance improvements have been made over the past few decades, and there’s no reason why you can’t have a truck that looks like a classic but rides a little better than it did when it rolled off the factory floor.
Chevy C10 Exhaust
Out of all of these, the exhaust is one of the easiest to check and can tell you the most about your truck’s overall performance. While the truck is running, examine the smoke coming from the exhaust (if there is any). The color of exhaust smoke can tell you a lot about how the engine is running. You can also check for exhaust leaks by seeing if smoke is coming out from anywhere it isn’t supposed to.

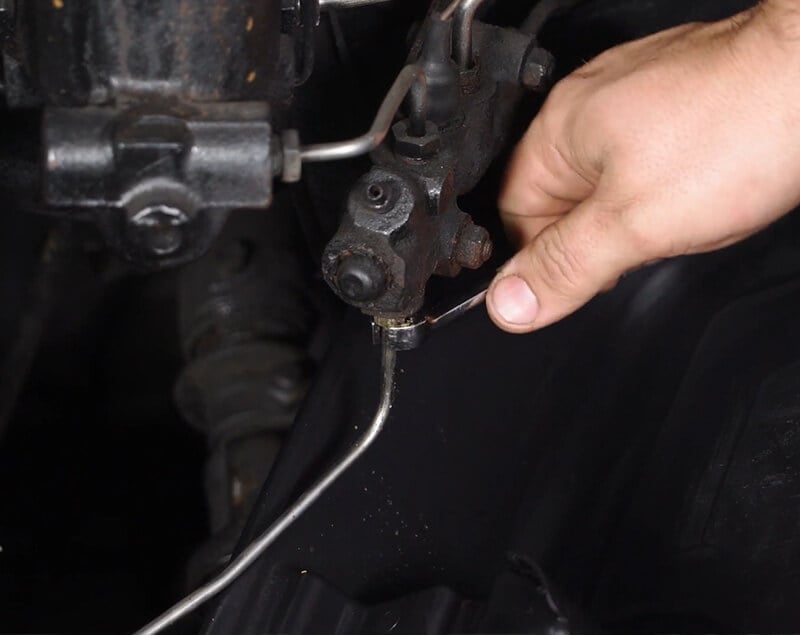
Chevy C10 Brakes
Making sure the brakes are functioning the way they’re supposed to is a critical step before cruising down the highway. Be sure to check the brake pads, rotors, and brake fluid. You may need to bleed your brakes or replace the brake line entirely. Essentially, when you press your brake pedal, you want to feel resistance and like the brakes are responding properly.
C10 Exterior Clean Up
Once you’re sure the mechanics of your C10 are in tip-top shape, it’s time to go ahead and start working on your truck’s external appearance. To start, wash your truck by hand and get a feel for what areas are going to need the most attention. Do you have rusty rocker panels? A bed that’s seen better days? Headlights that are basically useless? Make a mental checklist as you’re going along, or a physical checklist if you prefer.

Chevy C10 Rust Repair
This menace will absolutely devour your truck whole if you let it, and if you’re already seeing spots of rust or rot then it’s time to do something about it.
There are a few methods of removing rust, and unfortunately, almost all of them tend to be as corrosive to the metal you’re trying to restore as they are to the rust. This means that every rust removal method should be tried carefully and watched attentively.
Electrolysis is perhaps the best way, but it’s very difficult to do on large items. If you’re looking at a small panel or pieces that are rusted, then electrolysis is your best bet.
If the rust is only surface-level deep, you may be able to get away with sanding it away. You’ll want an orbital sander since sanding by hand will exhaust your arms long before it makes it through the rust.
If you'd like to learn more about rust removal, check out our guide on how to remove rust from your vehicle.

Chevy C10 Bed Replacement
If you want to go to a wooden bed but can’t salvage the wood you have, there’s no reason you can’t remove the old bed and install your own custom wooden bed. You’ll want oak planks that are free from knots or grain cracks. If you’re going to a reputable lumber mill, they should be able to cut them to size for you, but it’s certainly possible to cut your own. Just remember: measure twice, cut once.
You’ll need to be especially careful around the wheel wells, where the measurements vary significantly. Most people suggest working the boards from the center out to the walls of the bed.
You’ll then want to seal the wood with a polyurethane sealer. This will ensure that you can use your truck as a truck without having to worry about the wood becoming moldy or damaged. Then, you’ll want to use metal strips to run between the boards, which will help to protect them and give you additional rigidity.
If you still have your wooden slats but they’re in less-than-ideal shape, but not so bad that you want to replace them, then you’ll basically be treating them the same way you’d treat hardwood floors. Lots of sanding, lots of staining, and lots of sealing.

Painting a Chevy C10
If there are a few chips in your paint, then you can probably get by with applying touch-up paint, but if the paint is significantly damaged, then you’ll need to repaint your C10.
Painting a truck sounds easier than it actually is, so it might a good idea to take it to a body shop. This is especially true if you’re looking to create a period-correct restoration or want a custom paint job that looks OEM.
If you’re okay with an art truck or mostly just want to get down a little paint so that you don’t have to deal with rust and decay then you have a lot more options available to you.
The first step for any great paint job is making sure that your surface is prepared. Sanding is key. This will help to remove old paint from your car’s body without digging into the metal.
If there are any dings, rust spots, or other dimples, smooth them out with filler and then sand it flat with the rest of the truck. Once you’ve finished sanding and filling, it’s time to wash your truck down again, and then tape up everything you don’t want to get paint on it, from the windows to the tires and wheels.
Make sure to carefully cover your door handles and door locks as well. It’s worth it to put the time in here, since this is often what separates a crisp professional-looking paint job and a sloppy one.
Once you’re done with this step it’s time to prime.
Primer fills in and helps to create a perfect base. Even so, you’ll want to sand down the primer after you’re finished to make sure that it’s truly perfectly smooth.
After that, you’ll use a paint prep degreaser and then a sealer.
Only then are you ready to spray on your base coat. You’ll need to apply up to three coats of your base coat, a final coat, and then a clear coat.
If that sounds like a lot of work, that’s because it is and is why body shops tend to be worth the money to most people. But if you have a friend who owns most of the equipment you’ll need, then it can be a lot of fun to paint your own truck.
Chevy C10 Interior Restoration
Restoration projects tend to vary a lot when it comes to the interior. It’s possible that your truck just needs a good old fashioned interior detailing, but more often than not you're going to need a full restoration.

Strip and Clean Your Chevy C10's Interior
If you’re looking at a full interior restoration, the first step is going to be removing everything that can be removed and cleaning it thoroughly.
One of the great things about older trucks is that everything can be removed so you don’t have to try to work in tight quarters. Removing pieces slowly allows you to either restore or replace it with ease. The dash, window trim, seats, and window stripping can all easily be removed from the truck.
Repair C10 Interior Rust
The corners of the cab are one of the places where rust tends to accumulate. This includes not only the corners along the floor but also the ones along the roof. Make sure that you’re using touch as well as sight to identify rust. Touch-up paint can make rust nearly invisible but won’t cover up the rough texture and won’t stop the spread of rust.
Clean or Replace Old Chevy C10 Carpet
Though carpet was a premium option for C10s and thus may not be on yours, or may be in such a poor state that you’re eager to replace it. After you’ve cleaned up the floor and patched any rust spots, carpet can give your Chevy C10 an immediate facelift as well as provide a good hiding place for any restomod additions you may feel like making like adding Dynamat or tucking away stereo wires.
Dynamat is a soundproofing material. There are many options for soundproofing, and if you’re planning on doing more serious driving with your truck once it’s restored it’s a good investment. There are several opportunities during interior restoration to modernize your ride a little to create a more comfortable environment for you and your passengers.
Restore or Replace Chevy C10 Gauges and Door Panels
Some of the hardest parts to restore are the instrument gauge clusters and door panels. These can be hard to remove and fragile in their old age.
You can clean door panels and gauges with a lot of patience, a handful of microfiber cloths, and a gentle cleanser, but many people opt to replace them instead. The reason for this actually has less to do with the difficulty of true restoration and more to do with the added features present on modern parts.
Chevy C10 Vinyl and Seat Repair
For the most part, C10s had vinyl interiors. Vinyl can be a bit of a pain to repair. There are professionals who can do it and can make it look almost like new, but after you get it back you’ll still need to start conditioning it in order to avoid getting the decaying vinyl interior look that makes trucks really show their age.
If you have tears in your seats, then patching them is a great way to extend the life of your bench seat and can help prevent more serious damage. Patching vinyl can be a bit of a chore, but if you don’t the tension of the seat will cause the tear to grow in size until eventually, you get a full-length rip. Just cut a piece of material to use as the patch, add vinyl-safe glue, and hold it in place until it’s dry.
To clean vinyl, you’ll want to use warm water with just a couple drops of dish soap. Just keep applying the soapy water until all removable dirt has been removed. You’ll be able to tell because your cleaning cloth will come back clean.
Once your vinyl seat is clean, you’ll want to use a soft-bristled brush to work a vinyl treatment and conditioner into your seats. Though this doesn’t get rid of old damage, it can help keep new damage from forming and you might be surprised at how much better your truck looks with just a little cleaning up.

Your Restoration Journey
Ultimately, every restoration project is a little different and brings with it a set of challenges that are difficult to predict, but if you wanted predictability it’s unlikely you would have started restoring a classic Chevy C10 to begin with.
The best thing to do is think of restoration as a journey and enjoy every milestone along the way, whether that’s completing your first engine swap, relocating the gas tank, or turning your truck into a unique piece of art with some creative painting and interior restoration work.
At the end of it all, you’ll have a truck that you know inside and out, and the pride that comes from having completed a restoration project. Best of all, you’ll get to drive your restored truck out in the world for the rest of us to admire.
Image Credit: Barnfinds, Hot Rod


