
Mustang Restoration Chapter 9: Painting
Last Updated November 25, 2025 | Meghan DrummondMost experts say you should dedicate the bulk of your budget to body restoration. Few things will have as much of an impact on first impressions as the condition and quality of the paint. But a good paint job isn't all about looks. Having well-applied paint is crucial to protecting your investment, as it's the first line of defense against rust and corrosion.
Should You Paint Your Mustang Yourself?
There's no question that hiring a good body repair shop for paint work is worth the investment. Even the CJ Pony Parts crew, with a large garage, years of experience, and a massive supply of tools, usually hires a body shop for painting. For most people, it's not worth the time or money to paint their Mustang themselves.
Here are the top three reasons to hire a professional painter:
- High-Caliber Equipment
- Controlled Environment
- Years of Experience

The best painters can feel irregularities in a coat. They know how paint should be applied, and they notice immediately if something is off.
Body shops also have high-quality equipment that allows them to apply paint evenly and cure it for a perfect finish. No danger of flies getting stuck in wet paint in a body shop!
If you're set on doing the paint work yourself, or you just have minor touch-up work to do, we've got some tips that'll help you get a professional-looking finish.
Covered In This Chapter:
- Touch-Up Painting - How to find the matching paint and apply it to small areas
- Prepping the Surface - Ways to strip away old paint and prepare the surface for new paint
- Painting - The types of paints available and tips on applying it
Touch-Up Painting
If you're just covering up patches or doing minor touch-up painting, then you should be able to do it yourself. These tips will help you make sure your spot-painting blends with the rest of your Mustang's paint.
Finding the Right Touch-Up Paint
If you check your Mustang's data plate, there will be a code for paint color. If you're not painting your entire Mustang though, you may not want the factory-correct shade.
Time has a dramatic effect on many paint colors. In the past fifty years, it's almost certain that the paint on your Mustang has changed slightly. Buying touch-up paint in the shade it was fifty years ago and applying it directly to your Mustang will create some very noticeable patches.
There are several ways to create a match.
The first is to simply buy the factory-correct color and then add a little white or gray to age it till it's a good match. If you've got a great eye for color, this is by far the cheapest route. For those of us who routinely confuse navy and black, there are paint experts.
These automotive heroes can do a “hand match” using a special light gun to find the correct pigments and saturations to make a perfect match to your Mustang's existing shade.
Apply Touch-Up Paint
The best approach to touch-up paint is not to brush it on at all. Brushstrokes are difficult to get out. Instead, get a small bead of paint on the tip of a brush.
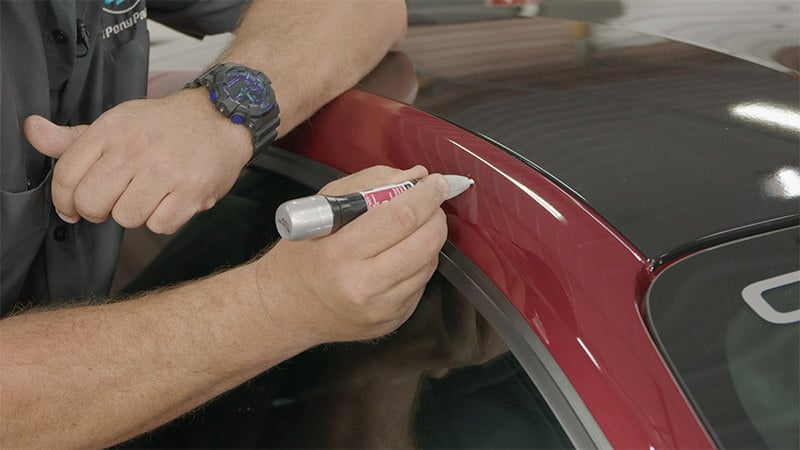
Hold the brush to the area that needs paint and wait. The liquid should naturally fill the hole when it makes contact with the surface.
Just remember that too little is always better than too much.
Prepping the Surface
Before applying paint, your Mustang's surface must be prepped. A clean, primed, and properly set-up Mustang is the first and most important step to a good paint job.
With a shiny clear coat and metallic sheen, car paint emphasizes rather than masks imperfections. As a result, most high-quality paint jobs involve more time on surface prep than actual painting.
Before applying any primer or paint to the surface of your Mustang, use a hose and wet the floor of the garage you are painting in. This will keep dust down and require less sanding in the later stages.
Paint Stripping
To truly get an even paint job, the first step is removing the existing paint. There are several ways to do that.
Sanding away the paint is one stripping method. Using a sander, the paint is simply stripped away. Sometimes this process is done by hand with block sanding methods.

Media blasting is a paint removal method that a licensed body shop can perform. Much like sandblasting smaller automotive parts, the entire body can be media blasted. This method has a lot of advantages. It's relatively quick, removes paint, rust, and any other surface imperfections and creates a surface that's more or less ready to paint.
Media blasting requires specialized equipment, and if done incorrectly, can damage the vehicle. So, there are some downsides.
Chemical stripping is popular, but is pretty gross to deal with. The stripping agent is applied like paint. After a time specified by the agent, you can scrape the softened paint away.
Types of Primers
Once the surface is clean and dry, it's time to begin the priming process. There are many types of primer, and most automotive paint jobs use at least three.
Epoxy Primer
Epoxy primer is best used on a freshly stripped surface. For an epoxy primer to get a good bond, the surface can't be completely smooth. Sanding with 120-grit sandpaper should be enough to allow it to adhere correctly.
Epoxy primer is hard to get in some places because it's a hazardous material. You should only use it in a well-ventilated workspace with a proper mask.
Self-Etching Primer
If you're doing minor paint touch-ups at home, self-etching primer is the primer for you. It sticks well to most surfaces. It's called “self-etching” because it uses acid to create a rougher surface to bond to.
Unfortunately, because of the acid, it doesn't mix well with epoxy primer or body filler. If you're using this primer, it's a good idea to research the chemical composition of the paint and any other body materials you may be applying.
Urethane Primer
A urethane primer is usually applied over epoxy or self-etching primer. It's not great at sticking to bare metal, but it is a perfect intermediary primer. It helps to create a smooth, even surface for painting. After this layer, your Mustang will look ready for paint.
Most people apply another layer of primer though.
Sprayable Polyester Primer
This is the final primer stage. It sprays over other primer layers and creates crisp lines that make your Mustang's body look nearly new. One of the great things about polyester primer is that it's sandable. It also works well with most paints and other primers.
Finishing Up with Priming
The final layer of primer should be a sandable, buildable layer. This layer will be block sanded with 800-grit sandpaper before painting.
What Not to Use
Oil-based automotive primers are available at every hardware store. You've likely seen someone in your neighborhood who used one of these sprays under a nice topcoat or epoxy primer. The end result isn't pretty.
Most paint experts recommend applying “like-to-like” primers and paints. Oil-based primers don't mix well with epoxy or self-etching primers. But they also don't provide a good base for any paint other than an oil-based one.
There are a lot of chemicals involved in paint and primer. If any of those chemicals don't mix well then you won't end up with a nice paint job.
The only time to use an oil-based primer would be if you were in a jam and needed to keep bare metal protected. Even so, you'd need to strip it off entirely before you put down your “real” paint.
Painting
Mustangs from the '60s and '70s were originally painted with acrylic enamel paint. This option is still available. Acrylic enamel is a great automotive paint to select if you're planning on doing the work yourself. Even with very little experience, these paints apply easily and gain a high gloss.
Unfortunately, acrylic has a few downsides. It chips easily and wears down quickly. Most automotive experts say that even a great acrylic paint job can only be expected to last five to ten years.
Most restored cars are painted with urethanes instead. While acrylic paint is air-dried, urethane uses a hardening chemical. This makes them more resilient, but also means applying them immediately is crucial. Urethane paint that's mixed and not used is wasted.
Urethane's other disadvantage is that it contains isocyanates. These toxic compounds mean there are a lot of safety precautions to apply a urethane.
To be fair though, it's all automotive paint. You should wear a respirator mask, gloves, and safety glasses regardless of which paint you select.
What About Authenticity?
Most automotive shows are fine with urethane acting as a substitute for acrylic. The acrylic paints made today aren't an exact match to the factory original anyway, so why not use the higher-quality replacement?
There are still some shows and standards that stand by acrylic. Corvettes are noteworthy in this regard.
Painting Layers
Several layers of base coat are applied after the Mustang has been primed. Most experts apply two to three coats of color paint. These thin layers get an increasingly fine-grade sanding in between each application. Though not useful for most home projects, 2,000 and 3,000-grit wet sandpaper is necessary to get the mirror finish you're looking for.
Each paint layer must be completely dry before adding the next one. Depending on the paint type, this can be a relatively quick or incredibly long process. Professional shops often have a curing oven where they can bake the paint on for a perfect finish.
Once the base coats are smooth and perfect, with the right degree of color saturation, stripes can be added (if you want).
Finally, a clear coat is applied to add a layer of UV protection for the paint.

Naturally, considering how much work goes into the finished product, you'll want to keep your freshly painted Mustang looking great. That's why many get car covers for their Mustang, even if they're garage kept. It's also important to take care of your paint coat with regular cleanings.
Check out our full Classic Mustang restoration guide to learn everything you need to tackle your next project.


