SSBC-USA Auto Trans Front Power Disc Brake Conversion Kit Mustang V8 65-66
Highlights
- For Automatic Transmissions
- Includes 4-Piston Calipers
- Direct Bolt-On for V8 Spindles
- Full Drum-To-Disc Conversion

SSBC-USA Front Power Disc Brake Conversion Kit for 1965-1966 Mustangs with V8 Spindles and Automatic Transmission.
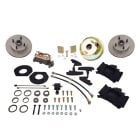
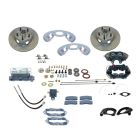
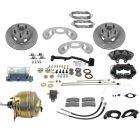
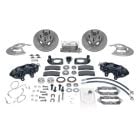
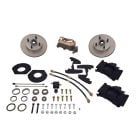
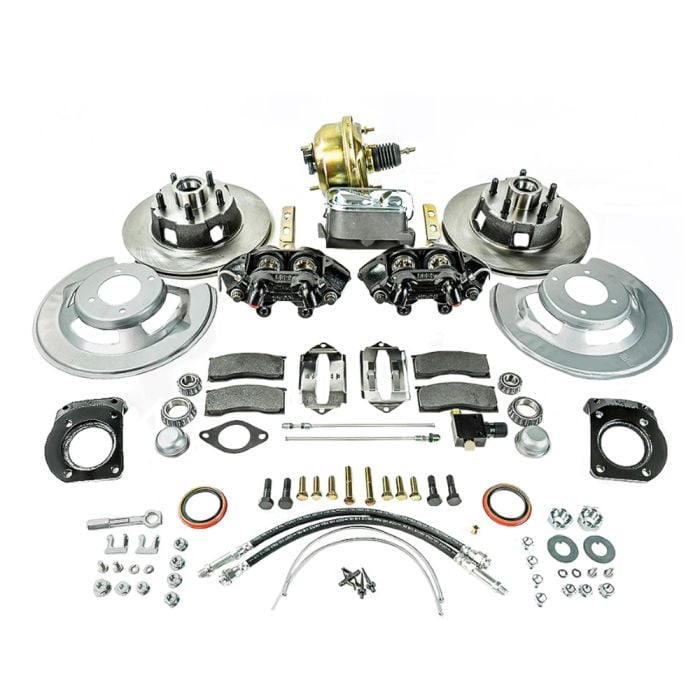
This conversion kit (A120-20) revitalizes the braking capabilities of your classic 1965-1966 Mustang. It guarantees improved stopping power and reliability. The kit transforms standard drum brakes into superior disc brakes. This American-made kit provides the seamless aesthetics of factory styling while enhancing functionality. The kit includes Kelsey Hayes-style calipers and a factory-style dual bowl master cylinder. The kit mounts directly onto your existing stock V8 5-lug drum brake spindles.
Features and Benefits:
- Maintains an authentic factory appearance
- Provides superior stopping power compared to drum brakes
- Enhances overall safety while driving
- Compatible with most 15” and original 14”x7” steel wheels
- Kelsey-Hayes original GT-Style 4-piston cast iron calipers featuring E-coat finish
- Premium black E-coat finish on calipers for added protection
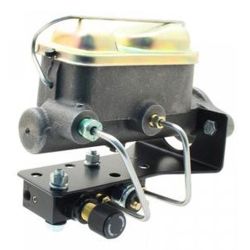
- Factory-style dual bowl master cylinder specifically for manual disc brakes
- Heavy-duty 11.25” vented rotors designed for optimal dissipating heat
- Includes mounting hardware, DOT flex hoses, splash shields, and backing plates
- Semi-metallic D11 brake pads and adjustable proportioning valve
- Bolt-on installation
- Made in the USA
Vehicle Fitment:
- 1965-1966 Mustangs with V8 Drum Spindles
California Residents: Proposition 65 Warning
Related Categories: Restomod Brakes

Installation Difficulty
Intermediate skill is required for this installation.
Installation Videos
Video Transcript
For this installation, you'll need a 1/2 inch ratchet, inch-1/4 socket, 3/8 ratchet, 3/4 inch socket, 17 mm socket, 9/16 deep socket, 9/16 shallow socket, 7/16 socket, 9/16 wrench, 9/16 stubby wrench, needle nose pliers, and a hammer. We're starting here with a bare spindle since we disassembled our drum brakes when we did our Suspension Kit. If you have any questions about how to take the drums off, just refer to that video. Everything is in there that you need.
The first two parts we're going to install are the splash shield and the caliper brackets, themselves. Both are side specific, so make sure you grab the correct ones. The splash shield is labeled. The bracket, you want the rounded end on the top and the threaded holes in the back. There are two different length bolts you're going to use. The top one and the front one are the shorter one. The longer one's going to go down here since the thicker part of the spindle's going to go through it. Now that we have our bolts in, we're going to install the nuts on the back. Once you have the backing plate and the bracket mounted, we're going to prepare your rotor. You're going to want to grease the bearings before you install them in the rotor. If you have access to a bearing packer, this will make it much easier; but if you don't, we're going to show you how to do it by hand.
What you want to do is grease the bearing by forcing grease through the bottom here so that it comes out through this top edge. The packer allows you to kind of fill it and push it all through at once. If you're not using a packer, you'll put some grease in your hand and kind of force it through that way. And yes, this is a very messy process. If you have it correct, you'll be able to look down and you won't be able to see through the bearing any more. This complete slot will be full of grease. That bearing's ready to be installed.
Now we're going to pack the small bearing as well, and they're both ready for installation. Some of the leftover grease on your hand, now you can put some inside the rotor. Put the large inner bearing in first. Now we'll put the oil seal in. You just want to lightly tap this with a soft hammer to install it, and we're ready to put the rotor on to the spindle. I'll install our rotor. Now I'll put the smaller outer bearing on followed by the retainer. I'm going to put the castle nut on. I'm going to thread this down so it's really not touching the retainer, just right in front of it, so hand tight. Now we're going to spin the rotor. Here you can use channel locks or inch-1/4 socket if you have it. You just want to slightly tighten it while you're turning the rotor. Then back it off a little bit.
The main purpose in spinning the rotor while loosening and tightening the castle nut is to properly seat the bearings. I'm going to tighten it again. I'm going to make sure it ends where it lines up so you can install the cotter pin. I'm going to loosen it up just a little bit more here. Ready to install our cotter pin. I'm going to put a little bit of grease on the dust shield to make it slide on a little bit easier. Now we're ready to load the calipers. I'm going to seat the brake pads inside the caliper so they're all the way on the outside. I'll grab the retainer. I'll make sure the pads are apart and tighten down the retainer. The last step before we mount the caliper on the car is to install our brake line. Remove the plastic fitting supplied with your caliper. Make sure you keep the washer in place. Then thread in the new one. Now you're ready to install the caliper on the car.
I'm going to put the caliper on over the rotor and line up the bracket. Now we'll tighten the bolts. Now we're ready to prepare our booster for installation. You want to start with the adjustable push rod that's included in the kit. You're going to want to thread that onto the edge of the booster for now. You'll connect this to your pedal once you install the booster in the vehicle. The next step is to install these brackets that mount to the firewall. Install on each side using the supplied hardware. Now we're ready to install the booster. It's going to mount right where your factor master cylinder was. Go through the firewall into your brake pedal bracket. You want to make sure your vacuum part is on the bottom. You'll need a wrench for this part. This bolts can be kind of hard to get to with the bracket. Once you get the bolts tight on your booster, now you're ready to bench bleed the master cylinder.
The next step of the installation will be to bench bleed the master cylinder and install it on the car. You only want to do that if you already have hard brake lines already running to the master cylinder location. In our case, we don't have hard lines yet, so we probably will just normally install this. We're going to show you to bench bleed it anyway so you can do your installation properly. SSBC includes these two plastic lines, these fittings, and this bridge to properly bleed the master cylinder. You'll need a vice once you put fluid in. We're going to show you how to assemble it first. We're going to put the small ends into the hoses. We'll install these in the ports in the side of the master cylinder. Turn them as you push them in. We'll install the bridge and put the hoses through it. Now we're going to go and install it in our vice. Now you want to fill the cylinder up with brake fluid about 3/4 of the way. Now using something like a screwdriver you're slowly going to push in and out of the master cylinder to get the air out. You want to keep doing this until you don't get any more bubbles. See, now we're getting a solid stream of brake fluid without any bubbles.
Our master cylinder's ready to be installed. We'll install the gasket on our master cylinder and put the master cylinder on to the booster. That's about as far as we can go with our installation until we get our hard brake lines run. We should mention this kit is designed to work with an automatic transmission. You can use it with a manual as long as you're not using the original Z-bar setup. Make sure you subscribe to our YouTube channel for more updates on the Forgotten Fastback.
Installation Instructions
-
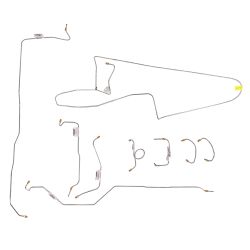 Classic Tube Brake Line Kit Complete SS Standard Disc Mustang V8 65-66 Dual Exhaust$161.99