Borgeson Power Steering Upgrade Kit Mustang 289 1965-1966
Highlights
- Tap To View 3D Model
- 14:1 Ratio
- Complete Kit
- Bolt-On Installation

And that's what I got. So happy, so much better than stock power steering. Great product!!!

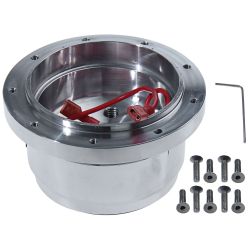
Borgeson Power Steering Upgrade Kit for 1965-1966 289 Mustangs.
Upgrade your Mustang's power steering with this quality power steering upgrade kit from Borgeson. Borgeson's steering box integrates the power assist into the assembly, allowing you to eliminate the power steering control valve and slave cylinder. The stock power steering system is notorious for leaks and providing a vague and over-boosted steering feel.
This kit features a sporty 14:1 ratio re-manufactured modern integral power steering gear box that provides benefits over a traditional rack & pinion conversion, while still offering a similar steering feel and an original look. Each box is carefully assembled, adjusted and inspected to standards that surpass OEM. Uses your existing Ford power steering pump. Does not increase the turning radius like most rack & pinion kits.
Installs easily with simple hand tools and without removing the engine. Features a 3 year manufacturer's warranty on the steering box.
Includes:
-Power steering box
-Power steering hoses for a Ford pump
-Steering coupler
-Manual steering center link (replaces control valve & center link)
-Replacement steering column shaft with floor mount
*Will NOT work with factory z-bar clutch linkage. Must use Borgeson's z-bar if you are using the factory clutch linkage.
*If you want to add headers to your 289/302 with Borgeson Power Steering our shop recommends using Tri-Y headers. Larger diameter headers may have clearance issues.
Order a Borgeson Power Steering Upgrade Kit for your 1965-1966 Mustang with a 289 Engine from CJ Pony Parts today!
California Residents: Proposition 65 Warning
Related Categories: Mustang Parts, Mustang Steering, Mustang Power Steering Conversion Kits

Installation Difficulty

Intermediate skill is required for this installation.
Installation Videos
Video Transcript
This Borgeson power steering upgrade kit's gonna be a direct replacement for the factory components on any 1965 through 1966 289 Mustang. It will be a direct bolt on for the automatic. However, if you stick shift car, you will have to get the Borgeson Z bar setup to work with your factory linkage. The beauty of the Borgeson system is this box here. The box itself has the power assist built into it. What that means, two lines only. One line to your power steering pump, one like back from the power steering pump. No slave cylinders, no control valves. More than likely, no leaks, as well.
The kit includes the box itself, new power steering lines a new steering shaft, and then a new center link to get rid of your factory power center link. It's a 14:1 box for a nice, sport feel without being over boosted. Again, it's gonna be a direct replacement and it installs with basic hand tools. Like I mentioned in the intro, this kit's going to install with basic hand tools, but you'll need a whole bunch of them, more than we're gonna list for this video, but a basically well-stocked toolbox. The only specialty tool you'll need is something to cut the steering column with. In our case, we used a large saw, but a Sawzall or any other saw will work, as well.
This is typical of your power steering system on an early Mustang. You can see the boot for the slave cylinder is all dried out and ripped. Leaks everywhere. Fluid everywhere. Gonna try to clean this up a little bit before we take it apart. Basically, yes, this is gonna be a mess because a lot of times, fluid gets everywhere with these original systems. First thing we're gonna do is start by removing the factory components we don't need. Now, in this case, we're gonna move the slave cylinder, then the control valve with the center link is all one piece. All that stuff comes off. We're gonna start by working on the back for the slave cylinder.
I'm gonna work on the idle arms and some of the other pieces of the suspension, so we'll start by removing all these extra cotter pins, then we need to remove the hardware. Now, we're gonna work on the fluid lines here. We'll lose some fluid when these come off, so you want to make sure you have drip pan underneath them. I'm gonna use pickle fork to separate the control valve from the arm. Now, I know there's special tools and other ways to do this. We're not trying to save the stock components. We know they're junk, so we're just trying to get them out of the way.
We're gonna remove the lines now at the control valve just to make it easier to get everything out of the way. Now, you can remove the center link with the slave cylinder and the control valve. Okay, now, we're gonna move forward with the hoses by removing the hose bracket. Now, we're gonna disconnect the lines up in the engine bay. You want to make sure it is a Ford pump. This will only work with the original Ford-style power steering pump. If it's an aftermarket pump or another style pump, the lines included with the kit are not gonna be correct.
Okay, and this secondary line is held on by a hose clamp. Okay, with everything out of the way, now we're gonna unbolt the steering box. There's three bolts on the outside of the frame rail. Remove these to unbolt the box. All right, on the 1965 through 1966 Mustang, the steering shaft comes up to the steering wheel, but it's part of the steering box assembly, so to remove everything from the car, we gotta remove the wheel so we can remove the column and then the shaft. We start by removing our horn button, so simply pop off, then remove the center bolt.
Sometimes, you get lucky. The wheel will pop off. Other times, you'll have to use a puller to remove it. Remove the turn signal stalk. Now, there's actually a little flat part here for a wrench. Ours is just hand tight. Just gonna try to remove it. Now, you want to go underneath the dash here. There'll be two harnesses you want to disconnect. In our case, our car had some of what we'll call creative wiring done at some point in time that we'll worry about later. You want to disconnect all the wires that are going up to the column, so we can separate the column from the steering shaft.
What we want to do now is very carefully pry the column tube off the shaft. Now you can remove the tube from the car. Now, unfortunately, with the 1965 through 1966 Mustang, this steering shaft is part of the steering box, so to get the box out of the car, literally, you have to either remove the entire exhaust the engine and tilt the engine, or in our case, since some of those components are junk and don't care about them, we simply cut the shaft out under the hood so we can pull it straight out.
All right, to install the column back in the car, what we're gonna have to do is actually cut the column tube because the size of the Borgeson box, plus we're adding a rag joint to it. The tube's gonna be too long with the factory configuration. Now, what you want to do ... You can do this one of two ways. You want to get the measurement from here down to the base which is gonna be an inch and three-quarters in our case. Now, if you want to, take that measurement before you remove the column for the car.
What we did here is just reattach the box and put the factory shaft right where it was to get that measurement correct. Now what we're doing here is now we're gonna line this up with the new shaft, and what we're gonna down here, this is gonna be the piece that is supplied by Borgeson that goes at the end of the column once you cut it. This has to be a sixteenth or less from the rag joint, so what we did is assembled everything here, basically got it touching. What we're gonna do is put this in there. Figure out what straight over is, and then make a mark.
Now, there will be some adjustment in the rag joint where it actually is seated once we get it installed which could basically take up about a quarter of an inch, so what you want to do with the tube is cut it a little bit short to begin with. Basically on the inside of our lines is about where we need to be, and if we have to, we can make adjustments and trim it later. Okay, now, we're gonna use our chop saw here to cut the column.
Now we're gonna assemble everything on the table again to make sure we're near where we're supposed to be. Everything's tight down here. We have a sixteenth of an inch gap just like is recommended. Now, what we'll do here is once again measure from that base plate. An inch and three-quarters just like the original, so we're good to go. While I'm working under the hood, Jeff's gonna remove these factory gasket from the firewall to replace with a metal sleeve included with the Borgeson kit.
When installing the new plate, there is only way it's gonna go. One tab will be up and the other one will be outside towards the driver. Okay, before we put the box in the car, we're gonna install the rag joint, and it only goes on one way. You want to be careful. Both sides will actually fit on. This side would be a lot looser, though. You're gonna put it on. Basically seat it all the way down. What I'm gonna do is remove the set screw and grab a marker and right where the set screw's gonna touch, I'm gonna make a mark on the splines. What we're gonna do there is grind the splines smooth so the set screw has a nice flat place to connect. Now, it's ready to go on the car.
You’re going to use the supplied hardware and I'm gonna reuse the original washer, and get some help here. Have someone hold the box in place and then you can line up the hardware and install it. Now do the same thing with the steering shaft. We're gonna remove the set screw and put the shaft in from inside the car, and then mark it. We're gonna do the same thing here. Right where we marked, we're gonna grind a little flat spot for the set screw. Then, I'll reinstall the shaft.
Before we put the column tube back in, there's this plug that goes in on the end here which is gonna go on the steering shaft. There's a screw to actually hold this in place. You want to put it on the top of the column because you may have to remove the screw to put it through the metal plate in the firewall, so make sure it's somewhere you can actually access it. Now, we're gonna take the column tube and actually put it over the steering shaft. Jeff's gonna do it from the inside. I want to make sure everything lines up out here.
Now, that's the way you want it to look like under the hood. The steering column tube has to come up to the rag joint. You want no more than a sixteenth of a inch between the rag joint and the column tube because if you don't, these studs here may not align properly when you're turning it and it could cause damage down the road. This is exactly how you want it to look. Now we're gonna bolt the column back up and move on with the installation.
Okay, now we can actually work on the hoses. We're gonna start with the pressure hose. Then the return hose. While I tighten up the hoses underneath the hood, Jeff's gonna put this band clamp on. This goes around the column at the bracket just to give you a little more support. Once all your hoses are connected and tightened down, you want to make sure they're not near the manifold or header. Give yourself plenty of clearance if you have to zip tie them out of the way. Just make sure that you have a smooth line for the return. It's not kinked, but again, keep it away from heat.
Gonna reinstall the screw that we put in earlier. All right, with the column installed before we go back underneath the car, we have to get an idea of getting the steering wheel somewhat in the center so we can set up the suspension, so what we're gonna do is put the spring on. I'm gonna reinstall the wheel and I'm gonna tighten it down. Just put it on enough to keep it from coming off so it stays on the splines, and then I want to measure the turns. Go all the way to the side. Our starting point is this facing up. One rotation. Two rotations. Three. Three and roughly three-quarters, so you'll want to do is basically figure out ... Start on the end here. Cut that in half. Go back to roughly where the middle is. Center the wheel and then it’ll go onto the car.
All right, so basically, we want go want to go one and a half, and three-quarters halfway’ d be right about there. Obviously, this will need an alignment when you're finished, but we want to get roughly in the center so we can get it close when we set up the suspension to at least make it drivable to get it to the alignment shop. We're gonna start by installing everything. No hardware. Just kind of get it mocked up. Just get an idea where everything's gonna go. I'm putting the pitman arm in. You want to make sure there are slots. Kind of want to make sure they line up.
I'll go back through and reinstall the cotter pins or install new ones I you have them. Okay, with everything bolted on underneath, now we'll move back up top here and fill up the pump. Okay, and we're ready to test our system. We're now gonna fire it up and make sure everything works. Everything feels good. Now, keep in mind with the Borgeson, it's a power assist kind of setup, so it's not gonna be over boosted like the factory where one finger, you can spin it. This has a really good road feel, but it gives you a nice amount of assistance so you still get the power steering feel, but still get a good feel for the road at the same time.
Everything's good. Now you gotta clean up the wiring underneath the dashboard. Tighten up your steering wheel and your installation's finished. The Borgeson power steering conversion's not the easiest installation, but overall, it's definitely worth it. That over boosted feeling's gone. Much, much better road feel, yet still the power assist that we were looking for. Now, as far as this installation goes, this is a power to power conversion. This kit's also available from manual to power, the difference being you're gonna add a power steering pump which is included with the kit and you'll add a two groove crank pulley which you'll have to purchase separately, but overall again, this is probably a weekend installation, but give yourself some time. Make sure you get aligned when you're done and you'll be back on the road in no time.