Drake Muscle Cars Hood Strut System AlumaLift Mustang V6/EcoBoost/GT 2015-2017
Highlights
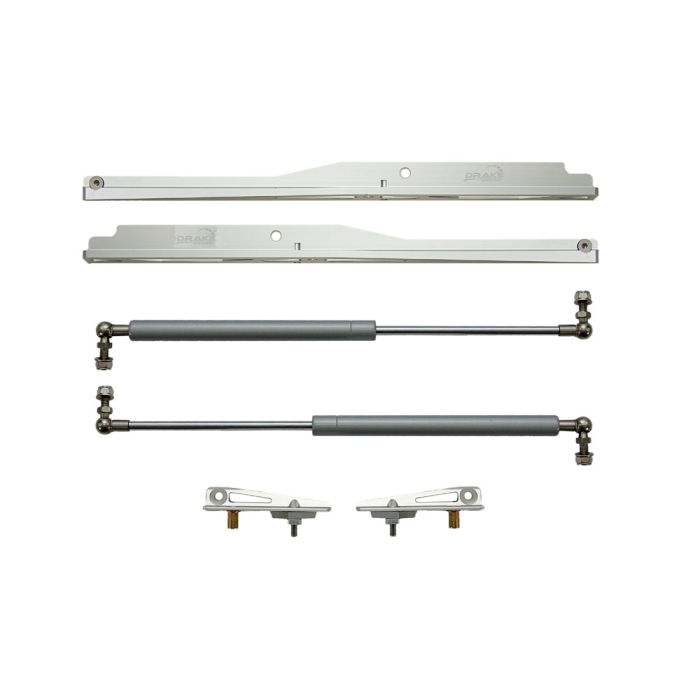
- Precision Tuned Gas Struts
- Extruded Aluminum Brackets
- Multiple Mounting Points
- Stainless Steel Hardware

Drake Muscle Cars AlumaLift Hood Strut System for 2015, 2016 and 2017 V6, EcoBoost and GT Mustangs.
Do you want to remove the flimsy factory prop rod and improve the look of your 2015-2017 V6, EcoBoost or GT Mustang's engine compartment? The AlumaLift Hood Strut System from Drake Muscle Cars is a surefire way to spruce up your S550 Mustang. It's a cutting edge system which provides smooth, controlled opening of the hood.
AlumaLift Hood Strut System FR3Z-16796/7-BL Features:
- Precision tuned gas struts
- Long extruded aluminum hood reinforcement brackets
- Multiple mounting points
- Heavy duty stainless steel ball and socket joints
- Includes stainless steel mounting hardware
The AlumaLift's gas hood struts effortlessly raise the hood then slow to a stop without any jerky movement. The multiple mounting points prevent your Mustang's aluminum hood from flexing or distorting. Unlike other hood strut kits that use weak plastic joints, the AlumaLift system utilizes stainless steel ball and socket joints that will last. Each system also includes stainless steel hardware and thorough instructions for a professional installation.
*Does not fit GT350 or GT350R models.
*Minor modifications to the plastic battery cover are necessary for pass-through of the fender bracket.
*We do not recommend using this kit on models outside of the U.S. due to the active hood safety feature.
Scott Drake has become an iconic brand that redefines quality for reproduction and aftermarket Mustang parts for 1964 to present Mustangs and has become the standard for OEM quality Mustang parts that offer the best fit, durability, and quality. CJ Pony Parts offers a wide variety of Scott Drake parts that have become so popular that many customers ask for them by name. Once you try their parts on your Mustang, we're sure you will too.
Buy this Drake Muscle Cars FR3Z-16796/7-BL AlumaLift Hood Strut System for your 2015, 2016 or 2017 V6, EcoBoost or GT Mustang from CJ Pony Parts today!
California Residents: Proposition 65 Warning
Related Categories: Mustang Hood Struts, Mustang Underhood Dress-Up, Mustang Hood Accessories
Installation Difficulty

Intermediate skill is required for this installation.
Installation Videos
Video Transcript
What makes the Scott Drake system a little more unique is going to be the bracketry provided in the kit. The Aluminum Lift System includes aluminum brackets for both the hood and the body of the car itself and a set of high-performance gas struts. All the hardware's going to be stainless steel as well. The difference here is the size of these brackets. What they're doing is they use a larger bracket to basically space the load of the strut out on the hood. A lot of people fear that a very small bracket puts a lot of strain on a very small portion of your aluminum hood. By spreading it out like this it's going to be a lot less dangerous. There's less chance of damaging your hood by installing the hood struts.
One unique thing about the Scott Drake kit is that is it's going to use rivnuts. You may not be familiar with what a rivnut is. What this is designed to do, is this insert is going to install in a hole you drill in the car and then when you thread a bolt in, it will basically make this fatten up here and hold it in place. This is designed to make an anchor point in a hole where you can't get in the back to put a nut. You will need a rivnut tool for the installation of this kit. Most of you are not going to have one. I personally don't have one either, but we found a way you can do it using basic hardware and it will do the same job as the tool.
For this installation you'll need a 3/8" ratchet, 10mm socket, 13mm socket, 4mm Allen key, 10mm wrench, 12mm wrench, 13mm wrench, silver marker, scissors, center punch, drill, 1/8" drill bit, 3/8" drill bit, homemade rivnut tool, and safety glasses. We're going to begin the installation on the passenger side of the car. The driver side is actually the easier side; the passenger's is a little more involved, so we'll show you this and then just repeat the process on the other side. The first thing to do is remove your battery cover. The first of the four rivnuts is going to be installed in this factory hole right here. To do that you first have to open this up to 3/8 of an inch. The next thing is going to be to actually install the rivnut. As you can see, make sure it fits in the hole first. We'll show you the tool that we made using some of the parts provided by Drake to allow you to install this. To install the rivnut insert we're going to use the bracket provided by Scott Drake that mounts to our fender. Then what you'll need is an m6x1.0 bolt. This one is 35mm long, but 30 to 35 will work ... a couple of washers, and a lock washer. What we're going to do is grab the washers. You only use 2 to 3 because you want it to actually be able to move; it's almost like a bearing.
Three washers on just through the larger whole on the end here, the lock washer, I recommend the star type underneath. Take the insert, the rivnut itself, what you're going to do is thread it on. What's going to happen is you're going to put the rivnut down into the opening, the hole we just drilled out, we're going to hold the bracket still and as we turn this bolt, it will actually bring this up, expand the rivnut and hold it in place. I do recommend, unless you have really strong hands, get somebody to help you for this part. Have somebody hold the bracket for you and then have somebody turn the bolt to install the rivnut.
You could do it yourself if you wanted to, but you really got to hold this tight. It's easier to have one person hold the bracket and have the other person actually wrench it on. You want to make sure you hold it flat against the fender. What will happen is it will turn fairly easily at first and then it'll reach a point where it gets extremely tight. At that point the nutsert is mounted and it's fine. You can remove it. Just back it off; unthread the bolt and you're insert is mounted.
Now we want to move on to the bracket for the hood side. The first thing you want to do is remove these little plastic clips. Just rock them back and forth and they'll come out pretty easily. That's basically going to get that out of the way. What we're going to do here is we're going to remove this bolt, this nut, I'm sorry, all the way off. Then this nut here, you're going to loosen it to the very edge of the threads. That one all the way, and this one down to the edge of the thread. This is a Scott Drake Hood Bracket. It's going to spread the load over three mounting points. The stud we removed with the nut is going to go here; the loose one's going to go here. We're going to mark this and add another nut insert up here. First thing we're going to do though is get it in place so we can mark our hole to drill out for our rivnut insert.
We'll use a marker and mark the hole, then remove the bracket so we can drill it out. I'm going to start by center-punching the hole. I'm going to use a power drill to drill the 1/8" hole first then we'll open up the 3/8s. With these holes it's very important to have a stop on your drill bit. I'm using tape to make one on here and do the same with my 3/8 bit. Make sure you don't go too far; it'd be very easy to push through this and go right through the outside of your hood. I want to check the hole to make sure it's the right diameter, and then we'll install another rivnut.
We're going to install the rivnut the same way we did on the bottom onto our hood. I want to mention, when you do your driver's side, make sure you do this part first and then this. That way you have this bracket available to you to use as a tool. Now we're ready to install the bracket for the fender. It's going to set-up like this when it's installed. This piece here, this little retainer, will go down in the hole and retain it. If you look, there's actually a small groove on the space here to fit that in there. Then the rivnut we installed in the front, will get a bolt through that. Make sure you get everything you started loose before you try to tightening anything down.
Now we can install the hood strut itself. You want to have the body of the strut on the hood part; the thinner part goes down here. This is going to face towards the engine. I'm going to lift the hood; make sure this is on the outside. Now I'm going to go back through and tighten them up. This install might be a little more involved than your typical hood strut install, but you want to take note here the quality of this kit. This is a single hood strut installed and it's holding the hood up without any problem. Now we'll locate our washer hose. We'll start by popping the clip off on the bottom one. The tops going to go right there and there's a hole right here on the side for this. So what I'm going to do is put the clip in actually first, re-position the hose and then lock it in.
The last step on the passenger side is going to be to cut our battery cover. This template is provided. Basically that hole goes over this and this cut-out section here's what we have to modify. The template's sitting on rubber so you want to make sure you have this flat as possible. What I'm going to do is basically use a marker. We're going to start by trimming that section there that we just marked. You want to start obviously small. You don't want to cut more material than you need. If we have to open up a little more, then we will. We're going to start by trimming the rubber section here just by using scissors. Plastic is obviously going to need something a little sharper, but we can start by getting this section out here.
Now you can put the cover back on. It's sort of a little bit different. You are going to start in the back and then slide it up on the bracket here. When we get the clips installed that'll sit nice and flush and we look good. We're going to install the other two clips for the battery cover. Then repeat the process on the driver's side. Like I said, it's much easier. No washer nozzle, no battery to deal with. Just install both brackets, bolt it on and your installation's finished. I did say your installation's finished, but in my opinion it's not completely finished until you remove the unneeded prop-rod. Now your install is finished. I showed you one strut will obviously keep the hood up, so both is going to do a great job. It's not real heavy though. You pull it down, it's got a nice weight to it. Again, like most hood struts, get it about half-way up, let go. It's going to go all the way to the top and slow down at the bottom.
The Scott Drake installation is a little more involved than your typical hood strut. They are putting a lot more of the weight ... they're spreading it out evenly along the hood which is probably a better install overall, especially from an engineering standpoint. Overall though, it might not be a beginner installation because of the rivnuts, but take your time and give yourself a couple hours and you'll be back on the road in no time.


