
Maintenance Guide for C10 Trucks
Last Updated August 21, 2024 | Meghan DrummondAn important part of keeping any vehicle in working order is sticking to a well-defined maintenance schedule, and this is especially true for classic pickups like the C10. Unfortunately, as these vehicles have gotten older, it’s become increasingly difficult to find detailed maintenance schedules.
Based on the combined owner and service manuals for all of the years that the C10 was manufactured, this is a good maintenance guide that will make sure that your C10 is being checked properly and that you’re catching problems before they occur.
This is a guide we’ve collected and assembled, but obviously, there are peculiarities for each individual year that may affect this guide slightly.
Clicking on each individual item will take you to a detailed breakdown about what the manufacturer recommended and what tips and tricks we’ve seen that make these steps a little easier.
Related: If you need to know where to jack up your truck for any of these maintenance tasks, check out our guide detailing the jack points on a C10 truck.

- Check Fluid Levels
- Check Clutch Pedal
- Change Engine Oil
- Lubricate Necessary Parts
- Tire, Wheel, and Disc Brake Check
- Exhaust System Check
- Check Cooling System
- Fuel Filter Replacement
- Drive Belt Check
- Drum Brake and Parking Brake Check
- Bumper Check
- Air Cleaner Check
- Carburetor Check
- Spark Plug Check and Replacement
- Crankcase Ventilation Valve Check
- Air Cleaner Replacement
- Wheel Bearing Repack
- Manual Steering Gear Seals Check
- Automatic Transmission Fluid and Filter Change
Once a Year or Every 7,500 Miles
Once a Year or Every 15,000 miles
Every 18 Months or 22,500 Miles
Every 30,000 Miles
Every 100,000 Miles
Fluid Levels Check
You may or may not need to refill any or all of these, but this is a quick list of the fluids that you should check as part of your routine maintenance. The manufacturer has provided their approved choice for what fluid to use, and in some cases, it’s necessary to use the recommended fluid in order to get the best service out of your vehicle or maintain proper functioning.
Brake Master Cylinder
Check the fluid in each reservoir and maintain a quarter inch below the lowest edge of each filler opening.
Automatic Transmission Fluid
It’s easy to overfill the automatic transmission fluid if you check it when the transmission is cold, but overfilling can cause foaming and damage. It’s recommended that you check your transmission fluid when the vehicle is running, but while in park and while level.
Manual Transmission Lubricant
Check lubricant and add, if necessary, to level with filler plug hole. Use SAE 80W GL-5 or equivalent lubricant.
Windshield Washer Fluid
Don’t fill to full if freezing weather is expected, but do use a fluid that can resist freezing. Honestly, we’ve seen tips about adding rubbing alcohol or vodka to water to keep it from freezing, but that ends up being more expensive than just buying windshield washing fluid and also it smells bad and will almost certainly get you pulled over. Also, in a pinch, you can use just water, but it won’t clean as well and if it freezes it can cause extensive damage. In cold climate, we recommend against that unless absolutely necessary.
Coolant
There is no need to remove the radiator cap. Just look through the recovery tank and be sure that it is at “Full Cold.” If needed, add ethylene glycol antifreeze and water in a 50/50 mixture.
Power Steering Fluid
If warm, the power steering fluid should reach between the hot and cold marks on the filler cap indicator. If cool, the fluid should be between "add" and "cold" marks. This fluid doesn’t need to be changed so long as there is an adequate amount in the reservoir.
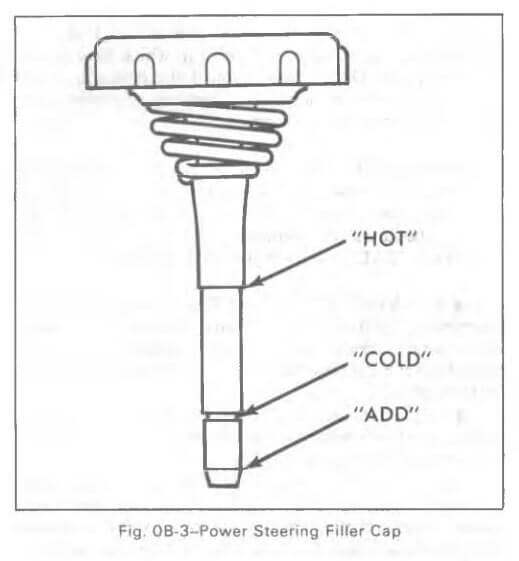
Power Steering Filler Cap Indicator
Rear Axle Lubricant
Check the lubricant level, and add lubricant to fill to level of plug hole. Use SAE 80W GL-5 Gear lubricant, the same lubricant required for manual transmissions.
Check Clutch Pedal
Obviously, this only applies to people who have a manual transmission C10. The clutch pedal should have one and a half inches (approximately) of free play. If there is none, or simply too much resistance, then the clutch pedal will require adjustment.
Check the clutch pedal bushings to see if there is a reason for sticking, or if there’s been excessive wear. If they look fine then go ahead and make an adjustment.
First, disconnect the return spring at the clutch fork, then rotate the clutch lever and shaft assembly until the clutch pedal is pressed firmly against the rubber bumper of the brake pedal bracket.
Then, you will push the outer end of the clutch fork backward until you feel the release bearing make contact with the pressure plate fingers. Once you feel that, you’ll loosen the lock nut and adjust the rod length so that the swivel slips freely into the gauge hole. Increase pushrod length.
Remove the swivel from the gauge hole and insert into the lower hole on the lever before installing two washers and a pin. Then, tighten the lock nut and reinstall the return spring.

Clutch Pedal Assembly
Oil Changes
Oil Filters
Oil Filters will need to be changed along with oil every other oil change. The manufacturer recommends only using SE quality engine oil, and not using additives.
Oil Viscosity Recommendations
It’s recommended that you base the viscosity that you need on the estimated temperature ranges for the area you’ll be driving in, with the caveat that 5W-20 oil is not recommended for high-speed driving.
In weather that averages 20 degrees Fahrenheit and under, 5W20 or 5W30 is recommended. For weather ranging from 0 to 60 degrees Fahrenheit, 5W30, 10W30, or 10W40 is recommended. Oil that is 20w-20, 20W-40, or 20W-50 can be used for temperatures ranging from 20 degrees Fahrenheit to over 100.
Lubrication
Steering Linkage and Suspension
Check your front and rear suspension and steering system for loose or missing parts while ensuring that all parts are properly lubricated. While lubricating, be sure to check your control arm bushings and ball joints for wear. Lubricate tie rods, upper and lower control arms, and ball joints.
Hood Latches
Lubricate hood latch assembly after cleaning off any dirt. Apply light engine oil to all pivot points, lubricate hood hinges, and make sure that hood hinge and latch assembly is fully functional and free of any sticking points.
Hinges
The most important hinges are the ones on the doors, the fuel filler door, the door lock striker, and all door jamb switches. Just like with the hood latch, you’ll want to first wipe away contaminants and dirt and then use a light lubricant, whether that’s WD-40 or a light engine oil.
Chassis
There are several points you’ll want to check the lubrication of, which you can see on this diagram. You’ll want to lubricate the lower control arms, upper control arms, upper and lower control arm ball joints, the steering shaft, tie rod ends, wheel bearings, steering gear, air cleaner, master cylinder, transmission, throttle bell crank, carburetor linkage, brake and clutch pedal springs, universal joints, and the rear axle, some of which may require removal of the truck's bed. If that sounds like a lot then you now understand why mechanics charge a fair amount for routine maintenance, it is a lot. Fortunately, you’ll only have to do this once a year, and it’s a great opportunity to spot any problems before they arise.

Lubrication Points
Tire, Wheels, and Brakes
Tire rotation should be done “as needed” so you should be sure to check your tires regularly to see if they are sustaining a lot of wear and tear and need to be rotated or even replaced. If you are frequently driving your C10 at 75 miles per an hour or more, you should increase your tire pressure inflation by approximately 4 psi.
Brake pads should be checked frequently as well to make sure that you’re able to stop when you need to. You should also check your brake lines and hoses for any leaks or cracks. If you’re having frequent issues with your brake lines, you may need to replace your stock brake lines with aftermarket ones.
Check the surface condition of the rotors while your wheels are removed, and look at wheels to ensure that they’re neither bent or cracked and that they’re tightened to 65-90 lb-ft of torque. This is also a great time to clean your wheels thoroughly.
Exhaust System
You’ll want to do a complete inspection of your exhaust at least once a year. This is primarily to check for broken or damaged parts, but your exhaust can also give you a lot of clues about what’s going on inside your C-10. Run your engine (in a well-ventilated area) and check the quality and quantity of your exhaust while noting any unusual odors or smells.
Exhaust repairs should be made immediately.
Cooling System Check
Only check coolant when the engine is cool. Cooling system fluid should be maintained at one inch below the bottom of the filler neck of the radiator when the cooling system is cold. The coolant level in crossflow radiators should be maintained three inches below the bottom of the filler neck.
As part of your once a year maintenance, the radiator cap and filler neck should be washed with clean water, and the system should be tested for proper pressure, which is 15 psi. If your cap is unable to maintain this pressure then it needs to be replaced.
Tighten hose clamps and inspect hoses for any points of swelling or deterioration and replace as needed.
Every two years the cooling system should be flushed with plain water and then completely refilled with a fresh solution that will provide freezing protection to -20 degrees Fahrenheit at minimum (obviously if you live in an area that gets colder than that regularly, you’ll want to ensure it can get colder than that).
Fuel Filter Replacement
There are two fuel filters on your C10, but you only need to replace one of them yearly. The filter you’ll be replacing is a pleated paper fuel filter located in the carburetor fuel inlet. A woven plastic fuel filter exists in the fuel tank on the lower end of the pickup pipe.
Fuel filters exist to keep dirt, rust, and other particulates from making their way into your engine where they can cause a whole bunch of problems. You’ll want to check your fuel filters regularly to ensure that they haven’t become clogged.
Thankfully, replacement fuel filters are inexpensive, especially when compared to the cost of repairing an engine. While you are replacing the filters, you may want to consider a full gas tank relocation as well to increase safety and ease of access.
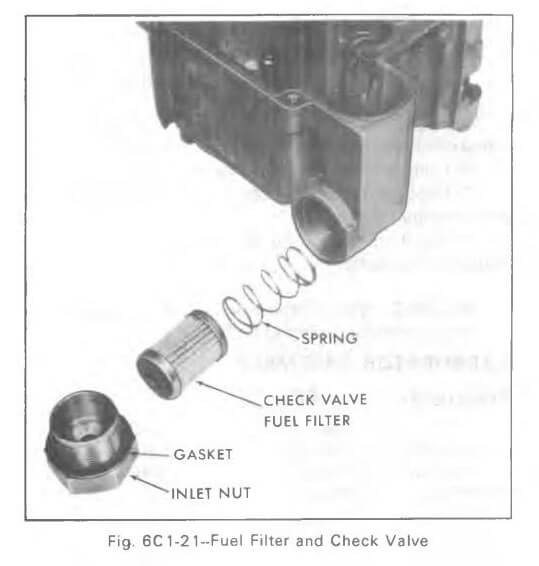
Fuel Filter Location
Drive Belts
At least once a year, you’ll want to check the various drive belts of your C10 to ensure that they have adequate tension and that there aren’t any visible frays or cracks.
The driving belts you’ll need to check are the ones that operate the fan, air pump, generator, power steering pump, and air conditioning compressor (if applicable). Each of these have a specific tension that they should be tightened to, and they should not be tightened any further than that.
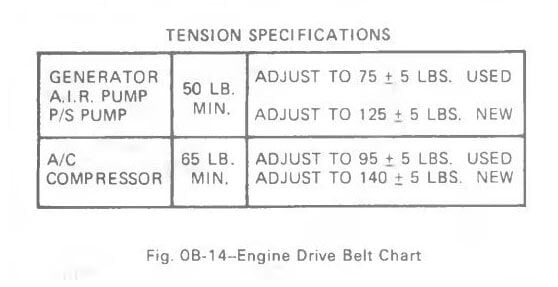
C10 Belt Tension Specifications
Spot Checks
Drum Brake and Parking Brake Check
Check for undue wear or cracks. Adjust as necessary.
Bumpers
Check bumpers for any issues with positioning or to see if there’s been any damage.
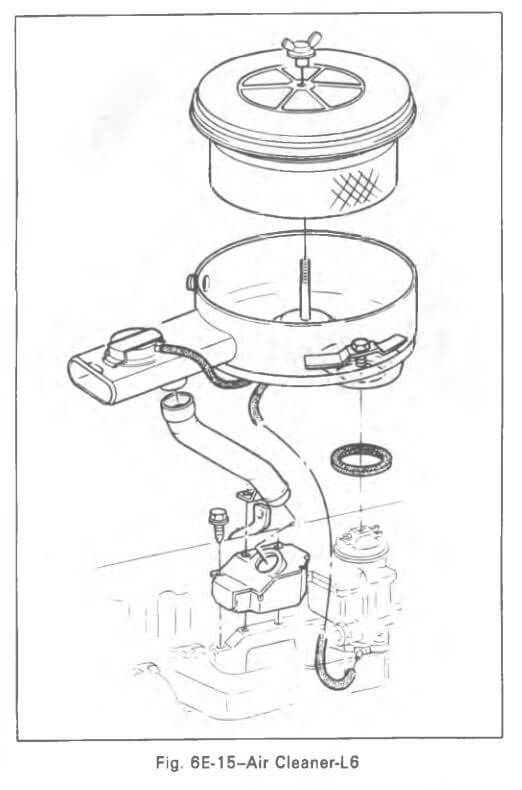
Air Cleaner Check
Once a year, you’ll want to check your air cleaner systems to be sure that all hoses and ducts are connected. In order to make sure that your air cleaner is functioning, you’ll want for it to be cool. If your engine is warm at the time of the check, you should remove the air cleaner and allow it to cool down to room temperature before conducting your check.
Once air cleaner is cool, reinsert and start the engine with the hood still open. As the engine warms up, the damper valve should slowly open. If it doesn’t, then locate and correct the cause of the problem, which is most likely an overly clogged air filter or dirt or debris lodged around the valve.
Spark Plugs
Clean the wires and remove corrosion on terminals, which can be done with a plain wire brush. If you see any burns, cracks, or damage, you will need to replace the spark plug wire.
Spark plugs may need to be changed at this interval, depending on the spark plugs you’re currently using. Though this is the manufacturer’s recommendation, spark plug changing times can vary based on the type of spark plug. Check this spark plug guide for complete steps to check performance and whether or not they need to be changed.
Carburetor Choke Check
The choke shaft must be checked to make sure that petroleum gum hasn’t formed on the choke shaft which can impede its movement. Otherwise, clean periodically with a combustion chamber conditioner.
Torque the carburetor mounting bolts or nuts as appropriate. If your carburetor has stopped working over time, you may also want to consider installing a new C10 carburetor.
Crankcase Ventilation Valve
Replace your oil fill tube breather cap and ventilation regulator valve assembly. While doing this, inspect the rubber fittings to see if they need replacements or cleaning.
There are direct replacements available for the breather cap, or you can get an improved one designed for either racing or underhood dress up.

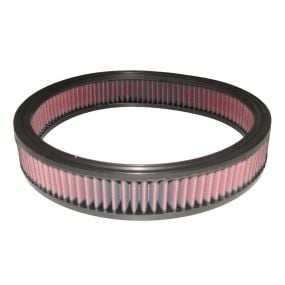
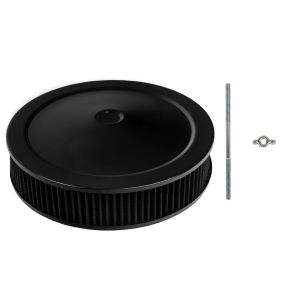
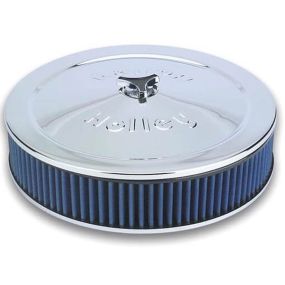
Air Cleaner Element Replacement
Inside of your C10’s air cleaner is a ring of pleated paper that’s vaguely reminiscent of a coffee filter, but in addition to filtering the air that enters your engine, an air cleaner also helps to direct the air as it enters. This improves an engine’s power and fuel economy, but naturally, as they get dirtier they’re less able to do their job.
You’ll want to replace the paper element at regular intervals. This replacement is fairly easy, and simply involves removing the air cleaner cover, taking the old element out, and installing a new one before replacing the air cleaner cover.
If you’d prefer, there are air filters manufactured now that allow you to reuse them, and some can go as long as 50,000 miles without even requiring a cleaning.
These work with the original electronics, and are essentially a drop-in improvement. If you prefer, you can get a whole new air cleaning apparatus that still includes a reusable air filter.
C10 Air Cleaner Element

Wheel Bearings
A lot of things can go south if you let your wheel bearings get overly worn. A good way to avoid that is to clean and repack your wheel bearings with lubricant at regular service intervals. To clean wheel bearings, use a cleaning solvent and a small brush with no loose bristles.
Despite what some have suggested, compressed air is not recommended since it could damage the wheel bearings. Either dry with a soft microfiber cloth or allow to air dry.
Use a cone style grease packer to force grease into the bearing, otherwise pack wheel by hand.
Manual Steering Gear
The steering gear’s lubrication should last the life of the vehicle and doesn’t require a seasonal change. What it does require is regular inspection for seal leakage, which can be identified by actual solid grease.
If a seal needs to be replaced, then it will also need to be refilled with appropriate steering gear lubricant.
Automatic Transmission Fluid and Filter Change
Approximately six pints of fluid will be required to refill the automatic transmission after you’ve drained the fluid.
To drain the transmission fluid, first you’ll need to raise the vehicle and support the transmission appropriately. Put something for the fluid to drain into underneath the transmission’s oil pan and then remove oil pan’s screws. The oil pan will still need to be pried off. The gasket will need to be discarded.
You’ll need to drain the fluid, clean the pan and dry it, and then install a new gasket. Then, reattach the oil pan. Lower the vehicle and add the Dexron II transmission fluid. Finally, you’ll run the engine while your C10 is in park.
Move through each of the available selections, from park to drive, reverse, and neutral, and then check the automatic transmission fluid again and add as much as is necessary while being careful to not overfill the reservoir.
These basic maintenance procedures can greatly extend the life of your vehicle, and by planning them out in advance, you can make sure that you’re maximizing the efficiency of each check. There is also a lot of vehicle maintenance that is harder to schedule, but equally important.
Cleaning out the inside of your car, for example, can keep it looking fresh, and patching up a sagging headliner is an easy way to make your car look like new again. Likewise, keeping your car waxed can help to protect the clear coat from UV rays and keep your Chevy C10's paint from peeling and creating space for rust to set up shop.
It takes work, but maintaining a classic truck is worth it. If this seems like a lot to keep up with, consider printing this handy guide that you can keep in your glove box so that you can easily remember when you should, and when you actually did, each of these tasks.
If you're looking to spend some of the money you saved by doing the maintenance yourself on some upgrades for your truck, check out our article on 5 affordable Chevy C10 mods.


Image Credit: Chevrolet, Bring a Trailer


