Taillight Bezel Chrome Kit Mustang 1968
Highlights
- Restoration Kit
- Chrome Plating
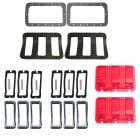
- Six Bezels and Pads
- Includes Mounting Hardware


Chrome Taillight Bezel Kit for 1968 Mustangs.
CJ Pony Parts offers this complete restoration Chrome Taillight Bezel Kit with six bezels, six pads and twelve mounting studs to get your 1968 Mustang back on track. These reproduction bezels fit directly into place for smooth appearance that will restore the functionality of your taillights. Unlike most aftermarket parts, these bezels are chrome-plated for a clean and crisp addition to your rebuild.
Features and Benefits:
- Complete Set of (6) Bezels
- Includes Bezel Pads and Hardware
- Direct-Fit Replacements
- Chrome-Plated
Includes:
- Chrome Taillight Bezels (6)
- Taillight Bezel Pads (6)
- Mounting Studs (12)
California Residents: Proposition 65 Warning
Related Categories: Mustang Parts, Mustang Lighting, Mustang Taillights, Mustang Taillight Bezels
Installation Difficulty

Novice skill is required for this installation.
Installation Videos
Video Transcript
For this installation, you'll a quarter-inch ratchet, an 11/32-inch socket, a Phillips head screwdriver, crimping tool with solderless connects or a soldering iron with solder, wire strippers, and a multimeter.
We're going to be installing our taillights on this '67 Mustang. The original lights have the typical wear and tear seen on an older car making it a perfect candidate for an upgrade. The first step is to open up your trunk to access the taillights. The first step is to remove the factory taillight bulb. It's held in place by springs, just give it a little bit of a shake and it'll pop right out. This bulb is all that currently powers our taillight. Upgrade to the Scott Drake three-lights we should see a significant improvement in light output.
The taillight bezels are held on by these studs that go through the taillight body. There's going to be one stud, top and bottom, for each, each with a retaining nut. We want to remove those, so we're going to take the bezels off and remove our housing. Many times when you go to remove the nut, the whole stud will actually come out of the bezel. This is perfectly normal. It's nothing to worry about. Now we're going to remove the studs. We're going to remove our original bezels. Now we can remove our taillight body. It's been on here for a while. The seal might stick. It's usually easier to push the lens from the outside, pop it through. You can see by the condition of our gasket and the corrosion starting on our taillight body it's a good time for an upgrade.
We're going to be using all new parts for our installation. I'm still going to show you how to take apart your original in case you're only replacing a couple pieces. The first step is to remove the large thick gasket. You want to pull on the corner a little bit to get it loose, possibly use a screwdriver to pry on the edge to get a good grip on it and you remove it. Now we'll remove the six screws that are holding in the lens and remove your lens.
Now we're going to start assembling our new taillight assembly. You want to make sure you have the taillight assembly in the proper position before you install it. The part that sticks out the furthest is going to be the top, so you want to make sure you install the lights facing up. The first step is going to be install your Scott Drake three-light conversion. Twist all the wires together to make it easier to put through the hole in the back of the taillight body. Next, we'll install our taillight gasket, just lays over the bottom of the body. Now we'll install our taillight lens. Again, make sure the lens is installed with the contour matching the contour of the body.
Now we're going to install the screws that hold the lens to the body. Your two outside ones are going to go through the lens, the gasket, the taillight conversion, and then into the body. It may be difficult to line them up. You may want to use a pick just to get everything aligned before you try to put your screw in. You want to get these screws snug. You don't want to over tighten them since you're screwing in the plastic.
Once you finish installing the six screws that hold the lens to the body you're ready for the body gasket. The body gasket is going to have six holes here. These are where the studs from the bezels are going to go through to the body. You want to make sure before you install it that the holes are punched through using a punch. Again, you want to make sure you install the body gasket with the proper contour matching up to the side of the taillight body. You want to get it seated as far down as possible. Don't worry if the edges are up a little bit or this is sticking up here. As soon as we attach it to the body all this will flatten out.
Since we now have a harness coming through the back of our taillight body where the original bulb was going to be, you want to install a grommet. Scott Drake provides the grommet with their kit. The grommet's solid. You want to cut a small X or a small circle in the center to fish the wires through. Now I want to get the bezels ready to be installed. You want to make sure the gasket is seated properly and install the threaded rods into the bezels.
Now we're ready to reinstall our housings and our bezels. You usually find it easier to put the middle bezel in first and grab your taillight body, line it up. Put the nuts on lightly just to hold it in place. You can install the other bezels, make sure your gasket is seated. Once everything's in place, then you can grab your socket and tighten down the nuts.
Now we need to wire up the three bulbs. To separate the two out, all your red wires are going to go to your parking light wiring, all your colored wires are going to go to the wire that runs your brake lights as well as your turn signals. We cut off the factory taillight plug leaving us with this black wire and this green wire with the red stripe. We need to figure out which one we need to connect to which side of our taillight. You want to turn on your meter to see which one of these two wires is getting 12 volts with the parking lights turned on. Check the green wire. See we're getting 26, that's the wrong one. Check our black wire, confirm we're getting 12 volts. That's the one we're going to connect to our parking lights, meaning the other one is going is to be for our brake lights and our turn signals.
While it's never a bad idea to solder all your connections, the case of our taillight wiring a solderless connector will work just fine. At this time, we've only installed the three-light conversion on the driver's side so you can really see the difference between the driver and the passenger single bulb conversion. For starters, your parking light is going to be much brighter. In addition, the brake light as well as the turn signals will be noticeably brighter.
As you can see, simply changing out the bezels and the lens has made a huge cosmetic upgrade for the back of our Mustang. The addition of the Scott Drake three-light conversion, we're not only getting a cosmetic upgrade, we're getting a safety one as well. Installation should only take you between one and two hours, so you'll be back on the road in no time.
Installation Guides
Vehicle Fitment
This product will fit the following Mustang years: