TMI Headrest Kit Mustang Standard/ Deluxe/ Pony 1965-1967
Highlights
- Tap To View 3D Model
- Direct Fit Upgrade
- Premium Quality Vinyl
- French-Seam Stitching


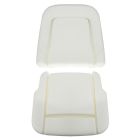
TMI Headrest Kit for 1965-1967 Mustangs with a Standard, Deluxe or Pony Interior.
Add some style while maintaining proper safety as you cruise around in your 1965-1967 Mustang! Upgrade to the Headrest Kit from TMI. Designed specifically for a Standard, Deluxe or Pony Interior, TMI provides you with everything you need in this kit to easily mount your new headrests into place for a fantastic upgrade with minimal work.
Features and Benefits:
- Includes a Pair of Auxiliary Headrests & Mounting Hardware
- Sierra Grain Vinyl Material
- Increases Safety & Overall Style
- Maintains Original Shape
- Increased Durability
- Easy Bolt-On Installation
- Available in a Variety of Color Options
- Made in the USA
This kit from TMI includes a pair of auxiliary headrests, one of each of your front bucket seats, as well as the correct mounting hardware that you'll need to install them into your classic Mustang's interior. Made with a thick, Sierra Grain vinyl material, these headrests will not only improve your overall safety but also the style of your interior.
Completely made in the USA, TMI's headrests are much more durable than their factory counterparts and will maintain their original shape over time. They also feature a true bolt-on installation, so mounting them to your Pony's interior will be fast & simple.
*These headrests will NOT fit TMI's Sport seats.
California Residents: Proposition 65 Warning
Related Categories: Mustang Parts, Mustang Interior, Mustang Seats, Mustang Headrests

Installation Videos
Video Transcript
For this installation you'll need a panel removal tool, 3/16 Allen key, a pick or an awl, razorblade, flashlight. If you have to modify your seat frame, you'll need a drill and a 5/16 drill bit and safety glasses. We have the seat out of the car to make it easier for you to see the installation. While it's easier to have them out, you actually can do it inside the car if you don't feel like removing your seat.
The first step is going to be to remove the seatback. The seatback is held on by door panel stock clips. Simply pop them up with your panel removal tool. Carefully work your way around the outside edge. We'll put that aside. This is a bracket for the headrest. We removed the hog rings from the top of our upholstery so you can get a better view of actually what we're doing. You don't have to do this for installation. This would make it easier for you to see. The bracket is going to slide in. You're going to put bolts from these two holes to hold the bracket in place. These holes are already open in the upholstery.
This is where the two of your top clips go for your seatback. On some seats provided hardware may not fit through the hole properly. If that's the case, you want to grab a 5/16 drill bit and open up the holes. We can install the brackets and install the hardware. We'll install the nut on the back and tighten them down. Now you want to grab an awl or a pick. I'm going to go straight up through the bracket to where it's installed and go straight up through these holes and poke holes through your seat foam and your seat upholstery. Now you want to find the holes and have a sharp knife and make an "X."
I'm going to cut a little bit smaller the first time. You can always open it up a little bit if you have to. If you cut too much off it's not going to look great. There's two different plastic inserts that come with each side. One has this little release which will allow you to adjust the height. We're going to install that one first. I'm going to make sure this lever is facing towards the inside of the car and the metal tab is at the bottom so the seat will release properly. I find it's best to use something like use your awl or another tool, come up from the bottom to line the hole up. Widen that over and then work it down into place. We're going to be going through some foam and the material you cut out that can take a little bit of work sometimes to get it into place. Before we put the seatback back on, we're going to install the headrest, make sure it works properly and clears back there and move it up and down, straight up and down or ratchet it. We're ready to reinstall our seatback. Line up all these original holes and push the clips back in.
The headrests do a great job with finishing off our Sport seat. The adjustability should make them comfortable for everybody, plus the added security is also nice as well. Installation will take you around an hour per seat. You'll be back on the road in no time.