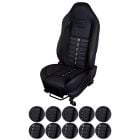
TMI Upholstery With Seat Foam Sport R500 Series Seat Vinyl Black Mustang 2011-2012


TMI Sport R500 Series Seat Black Vinyl Upholstery with Seat Foam for 2011 and 2012 Mustangs.
Re-style your Mustang's seats with a set of TMI's 2011-2012 Black Vinyl Sport R500 upholstery. Whether you need to replace just your front buckets, or your car needs a full upholstery overhaul, TMI's Black Vinyl Sport R500 upholstery set will surely fit your budget and cars style. Not only will you receive visually impressive upholstery, but included with all of the below listed kits is brand new seat foam to help your tired or worn out seats feel better than the day your car was new.
Sport R500 upholstery and foam will utilize the original GT seat frames while adding an aggressive style for more stability and comfort for you. TMI's upholstery offers excellent quality and amazing value. Featuring huge side bolsters on both the lower and upper portion of the seat and high-quality black UniSuede inserts integrated into the premium black vinyl sides. Contrast stitching runs around the perimeter of each seat along with a pair of contrasting rally stripes that flow throughout the middle of the upholstery.
Features and Benefits:
- Dramatic, Race Inspired Styling
- Includes New Seat Foam for Front Buckets
- Durable Vinyl Construction with UniSuede Inserts
- Contrast Stitching and Rally Stripes
- Replacement Foam will fit over Factory Headrests
- Available with White, Red, Blue, Black, Grabber Blue or Gray Stitching and Stripes
- Choose between Front Buckets, Coupe Full Set, or Convertible Full Set
Full sets include upholstery pieces for both front bucket seats, the rear seat, and replacement seat foam for both front buckets. Front buckets include driver side and passenger side upholstery and seat foam. Front buckets will require use of GT factory seat frames and the Replacement Foam will fit directly over Factory Headrests.
*These Front Bucket Seats are ONLY designed for use with 2011-2012 Mustangs WITH factory Airbags in the Seats.
*NOT designed to cover Recaro or any other aftermarket seat.
*CJ Pony Parts strongly recommends always buying a full set of Sport R500 upholstery, not just the front bucket seats, unless you have deleted your rear seat.
Available with your choice of White, Red, Blue, Black, Grabber Blue and Gray stripes and matching contrast stitching. Order the TMI Sport R500 Series Seat Black Vinyl Upholstery and Seat Foam for your 2011-2012 Mustang from CJ Pony Parts today!
Related Categories: Mustang Parts, Mustang Interior, Mustang Upholstery, Mustang Seat Foam
Installation Videos
Video Transcript
Waylon: Well, what we've got here, this is our sport R500 series for the '05 to 2014 Mustang, and although it doesn't look like a factory frame, this is actually sitting on your factory Ford frames from either a GT or a V6. We've just incorporated a high-back foam that gives it a more modern high-back appearance.
Now, Bill, I sent you a prototype of this seat a couple months back, and I know you guys did a step-by-step installation of this seat. Do you want to take a look at that now?
Bill: Sounds good.
The seats were removed from the car and they're going to break down using basic hand tools. You will need a couple specialty items for this installation. You're going to need some hog ring pliers, as well as some hog rings. You'll need 6 pieces 48" long of 1/8" steel rod, and a couple of trash bags.
We'll start with the head rest. We'll remove that from the seat. You want to flip it upside down. There's a little cover over here, you want to remove that next. This just stretches over the factory foam. We'll remove that. At this point, we're pretty much going to destroy the factory head rest. The only part we need is the actual chrome bar, so all the hard foam, soft foam, everything else in here has to be removed. That's all we're going to need.
Next, we'll remove the seat back lever and the cover. We'll just carefully pry on this. It'll pop off. There's a small Torx bit behind it. The side panels going to remove next. We're going to start with the screw in the back here. To remove the adjustable side lever off the plastic cover, there's a small little clip down inside. You need a small pick. Just get it in there and pull it off. Once you remove the clip to the lever, just lift up. It'll pop right off. Unplug the harnesses and put it aside.
Next, we can start removing some of the clips on this side of the seat that hold our upholstery on. We'll pull that off there. With our panel removal tool we'll pull this clip off here. Now we can move on to the other side of the seat. To start the other side of the seat, we'll remove the T-45 Torx screw that holds the seatbelt receiver on. We'll unplug the harness and put that aside. Then we'll pull some of these retainers off to loosen up the upholstery on the sides here. Back here is Velcroed on. A couple more plastic retainers.
This wire here goes to the air bag located in the side of your seat. If you have a non-air bag car, you can skip this step. This harness comes up to your seat frame and then clips along the main bracket here, so we're going to start by removing it up here. Push that harness aside. Il pull this clip off in the back here. Disconnect this harness as well. Now we'll pull off the front clip. Now that we have all our upholstery loose, we can remove these bolts on both sides here and allow us to separate the seat back from the seat body. Now we can remove our upholstery and foam from the seat bottom and put it aside.
Now that we have our seat bottom apart, we'll start by reupholstering that first. We'll grab the TMI foam. It's just going to sit right in place over the seat frame. It'll pop right on. Now we can start with the upholstery. Next, you want to grab the seat bottom upholstery itself. They are side specific, because there is a cutout on each side. Make sure the cutout goes towards the outside. When you remove it from the box, the first thing you're going to do is turn it inside out. That's actually how it installs onto the seat foam. The 1/8" metal rod we mentioned you needed at the beginning, this is what you need it for. These are listing channels here. There's two on each side and one across the middle. This is actually what holds the upholstery tight against the foam and gives the seat its contour. The metal rods will go in here, and are hog ringed in place onto our foam. We're going to start with the center one here.
We want to go to roughly a 10" cut for this bottom piece here. You want it to fit into this, but not extend out past the edges, so it can't rip the seat. Make sure when the rod is in there, that again there's nothing visible, just cloth. Now we can start putting it onto our foam. If you look at the seat foam, you can see there are actually indentations here where there is a metal rod. That is actually where we're going to attach our hog rings. We're going to start in the center. What we're going to do is we're going to measure this to the center here, then do the same thing with the upholstery, mark it, and start from there.
Here we have the upholstery in place. The line we made on both lined up, hole down there at the bottom. Now we're going to push this down in and attach our hog ring. I'm going to hook it on the seat upholstery first, and then the foam. If you do miss, by any chance, with the first clip, just get a pair of wire cutters, put it on the hog ring and twist it. It'll pop right back out. You see, now you've got it right. It's nice and tight. It's connected. Now we can do the other two.
Now you want to pull the other listing channel out of the upholstery, down into the channel on the foam. Put roughly a 19" piece of rod inside here. Again, just like this first piece there, you want to make sure that the metal doesn't stick out of either end of this listing channel. You want to put both sides in. We'll kind of push it down into the channel. We'll go back to our hog ring pliers and install more hog rings.
Now you want to grab the trash bag we mentioned in the tool section and cut it apart. Get a section that fits over the edge of the foam here. What you want to do is push part of the trash bag down into the listing channel and have the rest over the bolster. It makes it a lot easier to stretch the bolster over to fit.
Now we'll start underneath the seat with the front part of the upholstery here. If you look, there's a U channel. This actually has to be flipped over, and it goes over this piece of metal right here. You want to pull it pretty good and push it down and flip it over. Now we'll connect the clips on the sides. Again, pull up and flip it over. We'll leave this one just hanging there for now. The back flap's going to install the same way. It goes up and flips over on this metal piece here. The problem is this plug. This actually plugs into the seat back, so you want to leave this like this for now. Once we plug it back in, this will be the last step. We'll flip that back over.
Now we'll work on the seat back itself. It will come apart pretty much the same way. Pull these ends off here. Flip this over, and separate the front and the back upholstery. Now the seat back itself is going to have some hog rings holding it on from the factory, so you want to slowly work it's way down. When you hit the hog rings, we'll cut them off and then continue to work the upholstery down the seat frame. The factory does use Velcro, so pull the Velcro back. Now we're at the first set of hog rings. We'll want to cut those off. Again, you want to make sure you roll the upholstery over, so it'll be inside out when you're done. It's the only way you're going to be able to get it off the seat. Now we're at the next set of hog rings here.
Now we're going to flip the seat over to get the two channels off the top here. You'll see plastic tabs here. The actual internal runners for the bar we're going to use for our headrest. They have to be popped out to get the upholstery off the frame. Those little plastic plugs there, the best bet is to squeeze the plastic and give them a light tap with a hammer. When they're off, the upholstery comes off, and we can remove the foam from the seat frame. You will need these plastic guides, so remove them from the upholstery before you put it aside.
Here's the factory seat frame ready for installation of our new TMI products. You see the air bag located over here. Doesn't matter if your factory seats were power, heated, any option doesn't matter. The TMI upholstery and foam kit's going to work with your stock frame.
Like we mentioned before, the TMI gets rid of the adjustable head rest and makes it a one-piece design. It still uses the factory head rest bar as well as the plastic clips. These have to be installed next. You've got to be careful. They are side specific. One has a square cutout. The other one has a slotted cutout. Make sure they're locked into place.
Now you want to grab the bar you took apart in the first step. Make sure when you put it in it's facing forward, and you put it down for the first catch.
Installing the foam is going to be probably the hardest part of your seat back. This has to go all the way to the top of the foam, plus you have to get it cut out probably for your seat latch, as well as the air bags. What you want to probably do is push it on from the top. Then we'll flip the seat over and kind of force the frame into the foam. Just make sure you are careful with the air bag. When you have it seated properly, the seat release will be visible in the back. You'll see the air bag sticking out the side here.
Just like the bottom of the seat, you'll want to start by turning your upholstery inside out. The backs are also side specific. The tag that says air bag, you want to make sure that's on the outside of the seat. So if you're installing your driver's seat it will be on the left side. Passenger seat will be on the right.
The seat back's going to have listing wires just like the seat bottom does. There's going to be a short one that's going to go here, one that goes across here, and then two vertical ones corresponding with the locations on the foam. We're going to start with the little one up top here.
Just like before, you kind of want to mark the center. It makes it easier for you to line it up during the installation. Do that for both pieces here. We're going to put a 3-1/2" piece of our metal rod in this top channel here. Like I said before, make sure there's no metal sticking out of either side, and we can start attaching it to our foam. For the top 3-1/2" piece, you'll want to use two hog rings up there. Just like the seat bottom, the foam has cutouts where you want to connect to the wire in the foam. Now we'll install an approximately 11" piece in the center here. Always start with the middle hog ring, and then again work your way outward.
The last part is the side listing wires. These are going to be approximately 23" long. There's going to be 6 hog rings per side at this point. Now the tightest part's going to be at the top. So you want to start at the top and work your way towards the bottom of the seat. Then you want to cut another piece of your trash bag. Put it over the head rest here. Then we're going to start pulling the upholstery over. This part you want to be careful with. This is going to come up over the head rest area. Your zipper's going to be in the middle right here. You want to make sure you don't put too much strain on the zipper. You're going to have to pull it pretty hard. You don't want to pull it and try to separate it, because you can damage the zipper, and if the zipper breaks off, the seat bolt is not going to attach properly. There you go. Get the head rest covering. Now we can work on the sides.
The same thing on the side. You want to tuck it all the way down into the listing channel. Let me start pulling it over. Here you want to pull the upholstery back down and towards the bottom of the seat and start trying to work out some of these wrinkles here. More of them will go away once it's fully stretched. You want to kind of work it with your hands to get the upholstery up over the bolster. As you're pulling the upholstery and stretching at the zipper, you want to be careful with the seat release on the back of the seat. You do up the zipper and this is going to get cut out before the lever gets reinstalled. If you're not careful, this could actually get bent and could even come through your upholstery. What we recommend doing is grab a piece of foam from the head rest that you tore apart, put it over. That will protect it, and also protect your upholstery.
It's a good idea to have some help for this step. You want to pull the upholstery down, at the same time pulling it together, and then pull the zipper. An extra set of hands will be a big help. Make sure you're all the way to the bottom, because it will loop around at the very bottom. Now that it's zippered, you'll want to flip the seat upright, and again push down, work out the wrinkles. You want to work the upholstery as far down the foam and seat frame as possible, because you have to connect it underneath the bottom of the frame, which can be pretty difficult.
Once you have it zippered up and you know the upholstery is seated properly, we're actually going to unzip it down a few inches so it opens up. This edge in here, this has to actually be pulled to go all the way up to this edge down here. It will require a decent amount of stretch to get this to go all the way over. There we go. Now we can zip it back up.
Now I've come to the hardest part of doing this seat back. You see we've got a channel here. I've got two additional channels down here. These have to actually g4et pulled up and over to this channel, so it will require a lot of stretching, a lot of pulling, probably some cursing. You'll get it there. It's just really difficult to do. At this part, grab the seat lever that controls the seat back on the side of the seat. Put it on there and turn it, and basically you're going to bend the brackets upward. It will give you a little more clearance. It makes it easier to put pressure on the seat upholstery.
You want to try to work the plastic channel as far down the back as you can, literally kind of roll it. A small plastic pry bar can help do this. Now we've got to cut the material on the back of the seat for our seat release lever. If you push down, you can kind of see the rectangular shape you have to cut out. I'm going to start at this point here and then cut it. You don't want to go too big, so start small and just open it up as you go. We'll pull our foam out from earlier. You want to make sure you can see the front edge here and the screw hole in the back. Put the tab in over the top there. Slide the knob right back on, lock in place. There we go.
Our seat back is finished. Now we can reconnect our seat back with our seat bottom. Now we'll reconnect this wire here we've pointed out before at the bottom of the foam. Tuck that in there and stretch this over. Now we're going to fish and reconnect the harness for our side impact air bag. I'll bring this flap up here. This goes over this metal clip. We can reinstall our seat belt receiver. Now we'll reinstall the plastic side seat trim panel here. Install the screw we took out of the back. You want to reinstall the clip onto the seat lever, and install that back on again. And your installation's finished.
Like I said, these are prototype seats that we installed a few months back. They've held up great. They're actually breaking in, and every day we drive the car, they get even more comfortable.