J&L Oil Separator Company Oil Separator Kit 3.0 Rear Side Black Anodized Focus ST 2013-2014
Highlights
- Black Anodized Finish
- Multi Stage Filter System
- Billet Aluminum Construction
- Holds 3Oz Of Fluid

J&L Oil Separator Company Black Anodized Rear Side 3.0 Oil Separator Kit for 2013-2014 Focus STs.
If you're on the hunt for the perfect oil separator for your 2013-2014 Focus ST, you should take a closer look at this all-inclusiveJ&L Oil Separator Company Black Anodized Rear Side 3.0 Oil Separator Kit from CJ Pony Parts! It's easy to install, and it'll help protect and extend all of your Focus' other engine performance upgrades.
Features & Benefits:
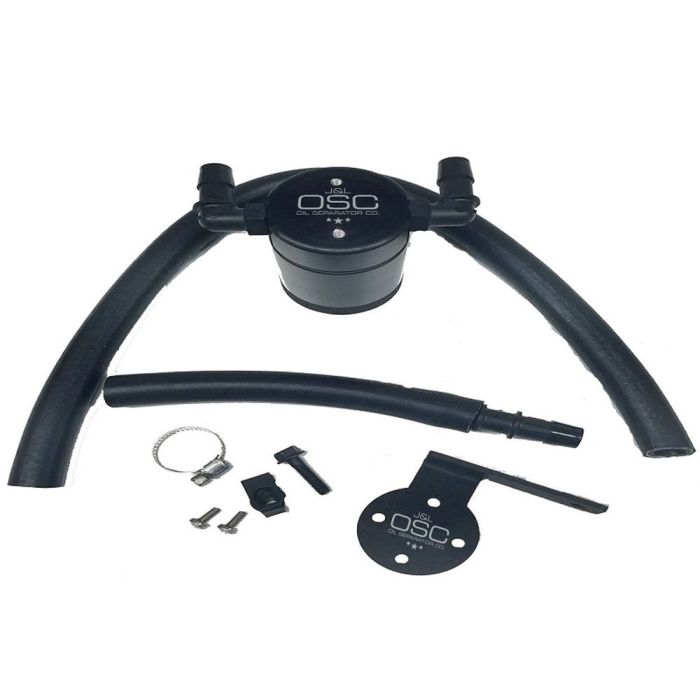
- Newly Redesigned Tank Holds 3 Oz. of Fluid
- Thick Billet Aluminum Construction with Eye-Catching Black Anodized Finish
- Easy to Install onto the Rear Side of Engine
- Multi-Stage Filter System With Fine Mesh Stainless Steel Screen
- Knurled Tank Base for Easy Disposal of Collected Oil
- Protects and Extends Other Engine Performance Upgrades
This J&L Oil Separator Company 3021R-B Black Anodized Rear Side 3.0 Oil Separator Kit features a newly redesigned tank that holds up to 3 oz. of fluid, which is an increase over their original design that only held 1 oz. This oil separator is made of thick billet aluminum with an eye-catching black anodized finish, and it has a multi-stage filter system with a fine mesh stainless steel screen that will capture fine oil vapors. After the collected vapors are heavy enough, they'll drop into a 1/2" to 1/16" aluminum honeycomb filter where they eventually become larger drops that fall into the bottom of the canister, and this keeps the oil vapors from passing into your Focus’ intake system. When you're ready to empty the canister (recommended every 5,000 to 7,000 miles), simply remove the knurled tank base to dispose of the oil. The included O-ring will keep the seal nice and tight to help prevent against leaks.
A knurled tank base allows for easy disposal of the collected oil, while an O-ring keeps the seal tight to prevent leaks. J&L Oil Separator Co. designs and builds its products in the USA to be a direct-fit upgrade and a plug-and-play install.
JLT Performance has worked to expand plug-and-play applications within the automotive industry. With the same great products, JLT Performance formally introduces the J&L Oil Separator Company, specializing in oil separators.
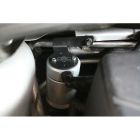
Tech Tip: This kit is specific for the rear side of the intake of a 2013-2014 Focus ST engine and should be used in combination with the front PCV side for optimum protection. Please see CJ Pony Parts # OILSEP74.
California Residents: Proposition 65 Warning
Related Categories: Ford Focus ST Parts, Focus ST Engine, Focus ST Oil Separators
Note: This item is not CARB (California Air Resource Board) exempt and is not legal for sale or use in the state of California.

Installation Difficulty

Novice skill is required for this installation.
Installation Videos
Video Transcript
This JLT oil separate features a multistage filter, and will hold three ounces of oil. It's available in a satin or black finish. We'll go with stain 'cause it will match one we already installed in the front. Now in case you missed it, the job of the oil separator is to keep oil vapor from going back through the PCV system, which over time can damage the engine. We already installed the front one so, today we're going to install the matching rear.
For this installation we need a quarter inch ratchet, eight millimeter socket, 10 millimeter socket, flat head screwdriver and a Phillips head screw driver.
Begin the installation by removing our factory engine cover. Now, before we get to that I should mention that JLT is designed to work with your factory cold air intake. It doesn't mean it won't work with aftermarket one like the one we have on our engine here. But, the installs going to be just slightly different and we'll go over those details as we do the installation.
The cover up remove this bolt right here on top of the throttle control. Now if you have a stock intake, it's going to be two pieces. You have one piece that goes to here, another piece that goes to your turbo. What you want to do with the stock intake is remove the middle piece here, which will make this a lot easier to see. In our case, we have a one piece, we won't remove it, we're just going to reach behind it. The PCV is located right here, straight behind this coil pack.
To remove it from the back of the valve cover, just squeeze this top and bottom and then push it off. If you have a factory intake, you have the exact same fitting on the tube side, just a larger version.
Now the stock PCV tube if you removed it, you're going to have a small fitting on this side and then a larger fitting on the other side. Now in the case of ours, this is an aftermarket intake so the large fitting was replaced by a normal hose clamp. But again, you can use this on a stock intake or an aftermarket intake like our cp-e.
Good, next step we're going to remove this factory fitting from the hose. We're going to start assembly. Grab the separator and the mounting bracket, we'll put that together first. You want to grab the long hose and that small fitting we just removed, put that on there. Now, the long hose can go to the top of the separator. Put a little oil in these if you need to, to get them on there. Just got to work it on. No clamp needed, they will not come off.
Now take the hose with the fitting on it, we'll put that on the bottom of the separator. Now you want to grab the factory PCV hose. Now if you have your factory hose on this end here you're still going to have that large fitting, which goes to your intake. In our case, we have a small fitting for our aftermarket intake, the connections exactly the same. Grab this hose and connect it on here. It's ready to go on the car.
Now oil separator is going to mount over here on the passenger side by the tower. Grab the supplied J-clip. Put it up into place on that opening there. You're going to feed the lines through, and put the separator in place. We're going to put them both behind, or one in front, one behind, it's wherever you've got the most room.
Grab the long hose and clamp the factory fitting. Make sure it pops on. Now again, if you have a factory intake, the other side will have another factory fitting, you'll plug it in. In our case we'll use a hose clamp. Okay, then you want to reinstall the intake tube. Bolt down the intake. Install the engine cover and your installations finished.
Now if you're watching the video, obviously the JLT rear wheel separator is a lot easier to install. But, if you can do this you definitely want to do both. So, I figure take some time to do the front one. The back one should take you no more than about 30 minutes to throw on, be back on the road in no time.