MBRP Cat-Back Exhaust System Pro Series 3" Focus ST 2013-2018
Highlights
- 3" Pro-Series Cat Back
- Stainless Steel Construction
- Dual 3" Polished Tips
- Direct Bolt On Installation
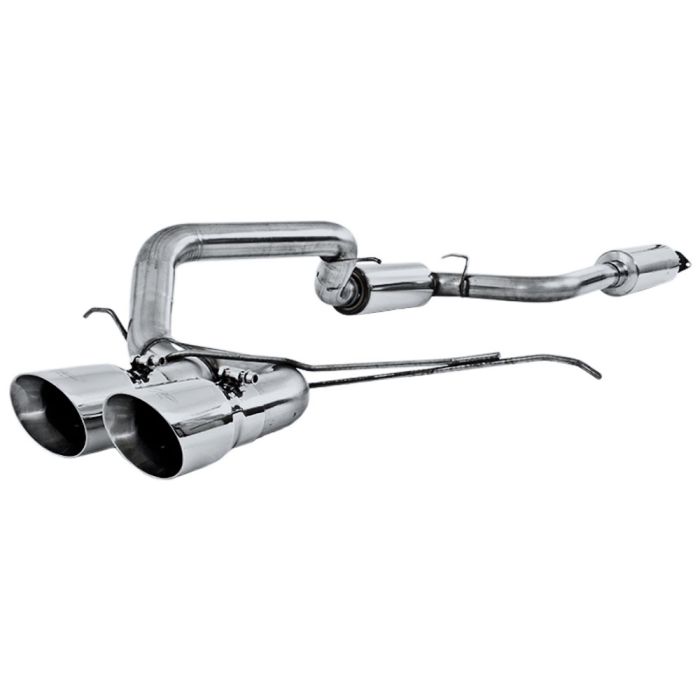

MBRP Pro Series 3" Cat-Back Exhaust System for 2013, 2014, 2015, 2016, 2017 and 2018 Focus STs.
MBRP's full 3" cat-back is guaranteed to boost the performance of your 2013-2018 Focus ST. The Pro Series cat-back is for the serious performance enthusiast who demands the best of the best. T304 stainless steel construction means this system is durable and will not rust or deteriorate like plain steel exhaust systems. MBRP packs their Pro Series exhaust with the highest chromium and nickel content of any exhaust, producing simply the best system money can buy. Polished dual wall T304 stainless steel tips exit the center of the rear bumper.
Features and Benefits:
- Dual Wall T304 Stainless Steel Tips
- Polished Finish
- Smooth Mandrel Bends
- Simple Bolt-On Installation
- Lowest Bend Degree Angles
Each exhaust system is designed with the lowest bend degree angles and smooth mandrel bends so exhaust gases have an easier exit path. This creates faster moving exhaust gases, reduces exhaust gas temperatures and flows much better than stock exhaust. Hundreds of test miles and hundreds of hours are invested into every MBRP system to provide you with the best sound and best performance improvement. Rigorous testing procedures ensure every component will fit as expected. MBRP designs their exhaust kits to be user friendly with simple bolt-on installation. Includes installation instructions.
Please Note: Ford designed the 2015 Focus ST with four exhaust hangers but only added three on the factory exhaust system. All aftermarket exhaust systems are built to use that fourth exhaust hanger. CJ Pony Parts recommends the purchase of COBB’s Polyurethane Exhaust Hanger Kit (591001).
California Residents: Proposition 65 Warning
Related Categories: Ford Focus ST Parts, Focus ST Exhaust, Focus ST Cat-Back Exhaust Kits
Installation Difficulty

Novice skill is required for this installation.
Installation Videos
Video Transcript
Jesse: As you know, it's a Cat-back system, but it's quite a bit larger than a factory system. We're utilizing 3-inch mandrel bent tubing and a high flow muffler and a high flow resonator to dial in the sound specifically for this car. To speak on the mufflers, we actually built these from the ground up. We were going to use a unit off the shelf and nothing was really going to cut the mustard there so, we designed two things specifically for this application. What it did is allow us to really get the aggressive exhaust that the guys were wanting, without any of the cackle or the reverberations in the cab like people are used to.
Bill: I know you guys have made Focus exhaust for years now, long before the ST was even on the market. It's not an older focus muffler, it's built specifically for the turbo guys.
Jesse:It is built just for the Focus ST, yes.
Bill:And this is full stainless steel just like others?
Jesse:Yes, this particular unit is stainless steel. We have it available in two grades of stainless and aluminized, depending on your price point or where you live. If you live in Arizona, you really don't need a stainless exhaust system and we have an aluminized kit for that guy, which is quite a bit less expensive than the stainless stuff. Then we have a T304, which is our best grade of stainless and a T409 for the middle of the road.
Bill:No matter which kit, tips are always the same in the rolled full stainless. Are they 409?
Jesse:They're 304. All the tips, no matter what system it is, is going to be a 304 material grade. They're all the same, no matter what.
Bill:This kit comes with everything. It uses factory hangers, but new clamps, new gasket, new hardware, ready to go?
Jesse:It comes with everything you need to install it, but yeah everything that's needed to replace the factory stuff is in the box.
Bill:Cool, let's get started on the install.
Jesse:All right.
Bill:Before we get started we'll start with a quick sound clip of the factory exhaust. As you can see, just way to quiet for a car like this. For this installation you'll need jack and jack stands or lift, Sawzall, 3/8 ratchet, 15 mm socket, 14 mm socket, 10 mm socket, 8 mm Allen key, 15 mm wrench, 14 mm wrench, hanger removal tool, and safety glasses.
As always, the first step is to remove our old exhaust system. As you can see, it's got a huge factory muffler in the back and a rather large resonator up front. Not only is it restricting flow, it's also quite heavy. The first step is to remove this support bar located up here. To remove the stock exhaust system unfortunately you do have to cut it in half unless you want to remove your whole rear suspension. Make sure you go right behind the weld, usually this area here is the best place to cut.
Now, we're going to remove the stock rear muffler assembly. There are three hangers, one on this side, one here, and then a third one is hard to see, it's up over the axle. We'll remove these two nuts up here to separate our front pipe from our down pipe. Jesse, what's the first step in installing the new system?
Jesse:We're actually going to take this over-axle extension pipe and feed it from the rear of the vehicle toward the front up over this way using the factory hanger.
Bill:Okay. I've done this before with 2-1/2 inch systems, but this part is a little bit challenging. Is the 3-inch pretty tough to get through?
Jesse:You might find yourself massaging the heat shields a little bit as you work through, but it's not too bad. Just take your time. The next part we're going to do now is actually slide the tailpipe section in.
Bill:Okay. Again, all factory hangers?
Jesse: Yes sir.
Bill:I'm guessing don't tighten up anything yet, just get it all fitted into place and then we'll tighten it up?
Jesse:Just fit it into place, yeah. Next we have our extension pipe that bolts to the factory down pipe and a new high heat aluminum gasket. We're going to go ahead and install this. Now this only installs one way. It actually goes just slightly toward the passenger side.
Bill:Again, I'm assuming we'll get these hand tight for now?
Jesse:That is correct, yeah just hand tight.
Bill:Now we'll put the front muffler on next. You've got a clamp for the back then?
Jesse:I do.
Bill:I think there's only one more piece to do, you want to grab that? Put the clamp on that will connect it to our tailpipe. Now we start tightening everything down?
Jesse:Start tightening everything up. The last step we have is just to place the tips on here. We have a little bit of variation as far as personal preference or aesthetics. Personally I like things flush with the bumper, some people like them to stick out a little further. It's up to you. The basic thing is to make sure you have it centered in the opening of the bumper and after that you just tighten them down.
Bill:Cool, sounds good.
Jesse:We're actually going to tighten these one at a time starting with the left. That way you can actually get your tool in there to tighten it down.
Bill:And our last step is to reinstall the factory brace and your installation's finished. That's the kind of sound we're looking for. Nice deep tone, definitely after market, but not overly aggressive. Jesse, thanks for helping out with the install today. The system looks great and sounds great too.
Jesse:Yeah, we've put a lot of homework into this kit and developed it from the ground up. Not only does it look and perform better than stock, you also reduce the weight quite a bit.
Bill:Installation should only take you around an hour and a half and you'll be back on the road in no time.


