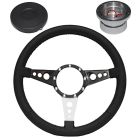
VSW 14" 9-Bolt 3-Spoke Steering Wheel Mustang 65-73 Black Leather Wrapped Polished Aluminum
Highlights
- Polished 3-Spoke Center
- Wrapped With Black Leather
- 14" Diameter
- Clear Coat Finish


Volante Black Leather 14" Steering Wheel with Polished Aluminum 3-Spoke Center.
Add some flare to your Mustang's interior with this aftermarket steering wheel from VSW! The 14" diameter rim is wrapped with black leather and the spokes feature polished aluminum with a 3-hole design. The aluminum has a clear coat finish for protection and a fantastic shine. Two inches (2") of depth provide clearance for the turn signal.
Features and Benefits:
- 14" diameter steering wheel
- Polished aluminum construction
- 3-hole 3-spoke design with protective clear coat finish
- Black leather-wrapped rim adds style and comfort
- 2" dish depth clears turn signal lever
- Fits 9-bolt mounting hubs
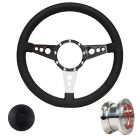
Please Note: This steering wheel does NOT include a steering wheel adapter or horn button which must be purchased separately.
Vehicle Fitment:
- 1965-1973 Mustang
California Residents: Proposition 65 Warning
Related Categories: Mustang Interior, Mustang Steering Wheels, Restomod Steering, Mustang 14" Steering Wheels, Mustang Leather Steering Wheels
Installation Difficulty

Intermediate skill is required for this installation.
Installation Videos
Video Transcript
The wheel itself is a 14-inch wheel and it's a teardrop design. It's all aluminum. The outside is leather, but it's also padded making it really comfortable for long drives. The Mustang horn button is just a nice touch to finish it off. Because we're messing with the horn assembly and some wire, we're going to disconnect the battery. We'll start by removing the stock wheel and the horn ring. The factory wheel is not a bad-looking wheel and the 67 has a unique style to it. It's a very thin plastic. It's just not comfortable for normal driving. The leather should be a really nice upgrade. Remove the factory horn ring by pushing in and turning. It will come right off. We'll have access to bolts to remove our steering wheel.
Start by removing now the retaining nut, which holds the steering wheel to the column. Now we're going to remove the steering wheel from the column. There's a couple of ways to do this. You may need a steering wheel puller. If the wheel has been on here for a while, it's locked in it's hub pretty well, it may not come off. I would say try it by hand first. If you're going to do that, take the retaining nut and put it on just a couple of threads. That way if the steering wheel does come off, you don't go flying if you pull it off. Just enough to hold it, now you give it a good tug and see if it will come off. Now you can remove the nut and remove the wheel. Start the assembly by slotting the column sleeve over the hub itself.
If you look carefully, there's a small set screw. You're not going to tighten it yet, just put it on there for now. Now you want to look at the adaptor itself. You'll see these two tiny little dimples next to the one mounting hole for the steering wheel. That's going to be the top. We want to make sure that goes towards the top. This tab here is a little stud for cancellation for the turn signal. We want to make sure that's lined up as well. I'll re-install the nut. Now I'll grab a supply and Allen key for the set screw. What you want to do is leave yourself about an 1/8 inch gap at the bottom here between the column and the sleeve and then tighten it down. You can grab your new wheel, grab the supplied hardware, and screw it into the adaptor.
Best to get all nine of them started first before you tighten anything down. Once you get them all started, now you can work your way through and tighten them down, kinda of want a zig-zag pattern when you tighten them down. Not that you really could with the tool they provide, but make sure you don't over-tighten them too. Just get them snug. Now connect the terminals for our horn to the back of our horn button. We'll get that lined up. There's an O-ring that holds it in place. It is a tight fit, so make sure you get it lined up. You have to work it back and forth to work it in, and the installation is finished. Our new steering wheel looks great and it's a lot more comfortable to drive the car as well.
The only tools you're going to need for installation are 15/16 socket and possibly a steering wheel puller. Everything else is included with the parts. Installation should only take you around 15 minutes. You'll be back on the road in no time.