Fuel Tank Pump In Tank Style Mustang 1983-1997
Highlights
- Tap To View 3D Model
- Factory Style Replacement
- 15.4 Gallon Capacity
- Fits All 1983-1997 Mustangs

Pump in Tank Style Fuel Tank for 1983, 1984, 1985, 1986, 1987, 1988, 1989, 1990, 1991, 1992, 1993, 1994, 1995, 1996 and 1997 Mustangs.
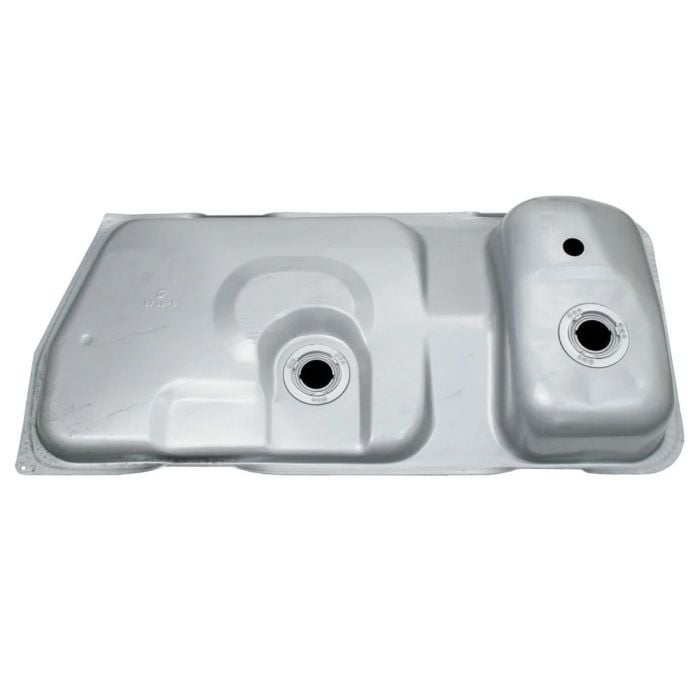
With how quickly the price of fuel can rise, there is no reason to settle for a rusted or leaking original Mustang fuel tank! This is a direct replacement fuel tank for all 1983-1997 Mustangs with the fuel pump mounted in the tank.
Product Details:
- Factory Style Replacement
- 15.4 Gallon Tank Capacity
- Fits 1983, 1984, 1985, 1986, 1987, 1988, 1989, 1990, 1991, 1992, 1993, 1994, 1995, 1996 and 1997 Mustangs
This is a factory style replacement fuel tank for all 1983-1997 Mustangs with a pump in tank style fuel system. Tank capacity is equal to the factory unit at 15.4 gallons and it will install in the factory location.
Don’t let something as important as your fuel tank rust away! Before you start losing fuel and efficiency replace that old and original fuel tank today!
Order a Pump in Tank Style Fuel Tank for your 1983, 1984, 1985, 1986, 1987, 1988, 1989, 1990, 1991, 1992, 1993, 1994, 1995, 1996 or 1997 Mustang from CJ Pony Parts today!
California Residents: Proposition 65 Warning
Related Categories: Mustang Parts, Mustang Engine, Mustang Fuel Tank Area, Mustang Fuel Tanks
Installation Videos
Video Transcript
This fuel tank'll be a direct replacement for the original tank in your 1983 through 1997 Mustang. It's the same 15.4 gallon tank and we'll install it using the factory straps. It includes two new locking rings and two new gaskets. For this installation you'll need a lift or a jack and jack stands, 3/8 ratchet, 8mm socket, 13mm socket, 6" extension, fuel line disconnect tool, hammer, brass punch, and safety glasses.
If you're going to replace your gas tank, the first thing you want to do, get as much gas out of it as possible. Gas is heavy, but the heavier this tank is, the harder it's going to be to get it out. We have about 1/4 tank in our car which isn't too bad, so we're going to start by supporting the tank. Doing this on the ground, just use a jack. We're going to use a trans jack, but you want to hold it before you unbolt it, to make it easier to remove.
On the driver's side there's one bolt and the strap will come down. On the passenger side, there'll be a bolt on the front and back. Now before you lower the tank, you want to remember there's a little ring over here on the filler pipe. Got to remove this screw as well before the tank'll come down. Everything disconnected, now we can start lowering down the tank. When you lower it, it's going to start pulling down further on the driver's side because it is on the filler pipe, here. What we'll do though is kind of slide it off the filler pipe and then we can disconnect our plugs.
Now these two harnesses here are for your setting unit and fuel pump. To do is disconnect them right up here. That's where you disconnect our fuel lines and these will dribble just a little bit. Just get a little towel and put it up on top, there. Pop the clip off. Next, we can disconnect the fuel lines from the fuel pump. To do that, you'll need a disconnect tool. These are very inexpensive. You can pick them up at any auto parts store. Then the last step now is to pop the vent.
With the tank out, we can start transferring things to our new tank. We're going to start by disconnecting this harness and then we'll move the fuel pump and setting unit over to our new tank. Lift up on this tab, pop it off. The setting unit's held on by a ring. To get the ring off, you'll have to use a hammer and a punch. You want to use a brass punch. You're messing with fuel. You'll make sure it doesn't spark.
Clean it up, then put it in the new tank. Start by putting the ring down, first, and grab our new ring and line it up here with the tabs. It's seeded when the curved part which is that little tab, right there. Now same process with our fuel pump. Fuel pump, you sort of have to spin around. It'll be a little trickier to get out. Should put the O ring down first when you install the pop. If you're having trouble getting the fuel pump flush, it has to sit in that little box inside there, so you can look through the side here, through the fill hole and make sure everything's seated properly before you put the ring on.
Now we can install the locking ring. Pump and setting unit mounted, reinstall the harness. Clip's in place, now we can move over the vent tube and the filler hose seal. Just want to carefully pry this off. We're going to move it over here, put the seal in first. The filler hose seal's one of those parts that nine times out of 10, I'm going to tell you to replace. In the case of this car, I know this one is brand new because I just installed it about two months ago, so I'm going to move it over to my new tank. Tank's ready to go back in the car.
We're going to take our new tank and put it in the cover and jack it into place. If I can make the connections up here, we'll start with the vent and the fuel lines. Fuel lines'll just pop right on and lock in place. Okay now we'll plug in the harness, clip it back in, and then we can push the tank up into place and put it over the filler tube. Push the strap back up into place. Double check all your connections. Make sure the hoses are nice and loose. Fill the tank with fuel and your installation's finished.
The fuel tank is obviously very important to your car so it's damaged or rusted, you're going to want to replace it. Now from 1986 to 1997, the install's going to be exactly the same as we've shown here. 1983 to 1985 will be a little bit different, but the same basic concept. It's about an hour to an hour and a half. Be back on the road in no time.


