SSBC-USA Rear Disc Brake Conversion Kit 8"/ 9" Small Bearing Mustang V8 64-73 w/ 10.5" Rotors
Highlights
- 30% More Braking Power
- 10.5" Vented Rotors
- Zinc-Coated Calipers
- Reuses Factory Cable

SSBC-USA Rear Disc Brake Conversion Kit with 10.5" Rotors for 1964-1973 V8 Mustangs with 8" and 9" Small Bearing Rear Ends.
This rear disc brake conversion kit is a direct bolt-on upgrade over factory drum brakes. It allows for reuse of factory parking brake cables and delivers up to 30% more braking performance. Plus, it maintains your 1964-1973 V8 Mustang's factory-style appearance! The compact single-piston calipers come zinc-plated and sealed for corrosion resistance. Each 10.5” vented rotor offers dependable cooling and durability.
Features and Benefits:
- Direct bolt-on upgrade over stock drums
- Up to 30% more braking performance
- Zinc-coated single piston calipers
- Built-in sealed internal parking brakes
- 10.5" vented rotors for enhanced cooling
- Stainless steel shim washers and spacers
- Includes DOT flex hoses and new hard lines
- E-coated brackets resist rust and corrosion
- Compatible with factory parking brake cable
- Fits most 14" wheels and spare tires
- Bolt-on installation
- Designed for Ford 8"/9" small bearing rear ends
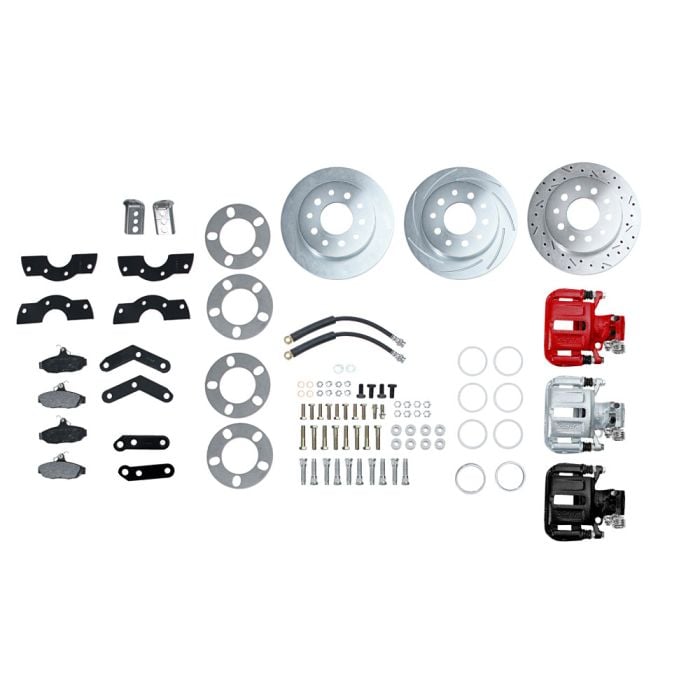
Kit Includes:
- Pair of Rotors
- Pair of Calipers with Built-In Parking Brakes
- Brake Pads
- Caliper Mounting Brackets
- Brake Hoses
- All Necessary Hardware
Vehicle Fitment:
- 1964-1973 V8 Mustang
- 8" or 9" Ford small bearing rear end
California Residents: Proposition 65 Warning
Related Categories: Mustang Rear Disc Brake Kits, Restomod Brakes
Installation Difficulty

Advanced skill is required for this installation.
Installation Videos
Video Transcript
This SSBC kit is going to fit an 8-inch or 9-inch rear with a 28 spline axle, includes a set of 10-1/2 inch vented rotors, new wheel studs, a 45mm single piston caliper with a built in emergency brake, brake pads, brackets, hoses, an E brake cable bracket and all necessary hardware for installation.
For this installation you need a lift or a jack and jack stands, 3/8 ratchet, 3/8 torque wrench, 3/4 socket, 5/8 socket, 9/16 socket, 3/4 wrench, 5/8 wrench, 9/16 wrench, 7/16 line wrench, screw driver and a hammer.
We'll obviously start the process with your car up in the air and your wheels off. You'll also want to make sure your parking brake is turned off or you won't be able to get your factory drums all off. The first thing you want to do is start by shimmying the drum to remove it. You want to start with the adjuster at the bottom. Lift up on this tab, then you can turn this and take the pressure off. You might want to get a screw driver or you can do it by hand usually as well. Okay, turn it all the way down.
Now we can start removing our springs. Now we'll turn these so we can get the shoes off. Now we can remove the E brake cable. Once the shoes and springs are off you'll want to remove the parking brake cable. It has these little tabs here that goes through the backing plate. Basically what you'll want to do is push these down and then work the cable through the back of the plate. Let's put the parking brake cable out of the way.
Now we can remove our axle. There's four nuts that hold the axle to the backing plate. Two on this side here and another two on this side here. If you don’t have a ratcheting wrench, there actually is a hole in the axle specifically designed for moving these. Just line it up with the bolt and that way you can put a socket through there. Now we can carefully remove our axle. You want to hold the axle. You don't want to drag it against axle seals if you can help it.
The kit includes longer studs that are going to have to be installed to use a disc brake kit. That will require a press or hammer out the old ones and then press the new ones in. If you don't have a press handy, most local machine shops or auto part stores can do this very inexpensively for you.
Before we can remove the backing plate, now we have to disconnect the brake line from our wheel cylinder. If you have a line wrench, I suggest using it. If not, a standard wrench will work just be careful not to strip it. Now we're going to remove the backing plate.
Our new brake hose is going to come off the back here so what we're going to do now is carefully just bend this line back and out of the way. Make sure you don’t kink it. Okay it's back there for now. We'll adjust that once our caliper is mounted.
Next, remove the four factory mounting studs. Some of them might just pop out, but I'm going to give them a little tap with the hammer. Once you have the new studs pressed in we can re-install the axle. Again be careful of the axle seal. We're not going to go all the way in. You want to get it to about an inch of play left. Now I'll pull the bearing out so the bearing's got about 1/2 inch to 3/4 inch. Now we can install the brackets.
The caliper mounting brackets are side specific so you want to make sure you get the correct ones for the side that you're working. They're labeled left or right. If you look in here when you mount the bracket, you'll see this round groove. That round groove is going to be your new outer bearing retainer. I'm going to use that, one of the provided shims, for our install. This split shim is going to go between the bearing and the original plate right here. They give you a couple of these so if you get it too twisted up you can try it again. What you're going to do is split it then carefully put it over the axle. You want to get it as close to round as possible, because it does have to fit in that groove on your bracket.
What you're going to carefully do now is take two halves of the bracket, get the shim in to it, put the shim on the bearing, get the bracket, push the whole assembly into the car. Fit it flush, then install the bolts to hold it in place. Some times you may have to grab a wrench to kind of just get them started to get them going through. Once you have the bolts in place, you can put the retaining nuts on, then we’ll tighten everything down. Once you get the bolts installed you'll want a torque of 40 ftp.
Now we're going to install the bolts and sleeves and start mounting our caliper brackets. One on each corner. These are your caliper brackets, this is actually the orientation they are going to go on your car. The shorter one goes on the top and facing the back of the car. The longer one goes on the bottom, again also facing the rear of the car.
Now we're going to tighten down the caliper mounting brackets to our main bracket. You can initially grab three nuts. The lower back bolts here, you don't want to put a nut on yet. We still have to mount one of the other brackets to this before we're finished. We'll start with the top two and the front one on the bottom.
This is your mounting bracket for your E brake cable. This is going to mount to the bolts on the bottom of your caliper mounting bracket. What you'll want to do with this is bring your E brake cable back and get an idea of where it's going to be in relation to the caliper. Some cars may be different. But using original cable, we found this front hole usually gets you the closest. Now we can tighten down the brackets.
Now I'll install the hub center ring over the axle. So we'll center our rotor. You can grab the rotor out of the box. Give it a quick cleaning with some brake clean. Get everything off and make sure it's nice and clean before you install it. If you have one, grab an open ended lug nut. We're going to thread it on to hold the rotor in place while we're installing the caliper. This makes everything a little bit easier. Now we'll prep the caliper for installation. You want to grab the included brake hose, grab the two washers, put one on top, with the included bolt, put another one on the bottom. I'm going to tighten that down. Now I'll flip it over and we'll install our brake pads. And our caliper is ready to be installed.
I'll put the caliper up into place, we'll install the caliper bolts to our bracket. Now we're going to install the E brake cables. We're going to go through the bracket we installed, up through the bottom of the caliper, and clip it on right here. Okay, now we're going to connect the hard line to our brake hose. I'm just going to bend it to a spot where the hose can easily reach. I want to hold the hose and tighten the line and there you go.
That's how you install SSBC's rear disc brake conversion kit on your early Mustang. Keep in mind if you do it on an earlier model than our '70, you may have a residual pressure valve built into your master cylinder. SSBC's instructions detail how to remove this properly to get a proper pressure to your rear brakes. In the case of our '70 it's not going to be an issue.
At this point you'd want to bleed the brakes starting with the brake furthest from the master cylinder, adjust your parking brake if necessary and your installation is finished. Overall it should only take you a couple of hours and you'll be back on the road in no time.