Ford Racing 8.8" Rear Axle Bearing and Seal Kit Mustang 1986-2004
Highlights
- Fits 1986-2004 8.8" Rear Axles
- Bearing Measures 2.256" O.D.
- Pair Of Axle-Seals & Bearings
- Will Not Fit IRS Rear Axles


Ford Racing Rear Axle Bearing and Seal Kit for all 1986, 1987, 1988, 1989, 1990, 1991, 1992, 1993, 1994, 1995, 1996, 1997, 1998, 1999, 2000, 2001, 2002, 2003 and 2004 Mustangs with a 8.8" Rear Axle.
Rebuilding your 8.8" Rear End? This Rear Axle Bearing and Seal Kit from Ford Racing gets the job done! These seals and bearings fit directly with OE quality on your Mustang.
Features and Benefits:
- For 8.8" Rear Ends
- Ford Racing Quality
- Sold As A Set
- Direct Fit Replacement
This Ford Racing (M-1225-B) Rear Axle Bearing and Seal Kit will work on all 1986-2004 Mustangs that have an 8.8" rear axle assembly. The seals are factory replacements that will give a tight seal, just like the originals when they were new! This kit is also highly recommended if you just had new gears installed on your Mustang.
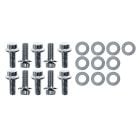
This Kit Includes:
- Pair of Axle Seals
- Pair of Axle Bearings
- 2.256" O.D. Bearing
Please Note: This kit is meant for non-IRS axles. This kit will NOT work on 2005-2009 8.8" rear axles.
California Residents: Proposition 65 Warning
Related Categories: Mustang Parts, Mustang Rear Axle, Mustang Axle Bearings, Races & Seals

Installation Difficulty

Advanced skill is required for this installation.
Installation Videos
Video Transcript
There are several different ways to do a five lug swap on a Fox Body Mustang. Now one way is to use parts from the SN95. You use the spindles of the conversion that way. Now in my case, I'm looking for the easier way to go, which is to replace just the front rotors. On the wheels I'm using, these will work fine, so I don't need the SN95 parts. So we're gonna install for the set of the front rotors, which will be direct replacements for your factory rotors, but in a five lug setup. Now for the rear, we have the five lug drums, a high quality set of 28 spun axles from Yukon Axles, along with a Ford performance axle bury and seal kit.
For this installation, you need a lift or a jack and jack stands, quarter inch ratchet, 8 millimeter socket, 3/8 ratchet, 1/2" socket, 17 millimeter socket, 6 millimeter socket or Allen Key, short extension, crescent wrench, hammer, pry bar, slide hammer, bearing installer, and a small flat head screwdriver.
Now Brendan's gonna handle the wrenching. I'm gonna walk you through the process to do this. This first thing we're gonna do is remove the caliper and the caliper bracket. Then we can remove the cap here, disassemble the rotor and remove it.
All right, so with the caliper off the bracket, now we're gonna remove the dust cover from the center and remove the internal pieces to remove the rotor. We're gonna remove the cotter pin first. Then we can remove the castle nut.
Now with the castle nut off, you can remove the whole assembly.
So with everything out of the way, what we're gonna do now is just clean up our factory spindle before we install the new parts. With the spindle cleaned up now, we're gonna put some more grease on it and then we're ready to prep our new parts. So before we install the new rotors, we have to pack the bearings with grease. There's a couple different ways to do this. The easiest way is this tool right here. You can pick this up at Harbor Freight, most auto part stores. These are maybe 15 bucks, definitely something worthwhile to have. If not, there's an old school way and Brendan's gonna walk you through that as well. Now the new bearings include races. Now our rotors already have races installed, so we're gonna use ones that are previously installed. If you do want to use the new races, you're welcome to. In my opinion, it's much easier to use the ones that are already there.
We're gonna start with the inner race. Now if you're dealing with the old school way without the tool, basically, what you're gonna do, put grease in your hand and then slowly work the bearing through. This is a very important part. You want to make sure you do this right and take the time. If you don't have the proper amount of grease on the bearing, you don't get enough grease inside the bearing, it'll definitely wear out in a hurry. Basically, what you're doing here is just working the bearing around and just pushing the grease into it.
Here's roughly what it'll look like when it's done. You want to make sure you have grease all the way around the outside and then actually push up through here as well. Then you know it's ready to be installed. Now you can grab the inner bearing for the other side. We're gonna show you how to properly pack the bearing use the handy packer.
Now that this is worked in, basically, this is pre-packed. In our case, we put the grease in earlier. This is grease down here and as you push down, grease is forced up the middle and pushed through the bearing.
You can see the grease equally pushed through the bearing. It's ready to install. Now that the bearing's properly greased, we're ready to assemble a rotor. The first things you're gonna do here again, more grease. Put some on the races themselves before we install the bearings.
Now with the inner bearing installed, now we're gonna install the seal itself. What you're gonna do is put this over the edge here and then carefully tap it into place with a hammer. Small piece of wood's not a bad idea to make sure you hit it evenly.
Now you want to make sure the race for the front outer bearing is also greased up. Now we can put the rotor up on the spindle. Now make sure it's seated all the way on. Now we can install the outer bearing and then the castle nut.
All right, you're gonna tighten up the castle nut. There is no real torque spec to it. Get it hand tight and then a good quarter turn is as tight as it needs to be.
Okay, with the castle nut tight, now we can put the cap on and reinstall the cotter pin. With the cotter pin installed, just make sure you bend it to a point where you can install the cap without making any clearance issues. All right, now we can reinstall the dust cap.
The next step's gonna be to reinstall the caliper and the brakes. Before we do so, you want to grab some brake clean and clean off the rotor. I know it's a brand new rotor. But you want to clean it, get all the oils off of it before we reinstall everything. I should mention at this point too, obviously we just installed brand new rotors, excellent time to also install some brand new brake pads. On the case of our project here, we actually have some brake upgrades planned for the future. Our stock pads are not in bad shape, so we're gonna leave them on the car for now. Now the caliper can go back on. You may have to compress the piston a little bit to get it on, but a lot of times, it'll go right on as well.
Now before we bolt the caliper back down, you'll want to grease the slide pins on the bolts and then put them back on.
All right, you can tighten up the pins.
You want to repeat the process on the other side. We can move onto the rears. All right, with our front finished, we're ready to move onto the rear. Now the rear is a little more involved because to do this, we have to remove the axles, obviously, from the car. So the first step is gonna be getting it up in the air. We're gonna pop off this rear diff cover, drain the fluid so we can work on removing the axles.
Now the top bolt's loose, but leave it in place. Now what we're gonna do is get a small pry bar or screwdriver so we can crack the cap loose and make sure you get something underneath it because the oil's gonna pour out.
Okay with the diff off and drained, now what we need to do is remove the pin to get to the C clips to remove the axles. To do that, what you're gonna do is remove this pin here. This is the set pin that basically bolts in and holds this pin in place. So remove this bolt and this pin will actually slide out and we can get to the C clips.
Now before you can actually remove the axles, you do want to remove the drums. Now make sure when your car's up in the air, your E-brake is off or you'll never get these things off. Sometimes you will have to tap them with a hammer and sometimes, they'll just kind of come right off. Now with the drums off, it's a great time to check out your brake shoes. If they're worn, this is an excellent time to replace them. In our case, our shoes are actually not in bad shape. We do have disc brakes planned for the future, so we're gonna leave them for now. What you're gonna do now is push the axle in. Once you push the axle in, the clip itself will be visible. This is the C clip. This is actually what holds your axle in place. Sometimes, you do gotta wiggle the axle a little bit to get the C clip out.
With the C clip out, we can remove the axle.
Before we install our new axles, we're gonna replace the axle bearings and seals with new parts from Ford performance. The first thing I'm gonna do here is remove the original seal, a small pry bar, carefully, you can remove it and get it out of the way.
To get the bearing's out a little more challenging. You'll want to get a slide hammer. Basically, you're gonna hook it on the inside and pop it out. If you don't have a slide hammer, this is a tool you can rent at pretty much any auto parts store.
Okay, now we're gonna install our Ford performance bearings. You're gonna put the new bearing up into place. You can use a proper tool and hammer it in.
This is tool you probably don't have. These are actually very inexpensive at a place like Harbor Freight or you can always rent them as well. Hammer it in until it bottoms out. With the bearing all the way in now, now we're gonna install the seal basically the same way. A little bit of grease on the outside of the seal will make this easier to put on, to get it lined up and then carefully tap it into place. On the seal, you want to get it flush with the outside edge. Once it's seated properly, you're gonna repeat the process on the other side. What we're gonna do here is just put a little bit of the gear oil on the bearing before we install the axle for a little more protection. Now we can install our new axle. We careful with the new seal. Don't put a lot of weight on it. You want to just put it straight through.
All right, so the axle's in. Basically now, the reassembly process is everything backgrounds. We're gonna start by installing the C clips.
We're gonna reinstall the pin and then put a little bit of Loctite on the bolt because trust me, you don't want this bolt to back out to hold the axles in place.
Okay, with the axle seated now, we can put both drums on.
We're ready to reinstall our differential cover. Now in the case of this car, the factory diff cover was just straight up ugly. Now while the rest of the car is sort of ugly right now, we have big plans for this project. So while we have it apart, we're gonna upgrade to this cover from B & M. this is much beefier than the factory cover, has both a drain and a fill plug on it. It even supports for the main caps. We're gonna put some gasket maker on our B & M before we install it. You want to make sure the differential on the car is clean. Get sure all the gaskets off. Get the service nice and clean before you install our original or upgraded cover.
We're gonna tighten these down in a criss-cross pattern and then torque them down to 15 foot pound.
Now to set up the support, what you're gonna do is turn these in until they hit the caps.
Get them so they're lightly touching.
Once they're touching, then you're gonna torque them to five foot pound. Once they're tightened down, you're gonna put just a dab of RTV on each one then install the supplied jam nuts and then tighten those down again five food pounds. All right, so the last step of the process now is to fill it up with gear oil. Now what we're gonna do here, remove the factory fill plug from the further differential. We're gonna fill it back here and we're gonna use that hole. Basically, put your finger in it. As soon as you feel fluid, it's full.
All right, so once it's full and it comes out the back, we can reinstall the fill plug on the factory differential and your installation's finished.
While there's no real performance gain for a five lug swap, the main reason to do it is right here, wheel option. You'll have a ton more options to choose from with a five lug wheel. Now obviously, these are just factory 9" cover wheel for now. They look great on the car a lot better than the wheels that were on there. As far as the installation goes, figure you give yourself about four to five hours for the whole install. You'll be back on the road in no time.