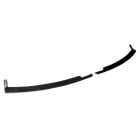
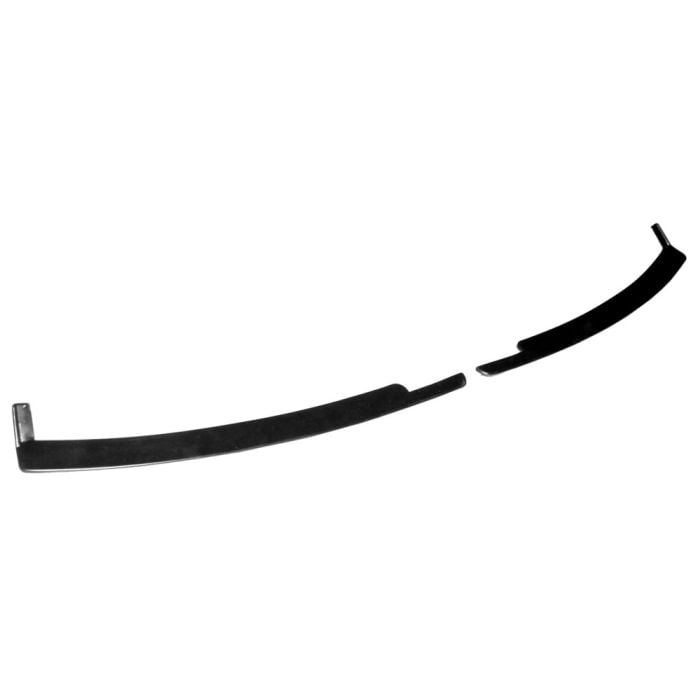
Lower Windshield Trim Molding Pair Mustang 1983-1993
CJ's Part Number:
WMT2
Highlights
- OEM-Style Reproduction
- Black Finish
- Sold as a Pair
- Fits 1983-1993 Mustang
MSRP $22.99
$16.99 You save 26%
Earn points.
Product Description
Pair of Lower Windshield Trim Moldings for 1983-1993 Mustangs.
These lower windshield trim moldings are made for a perfect fit and finish on 1983-1993 Mustangs. They're sold as a pair and are made from black plastic. They mount on the driver and passenger side lower portion of the windshield, splitting the cowl vent grille.
Features and Benefits:
- Factory style replacements
- Sold as a pair
- Black plastic construction
- Fits driver and passenger sides
Includes:
- One (1) Driver Side Lower Windshield Trim Molding
- One (1) Passenger Side Lower Windshield Trim Molding
California Residents: Proposition 65 Warning
Related Categories: Mustang Moldings
Installation & Fitment
Installation Videos
Video Transcript
We recently replaced the cowl grill on our 1990 Mustang Convertible. It really cleaned up the front of our car, but unfortunately, sometimes, when you add new parts, some of the older stuff looks a little more worn out. We're noticing a lot of wear on our lower windshield moldings, so today, I'm going to show you how to replace those as well. For this installation, you'll need a Phillips head screwdriver, panel removal tool, and a small pick.
To remove the lower windshield molding, we have to remove our cowl first and then the outer pillar trim, as well. To remove the wiper, simply lift up on the arm, pull out the tab here. Press it back down and slide it off.Now, we're going to remove the six screws that hold the cowl to the body, lift up to move the washer hose, and put our cowl aside. We'll need to remove this thin windshield weather stripping to get this outer panel off. We want to get a small pick, go right down here in the corner, and pull it out.
You want to grab a panel removal tool, slide underneath the panel, and just twist to release. We don't have to take it all the way off. Now, we can access our molding. We're going to remove the original molding and you can just pop it off the clips. The lower windshield molding is held on by these two metal tabs. Many times the original plastic clips will be broken off. You want to remove them before you install the new panel.
We'll give the area a quick cleaning before we install the new pieces. To install the new molding, you'll align these two clips up, two metal tabs, put it in the center and press downward. At this point, you can reinstall your pillar. Taking a close look at ours, it's also pretty faded. Again, with the new part here, this will probably look pretty worn.
We're going to remove this the rest of the way, give it a quick coat of paint before we put it back on. Simply pull it outward, slide it down, and out. Give it a quick scuff with a Scotch Brite. Then I'll wipe it down with a little bit of rubbing alcohol. Let it dry for a couple minutes and be ready for paint. Now, we'll give it a couple coats of trim black.
We'll give that some time to set up before we put it back on the car. We're going to reinstall our new painted pillar piece and then we want to attach this weather stripping to the pillar before we press it down into place.
Once you've repeated the process on the other side, we're ready to reinstall our cowl. Please don't forget to hook up the washer hose. Again, you're screwing in the plastic here so make sure you make them snug but don't over tighten them. The last step, reinstall the wipers and our installation's finished.
New trim panels and a little bit of paint made a huge difference in the look of our Mustang. If you're just looking to replace the trim, you'll need about a half an hour of labor total. If you're going to paint like we did, I'd say give yourself an hour to do the whole job. You'll be back on the road in no time.
Questions & Answers
Reviews 7
Write Your Own Review
Might Also Like