Trans-Dapt Performance Valve Cover Gasket Cork Standard Duty Pair 260/289/302/351W
Highlights
- High-Quality Cork
- Rubber Nitrile Compound
- Chemical Resistant
- Sold In Pairs
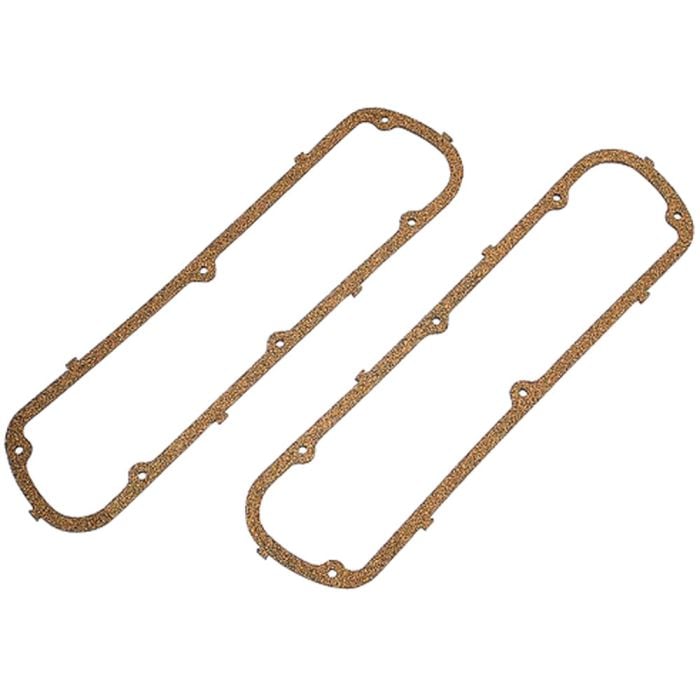

Pair of Trans-Dapt Performance Standard Duty Cork Valve Cover Gaskets for all 260, 289, 302 and 351W Engines.
Replace your old, worn out or missing valve cover gaskets on your Mustang or Bronco with this new pair of Standard Duty Cork Valve Cover Gaskets from Trans-Dapt Performance. Made from a high-quality cork and rubber nitrile compound, these gaskets will have your Mustang or Bronco’s valve covers sealed good and tight in no time.
Trans Dapt Performance Products Standard Duty Valve Cover Gaskets are constructed from a superior cork and rubber nitrile compound, this mixture of cork and rubber gives you a final product that has the positive aspects of both materials. The nitrile rubber and cork combination allows for a perfect seal between the cylinder head and the valve cover.
Nitrile rubber is naturally resistant to oil, fuel and other chemicals but can become inflexible as more nitrile is added to the rubber, that is where the benefits of the cork come into play as it adds more flexibility back into the rubber. The final product is a pair of valve cover gaskets that have excellent sealing characteristics.
Please Note: This pair of valve cover gaskets are intended for use with 260, 289, 302 or 351W Mustang/Bronco engines between the years of 1965-1995 ONLY.
*Trans-Dapt Performance Standard Duty Cork Valve Cover Gaskets are sold in pairs.
Trans-Dapt Performance Products is a member of the Hedman Performance Group. Trans-Dapt produces engine accessories that are made of durable quality materials.
Order a new Pair of Trans-Dapt Performance Standard Duty Cork Valve Cover Gaskets for your 260, 289, 302 or 351W Engine from CJ Pony Parts today!
California Residents: Proposition 65 Warning
Related Categories: Mustang Parts, Mustang Engine, Mustang Engine Gaskets, Mustang Valve Cover Area, Mustang Gaskets, Breathers & Hardware
Installation Videos
Video Transcript
These Scott Drake Valve Covers will fit your small-block Ford and will be the correct color for your 1964-1/2 through 1965 Mustang, and you want to pick up a set of gaskets to install these. While we're in there, we're actually going to restore our factory air cleaner by repainting it, put some new stickers on to give a nice, fresh look.
Parts used for this installation video include Scott Drake Valve Covers VC43, PTGLD Gold Paint, PTBLK Black Engine Paint, DEC013 Air Cleaner Decal, DEC150 Front Air Cleaner Decal, VCG20 Valve Cover Gaskets, F481 Valve Cover Bolts, HW1355 PCV Grommet, and HW388 Air Cleaner Snorkel Snout Screws.
Our 289 on our 1965 Convertible runs real well, but it's definitely starting to show its age a little bit. Now we're not looking for a show quality engine bay, but the valve covers and a fresh coat of paint on the air cleaner should really clean up the engine.
We'll start just by getting the air cleaner off, we'll do the valve covers first. We're going to pull the spark plug wires off of here first. You can actually remove them, or you can just move them out of the way. There's honestly plenty of space to work, so you really don't have to take them off. Then we'll start by removing the bolts. I'm going to get the original gasket off here.
Now you want to clean this surface off here, to make sure there's no residue from the original gasket. Use a scraper for big pieces, a little bit of sandpaper for the smaller stuff.
We have our new valve cover here with our gasket, so what we're going to do, there's little slots here to press the cork in, that'll hold the gasket in place, makes it easier to line the bolts up when we install it. I use cork or rubber, I actually prefer the cork ones, but either one will work. Make sure it's seated, now it's ready to go on the car.
While we're replacing the covers we'll put some new hardware in as well, as you start with the top center one. Don't tighten it all the way down, just get it snug that you can still move the cover, get everything else lined up. Now working from the inside out, we'll snug them down. You don't have to get these real tight either, just get them snug. Now I'm going to do the same thing over on the passenger side.
Before we even get started over here on the passenger side, you can see how much better the engine bay looks just by installing a valve cover. Both of these along with the new air cleaner all cleaned up should make it look a lot better.
We'll put a new PCV Grommet in the valve cover. Install the PCV. Now I can move on to the air cleaner.
I'm going to start by taking everything apart first then cleaning it and sanding it down. First thing we're going to do is take the snorkel off the base. Now we're working on the lid itself, and you want to get the original stickers off. Now depending how old they are, these have obviously been replace at some point in time, a heat gun, get them as soft as possible, and if you have to use a scraper or razor blade, whatever, you'll need the surfaces as clean as possible before we paint it. Yours probably won't come off that easily.
Now what you want to do is get some sandpaper, and just scuff the surface. It doesn't have to be completely stripped down. Just to make sure there's no build up on it anywhere. Once you have it scuffed, then you want to thoroughly clean it up and get it nice and dry before we paint it.
Now if you had to take down your air cleaner beyond the gold paint down to almost bare metal, at this point you want to use a primer. Now in our case since the gold is still there, we're just going to paint right over it. You want to make sure you're in a well-ventilated area when you do this. I'm going to do a couple even coats on it. I'm going to repeat the process with the base which is also going to be in gold, and the snorkel gets painted black.
Now we're going to install our 289 sticker on here. I'm not putting all the correct decals on, this is not by any means correct, all we're just doing is making the engine bay look a little bit nicer. We're going to place the front decal as well.
Reassemble the snorkel, we'll use new hardware here as well.
That's all there is to it, you're installation is finished.
A set of Scott Drake Valve Covers and a little bit of paint, and the engine bay on Lucy looks a lot better than it did before. Now like I'm saying this is not a correct by any stretch, kind of restoration, this is just making it a little bit better and a little bit cleaner to look at. So this is an installation that anybody can do, it's an excellent first timer for someone who's looking to start to working on their car. It's about an hour of work, you should be back on the road in no time.
Vehicle Fitment
This product will fit the following Bronco years:
This product will fit the following Mustang years: